Hazel’s Trans Injection Guide
As many trans individuals in the world do, I take my HRT as a subcutaneous injection. I was disappointed not to find many great resources on how exactly one goes about doing this when I was starting, and now that I’ve been doing this for a while, I want to share both my process and some advice on the topic.
A quick word on what this is not: I will not be giving advice on which kind of HRT you should be taking or what dosage you should be aiming for - while I could give that kind of advice that would be much more individual and very much out of scope for this! I’m just going to show you how I would recommend performing a subcutaneous injection in general. Please see https://diyhrt.wiki for a overall primer and help with all things HRT, https://hrtcafe.net to find trusted vendors (and updates on vendors!) and further information on particular medications, dosing, extra health concerns (e.g. liver function tests for bica), and so on.
I have recorded a demo video of me performing this method, but it is not a replacement to this guide, just a demo of me performing an injection according to it on camera.
Another good guide, and the resource that got me started, was Dr. Jerrica Kirkley’s video for Plume, here: Subcutaneous injection tutorial for trans people and here: Intramuscular injection tutorial for trans people. This method and mine diverge in some places, but it’s a good, well produced guide.
Even if you prefer to follow these videos’ method, because they are clearly far more professional than this blog post, I still would ask you to read my advice section at the end of this page, as there are things I know now that I wish I knew when I was following these!
In addition, while my tutorial does not cover the injection method for an intramuscular injection, I still believe my preparation to be a better method. I defer to the video linked for the IM method as I have never injected intramuscularly.
Three Injection PSAs
Yes, the PSAs are boring / a chore to read, but if I’m going to be telling and showing you how to do an injection, I want you to be doing it safely, and you need yourself to be doing it safely. Please read this carefully and do your best to stay safe out there. It’s worth the time. Also keep a level head, if you get a little more soreness than usual or a bit more blood than usual it’s not the end of the world for a subcutaneous injection, try not to freak out, you’ll be okay, and beating yourself up will hurt your confidence for next time around.
One: you are injecting a substance into your body. As such, preventing infection is very important, and we do this by being sterile.
Don’t forget to use alcohol swabs on the vial and injection site to sterilise them before use.
You must use new/fresh needles and syringes each time. This ensures that there are no contaminants inside the syringe left over from last time. If you have to reuse a syringe for some reason, you can find instructions on syringe cleaning here. Never reuse a needle. They are one-use-only.
- If you are considering cleaning reusing a syringe due to inability to afford injection equipment, I would urge you to first consider using a single-needle injection technique in which you use an injection-suitable needle to draw and then inject without a needle swap. This is a much lesser risk than reusing syringes, and I explain how to adapt this method for a single needle in the advice section at the end.
You should keep the cap on the needle whenever possible, for general safety (it’s sharp!) and to protect it, but also to prevent it from getting contaminated by contact with anything that isn’t the inside of the cap, the vial, or your injection site.
Two: needles are sharp, so don’t spike yourself, and they must be sharp. A blunt needle is more dangerous than a sharp needle, just like a blunt kitchen knife is more dangerous than a sharp kitchen knife.
Again, keep a cap on the needle whenever possible, so you don’t spike yourself or something else.
When you recap the needle after using it, do NOT put the cap onto the needle with your hands, instead, place the cap on a desk, move your hands away from it, and slide the needle into the cap and kind of hook it up onto it, then you can press it onto the needle until it clicks into place. If that description is hard to follow, see the videos linked previously to see someone doing exactly this, or look at the pictures of me doing it. This method prevents the most likely point for you to accidentally stab your hand.
When a needle is sharp, it has a very clean sharp point that will cleanly pierce the skin, and can do so with the minimal possible damage. When a needle is used, that point experiences a very high pressure (because science!), and so it rolls over a little. It will end up forming a kind of hook shape that will certainly do more damage on both the way in and out as compared to a fresh needle. You cannot see this with the naked eye. You’ll feel this as increased pain as you push into the skin and as increased soreness post injection.
- In addition, you should rotate (change between many) injection sites to allow them more time to heal and recover from the inevitable tissue damage that occurs due to an injection.

Three: Keep Steady. You do not cause very much pain and damage by just inserting the needle into yourself. You are going to get more pain if you move the needle around while it’s inside, both sideways, and especially in/out. Obviously you can only do so much, especially when you’re nervous for your first injection, and you’re shaky, but as best as you can, try to push in in one motion, hold it as still as possible while you inject, then pull smoothly out.
Miscellaneous Terminology
The needle is the part of the total assembly that is sharp - the metal piece and generally a plastic Luer connection.
The syringe is the part with a plunger and measurements on it, usually either plastic or glass. There is no word that refers to the assembly of the syringe and needle, so unfortunately there is a bit of ambiguity in the language there.
Syringes which have a needle permanently affixed to them are known as fixed-needle syringes or insulin syringes.
Drawing (or drawing up) is the process of pulling the injection from the vial into the syringe. A drawing needle is a needle that is being used purely to draw up.
Needle Gauge describes the diameter of the needle. The higher the gauge number, the thinner the needle - yes, this is confusing! A 30G needle is thinner than a 20G needle.
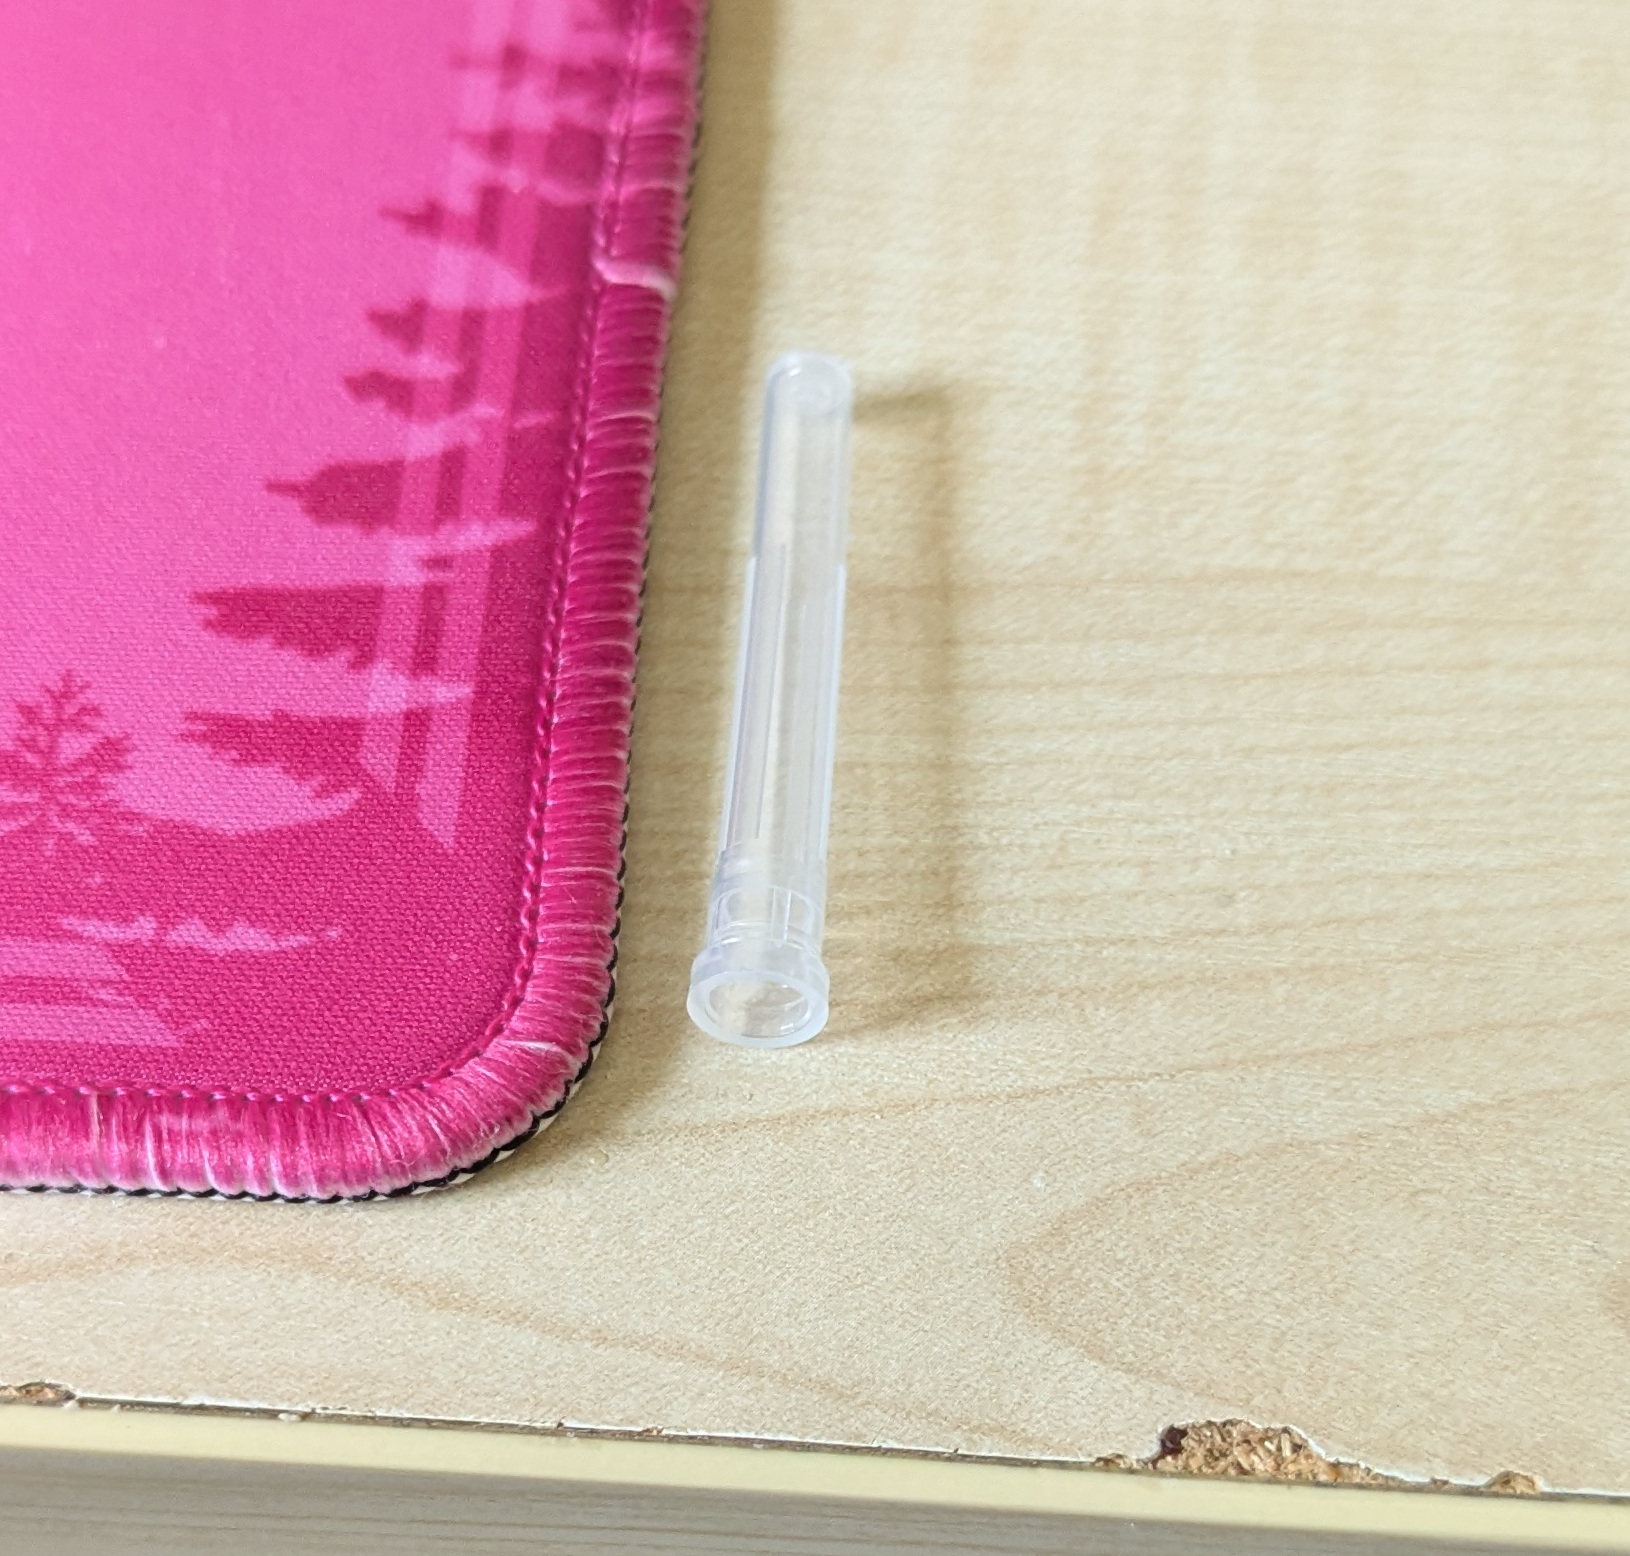
Dead Space is the volume inside the needle that would retain the medication after the injection or removal of the needle. Needles generally come in either a standard kind which are just a plastic Luer connection bonded to a metal needle, or a low dead space variant in which the metal needle actually pokes through the syringe’s hole back inside it to reduce the dead space.
Luer Lock and Luer Slip refer to standardised connection types for needles to syringes. Any Luer needle should work with any Luer syringe. Needles just push onto Luer Slip syringes and stay in place with friction. Needles on a Luer Lock syringe push in and screw on clockwise as you attach it, then will not come off without being unscrewed anticlockwise.
A subcutaneous or subq injection is one in which you inject into the layer of fat below the skin. These are generally done either on your tummy or thigh (I’ll discuss how to find your site later). This guide covers subcutaneous injections.
An intramuscular or IM injection is one in which you inject into a muscle, generally on your thighs for the case of HRT. This is done with a longer and thicker needle, and you’re more likely to see just a little blood, but it can reduce initial post-injection soreness.
Air-Locking is an injection technique in which you purposefully let a little air follow your HRT down to help prevent it from pushing up back out of your injection site or from being left in the needle. It is not something I do on purpose, and I don’t recommend you do it in this guide, but it is a technique many people perform and is generally safe. If you get a small air bubble in your syringe that can actually be helpful to your injection for exactly this reason. This is safe for subcutaneous and intramuscular injections but very dangerous for intravenous (into the bloodstream) injections!
Coring is when a hole is made in the rubber stopper on a vial, generally by using a needle that is too thick, by drawing from the exact same spot every single time, or wiggling around the needle too much while it is in the vial. This is very bad as it means that the stopper no longer forms an airtight seal to the outside world, and contaminants can find their way into your medication.
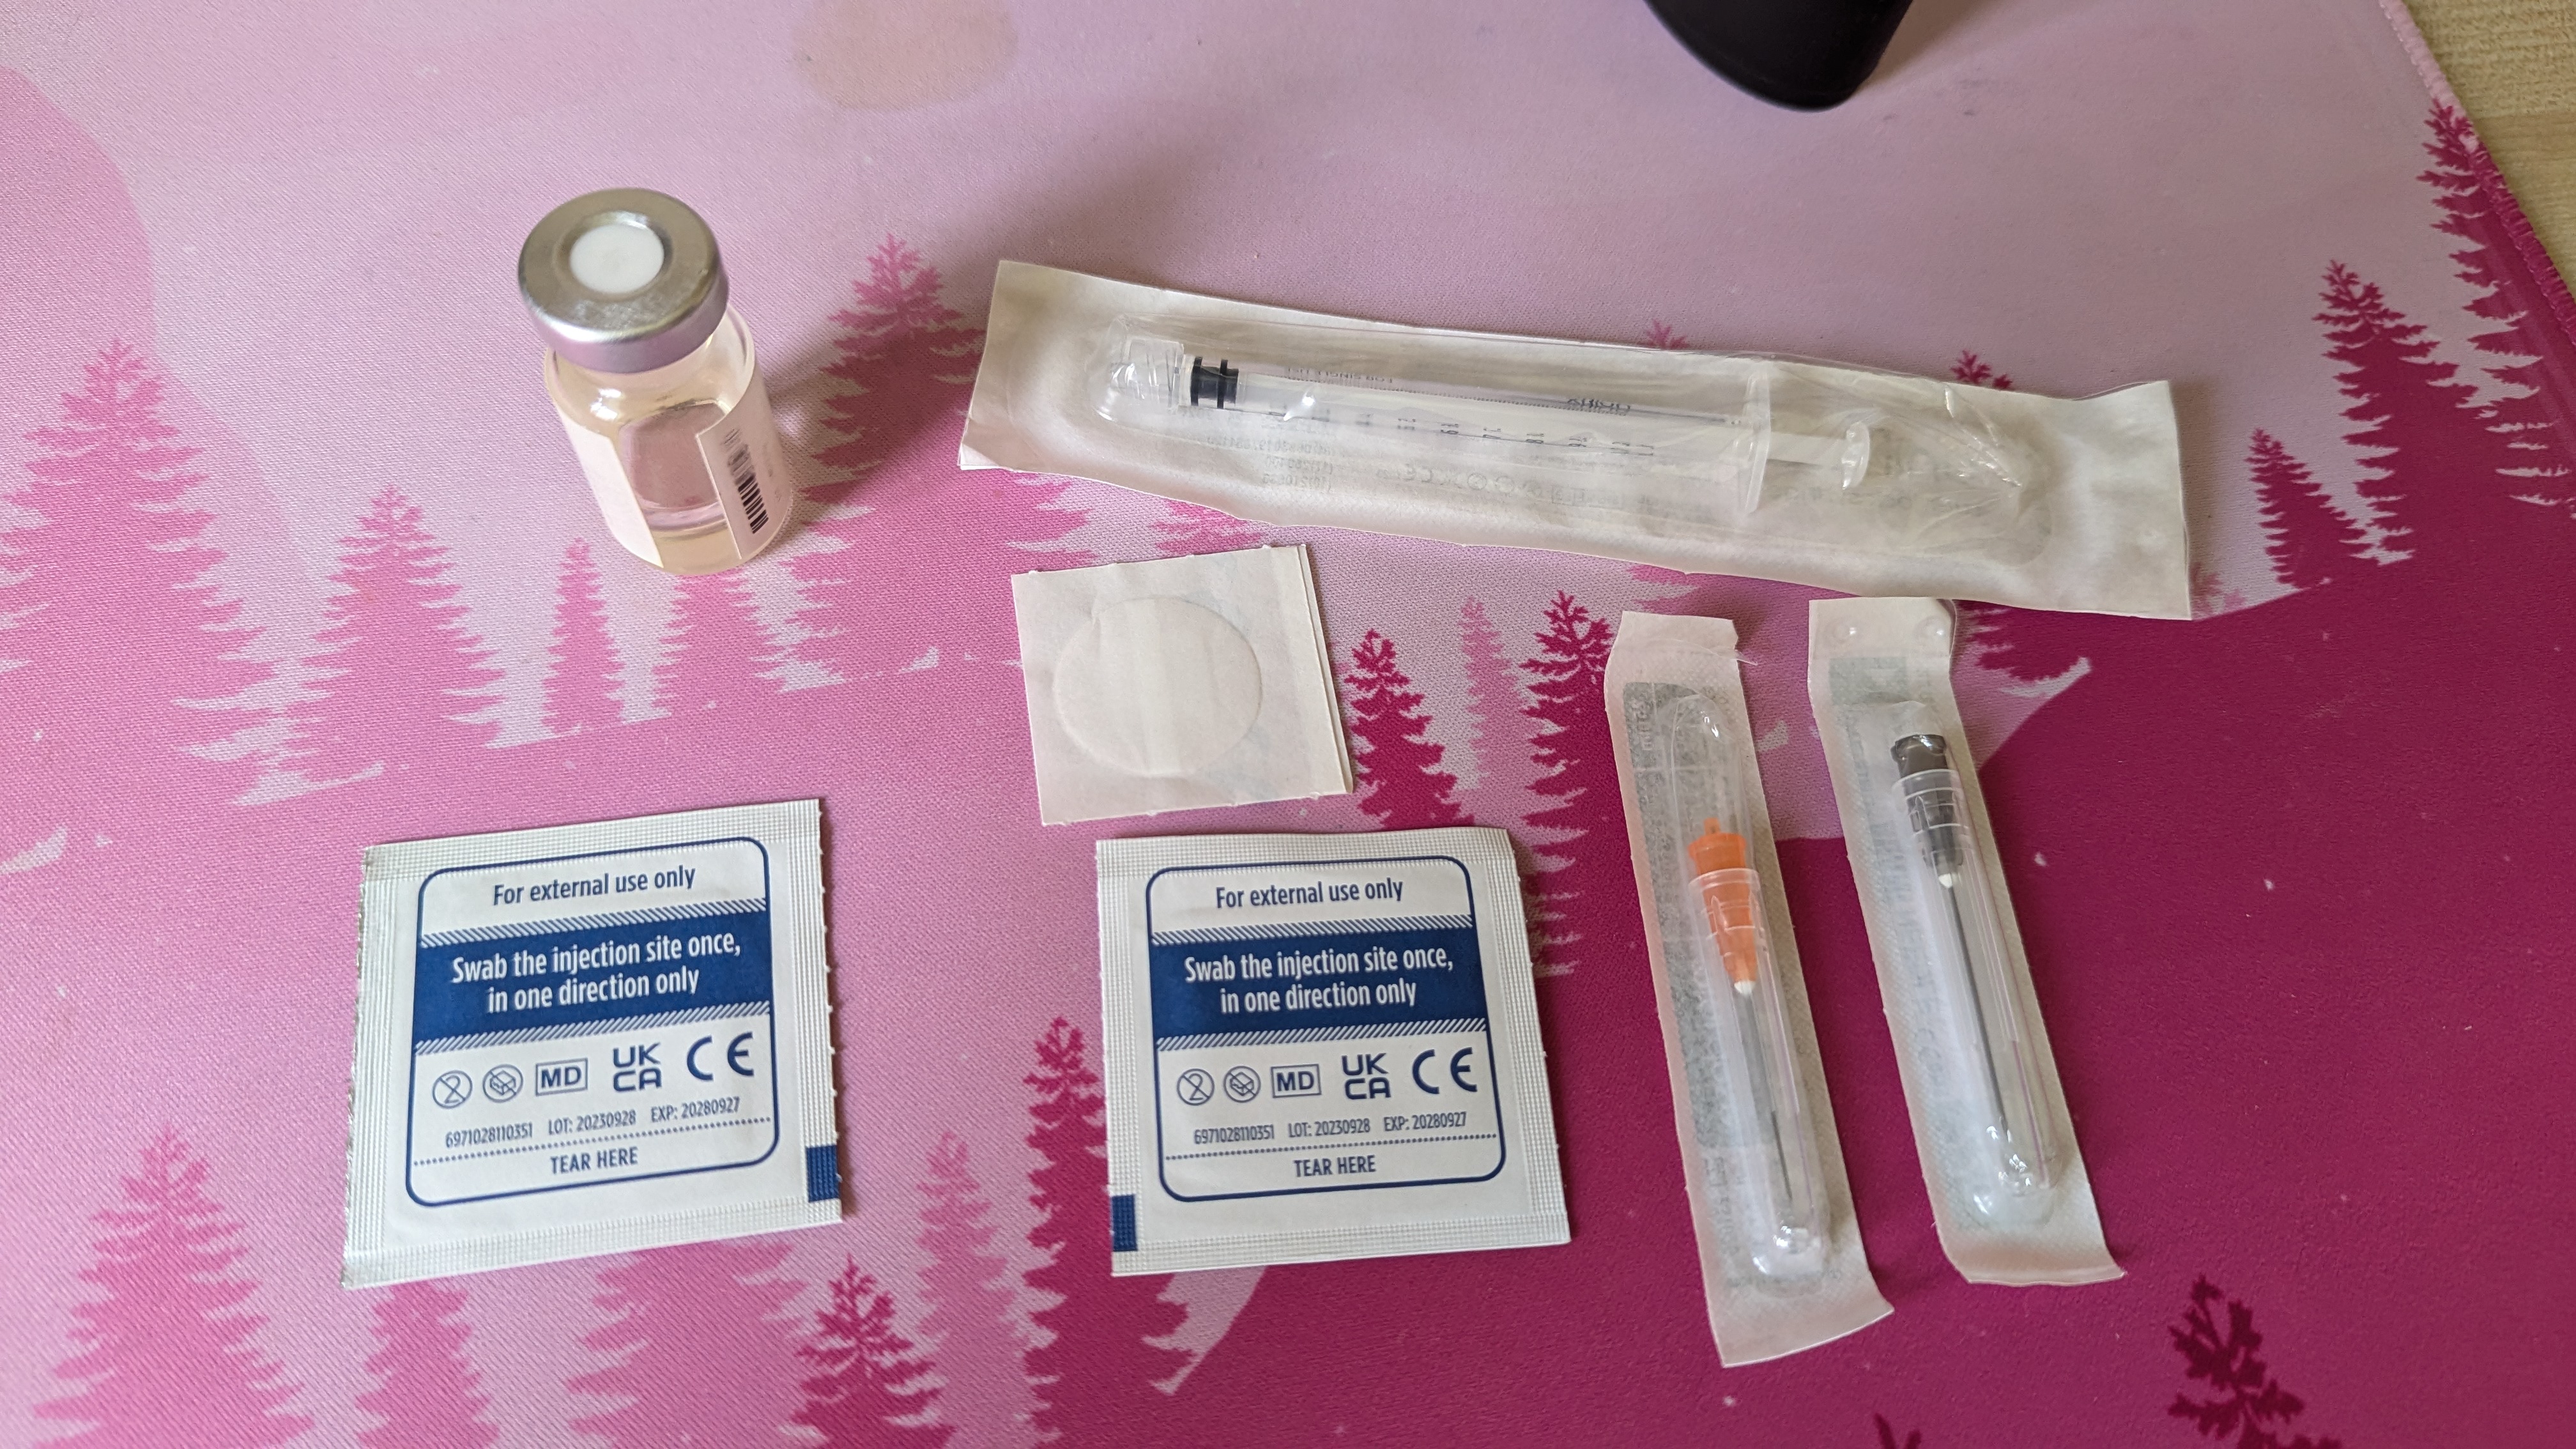
Stuff You’ll Need
Obviously you’re going to need your hormones/etc themselves first. For injection, these should come in a glass vial with a rubber stopper on the top. You should not attempt to open this vial in any way, as this would ruin the sterility - you will poke a hole in the top with a needle instead, and the rubber stopper pushes itself closed again hard enough to keep a seal.
Next up, you’ll need isopropyl alcohol swabs. The ones I’m using are 70%. The percentage concentration is not too important as long as it’s quite high. You will need TWO of these per injection! One is for the vial and one is for the injection site.
Some people perform their injections with only needle, and I’ll talk about that after the method, but I recommend using two needles. For your injection needle, you want a length of between 1/2 inch and 5/8 inch for subq, and 1 to 1+1/2 inch for IM injections. You’ll want a gauge of 25-30G for subq and 23-25G for IM.
For a drawing needle (the needle used to pull the hormones up into the syringe) pretty much anything goes, but a wider gauge is useful as it reduces resistance. I personally use 22-gauge needles that are 1+1/4 inch long to draw, because I can get these cheap in bulk. Try not to go too thick, though, as the thicker the needle, the more likely you are to core your vial.
I recommend looking for Luer Lock syringes, and buying those. If you’re worried about minimising wastage of your medication, it may be more economical to get all low dead space needles or even fixed-needle syringes (insulin syringes), depending on availability and the cost difference.
For a syringe, the main requirement is the capacity. You want a syringe that only has capacity of 1ml to help you get much greater accuracy (down to 0.01ml!) for the relatively small quantities at play with HRT injections. 3ml can work but you ideally want 1ml.
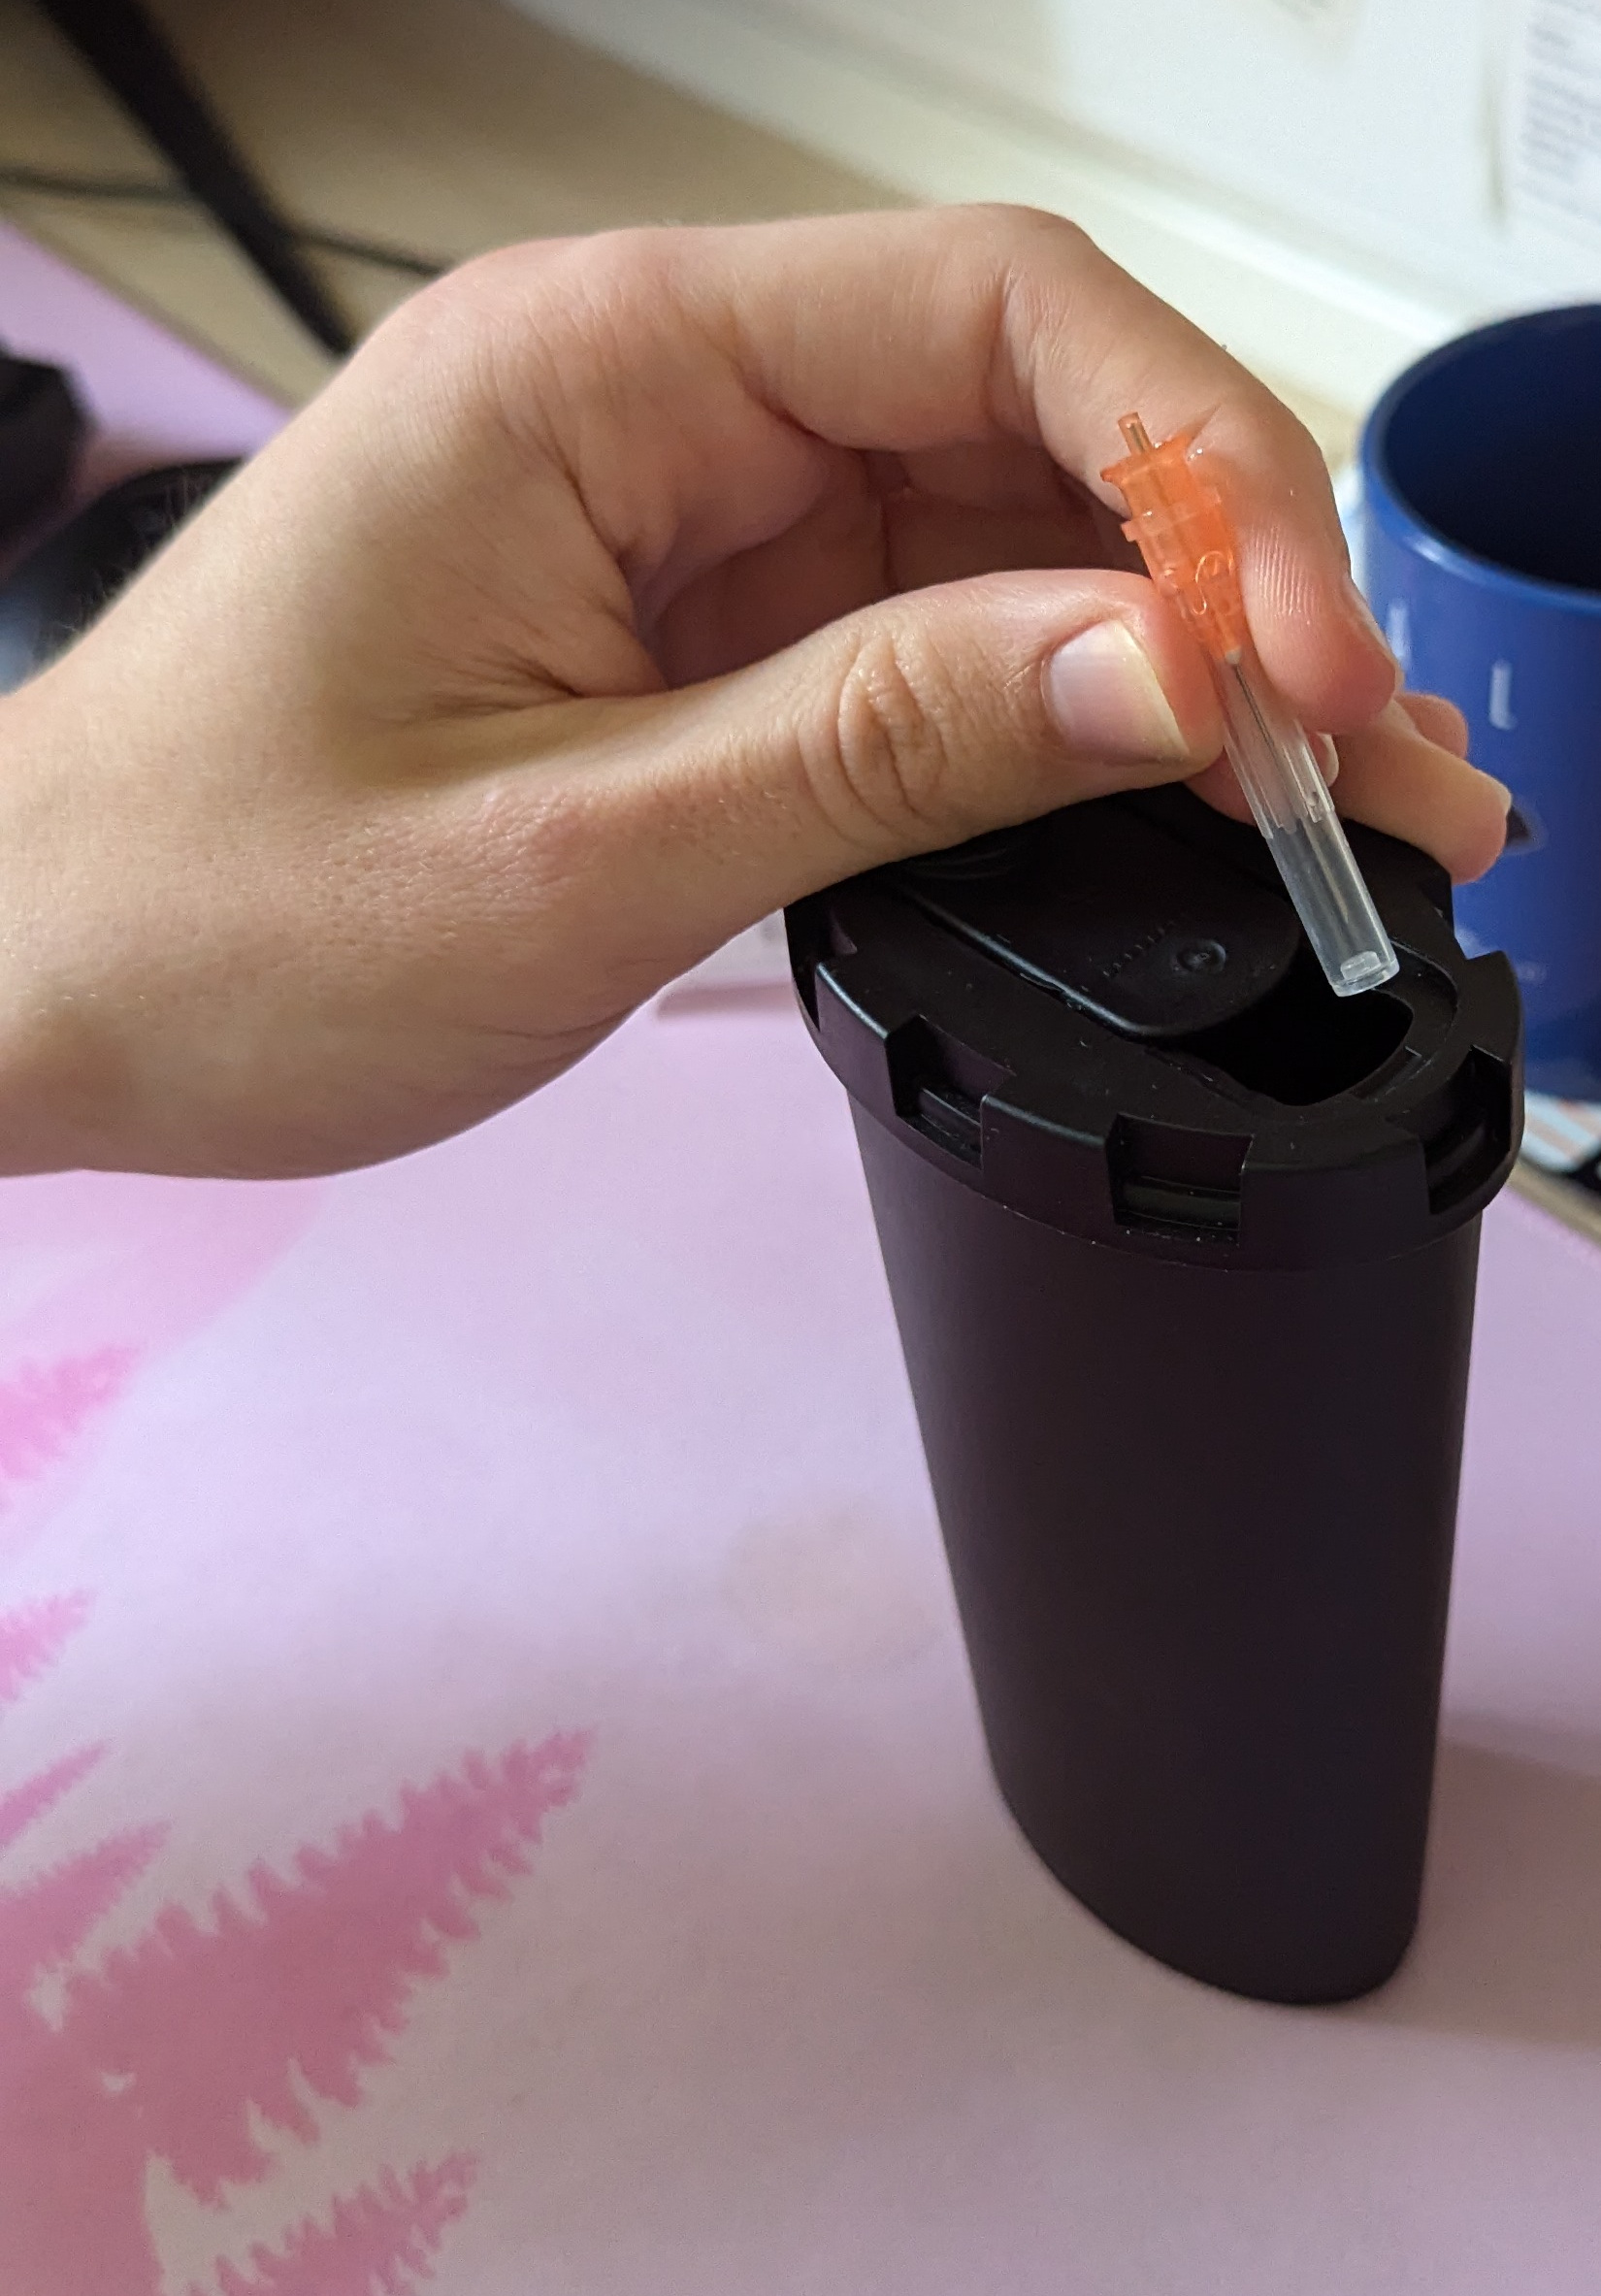
You will need a sharps box. You can get these in many places. This is to put your used needles in once you are done with them. Contact your local authority for information on how to dispose of your filled sharps box. I like exchange supplies’ compact locking one. You can also use a lidded hard plastic container, but it’s not ideal.
You cannot just put needles in the trash as-is, they must be stored in a sharps box and specially disposed of, because if the cap comes off, they poke holes in bags and could cause serious harm to waste workers and wildlife, or pierce other items such as batteries. They are also considered a biohazard!
Finally, I recommend having a plaster/band-aid for after your injection. The ones I find the best are the small circular ones that are about 20-25mm diameter. This is because they stay on for much longer and are basically unnoticeable compared to larger more standard plasters. I have been getting them from plaster multipacks so far, but you can also buy them online in bulk. My experience has been that pharmacies likely don’t have boxes of JUST the small ones but naturally your mileage may vary. There are boxes of just the small ones on Amazon, though!
If you are based in the UK as I am, then https://www.exchangesupplies.org/ is an awesome source for all of this stuff. I priced up all the supplies you’d need to get going at £40, but you can get it cheaper if you don’t go standard for low dead space! I have heard good things about https://praxisdienst.de for any readers in Germany.
You can also ask a pharmacist for injection supplies in most places too, and you can also order them online - in the US even on Amazon!
Many needle brands will colour code their needles by gauge, which is helpful to help you remember which is for drawing and which is for injecting (e.g. my drawing needles are grey and my injecting needles are orange).
Injection Method
I suggest you read the entire method once before starting, so you know what’s ahead, but absolutely feel free to follow it step-by-step as you go, it’s intended to be followed step-by-step.
So, you’ve got your medication , your syringe , your two needles , your two alcohol swabs , and your sharps bin out on your desk, a clear work space , and either are alone for privacy or have a trusted friend to help keep you calm (or even deliver the injection for you if you’re too nervous and shaky! That’s totally okay, especially if it’s your first time!). You know what your dose is . Let’s do this.
Prep: Drawing up
The first step I do is sterilising the vial because, to be totally honest, otherwise I might forget. So take one of your two alcohol swabs, and wipe it left to right across the top of the vial once. Do not wipe back and forth repeatedly like you might be accustomed to for cleaning, as then you’d be wiping any contaminants that you just picked up on the swab back over the rubber stopper again! One movement is enough. Place the swab and its packaging to the side (you’ll likely end up with a little trash pile at the end of this, or you can throw stuff straight in the bin, whatever works for you).
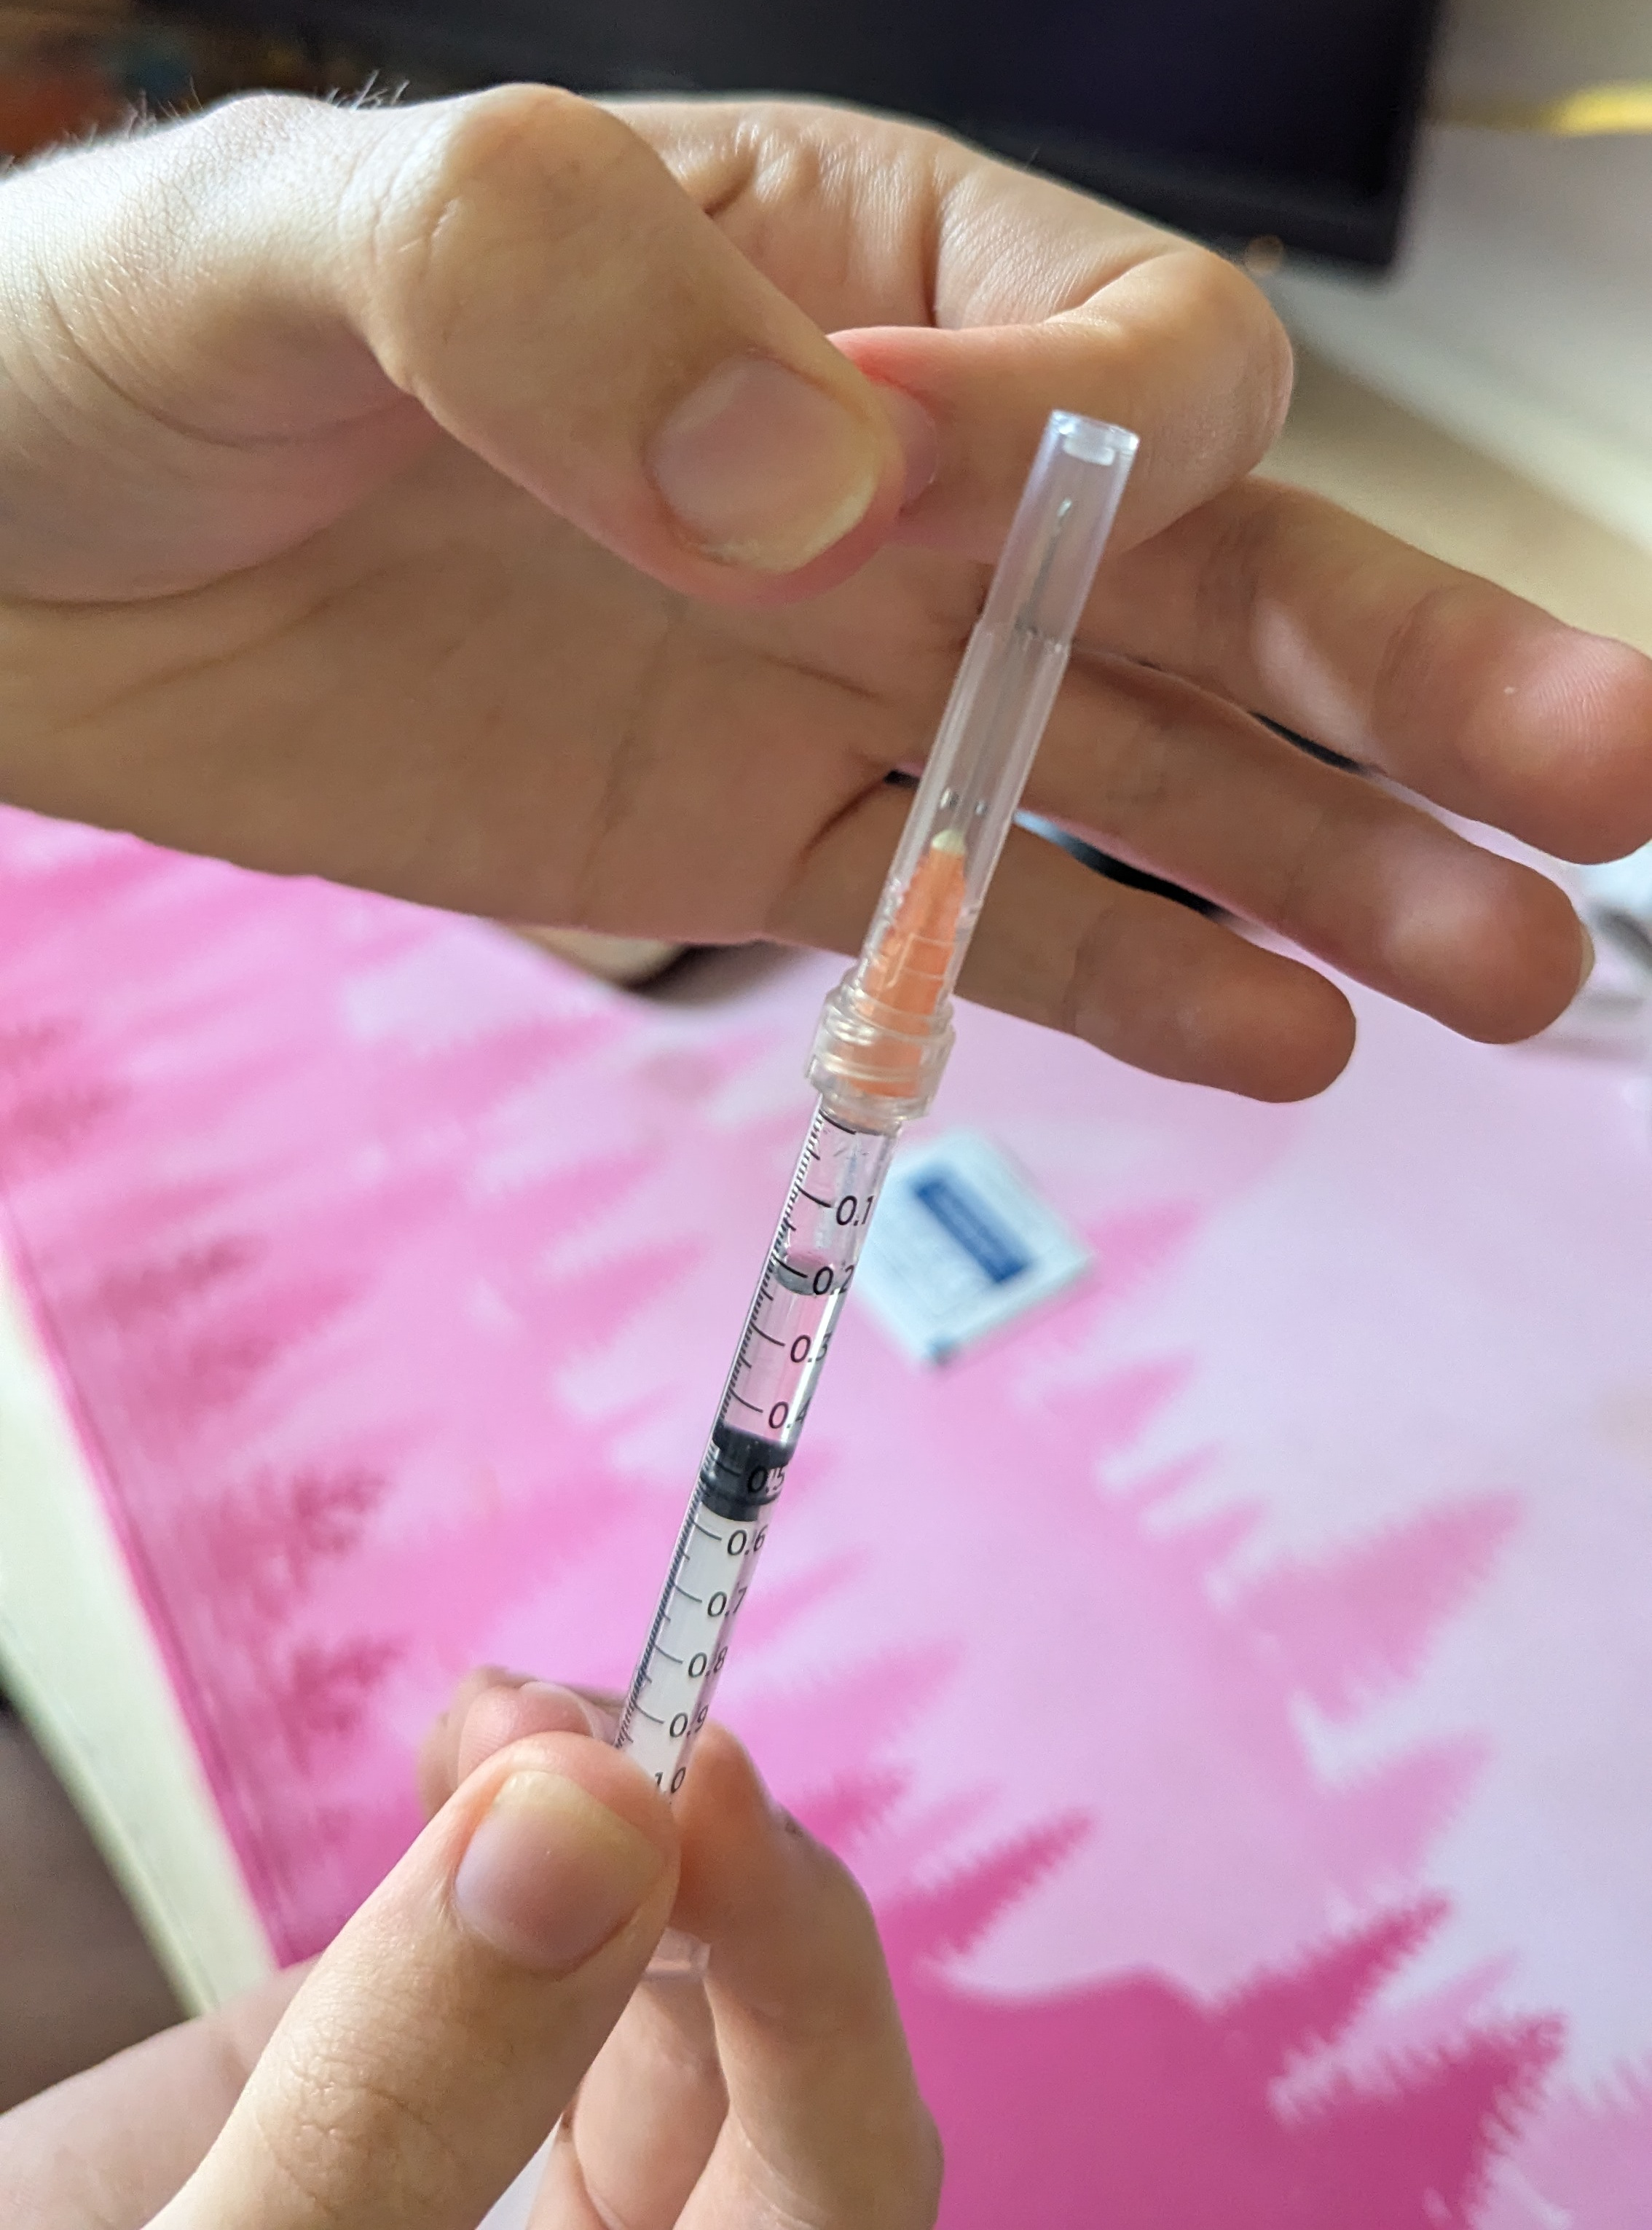
Next we’ll prep the drawing needle. Take your drawing needle and syringe out of the blister pack, and lock them together. Make sure you keep the needle’s cap on. If you have a luer lock syringe, you need to twist on the needle until its secure. The cap and needle are designed such that twisting the cap will twist the needle, so you can and should do this with the cap on.
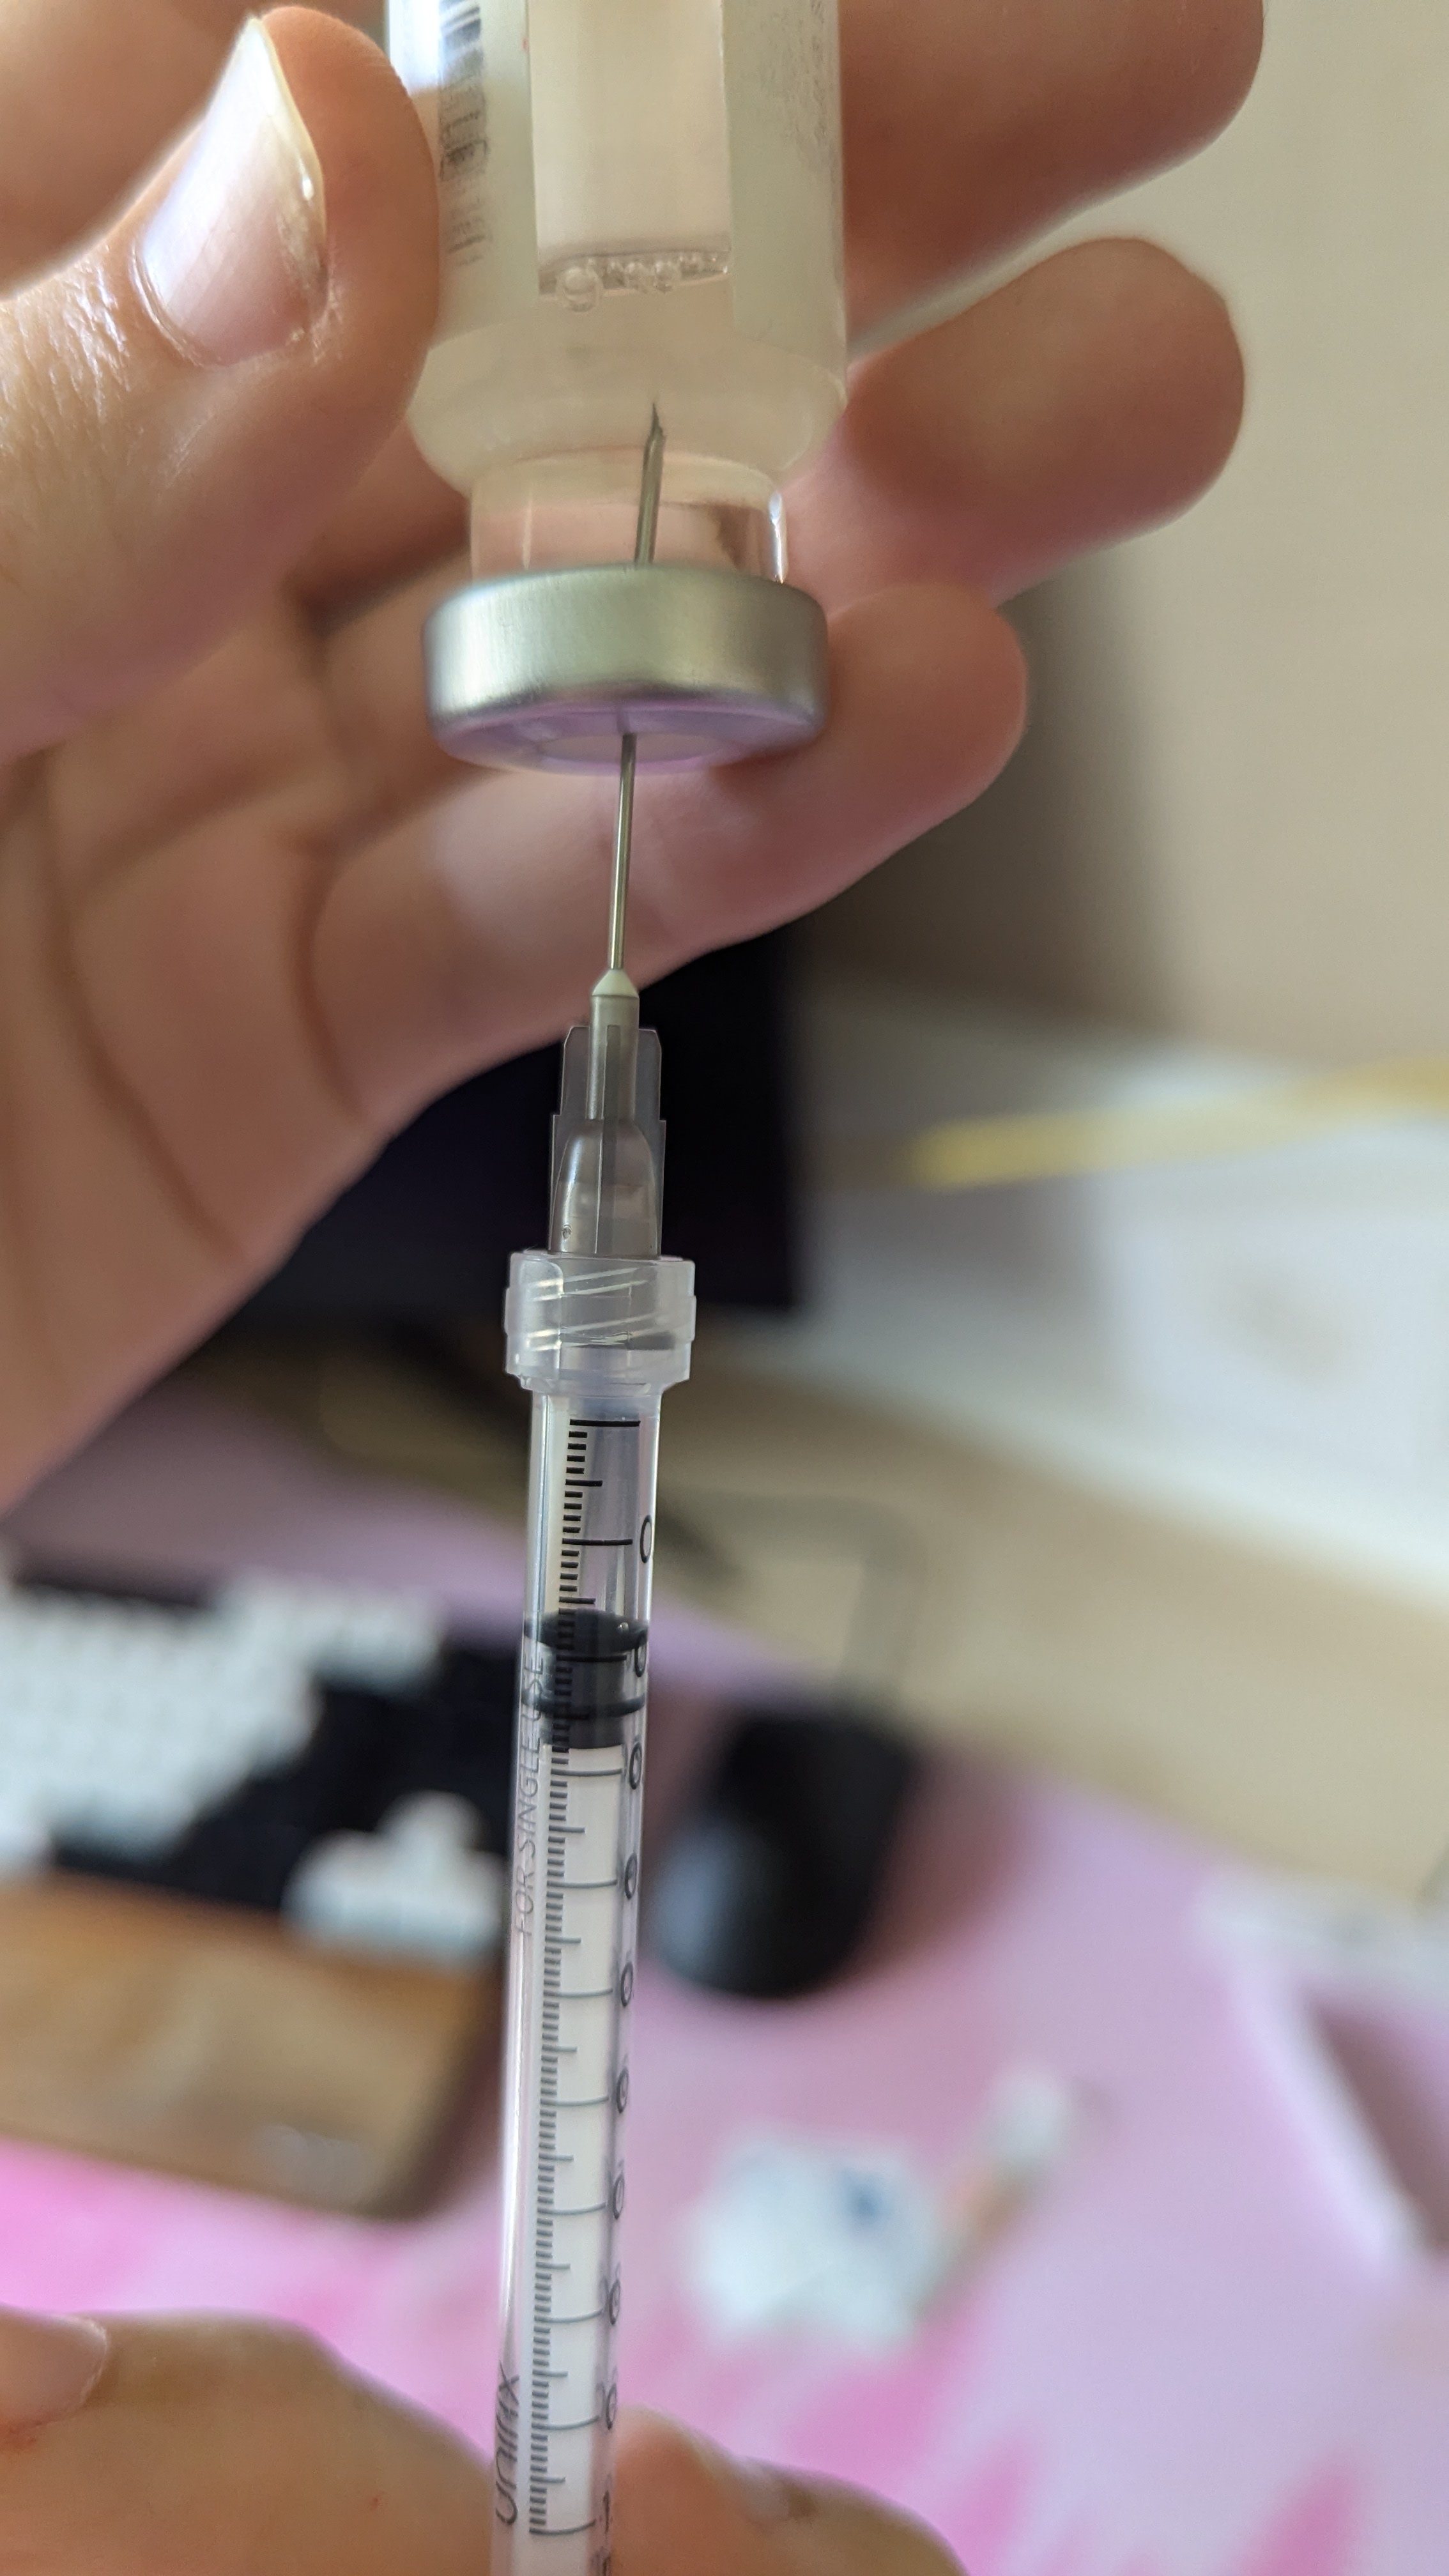
Now to draw up. Before we actually draw, we’re going to inject some air into the vial to reduce the pressure differential caused by removing some medication. You want to inject about as much air as the total volume you’ll be removing at the end (too much air here is better than not enough!), so draw in around 0.5ml of air, and then slide the cap off the needle and place it on the desk with the opening facing you. Hold the vial steady, and holding the syringe like a dart, push the needle straight through the rubber.
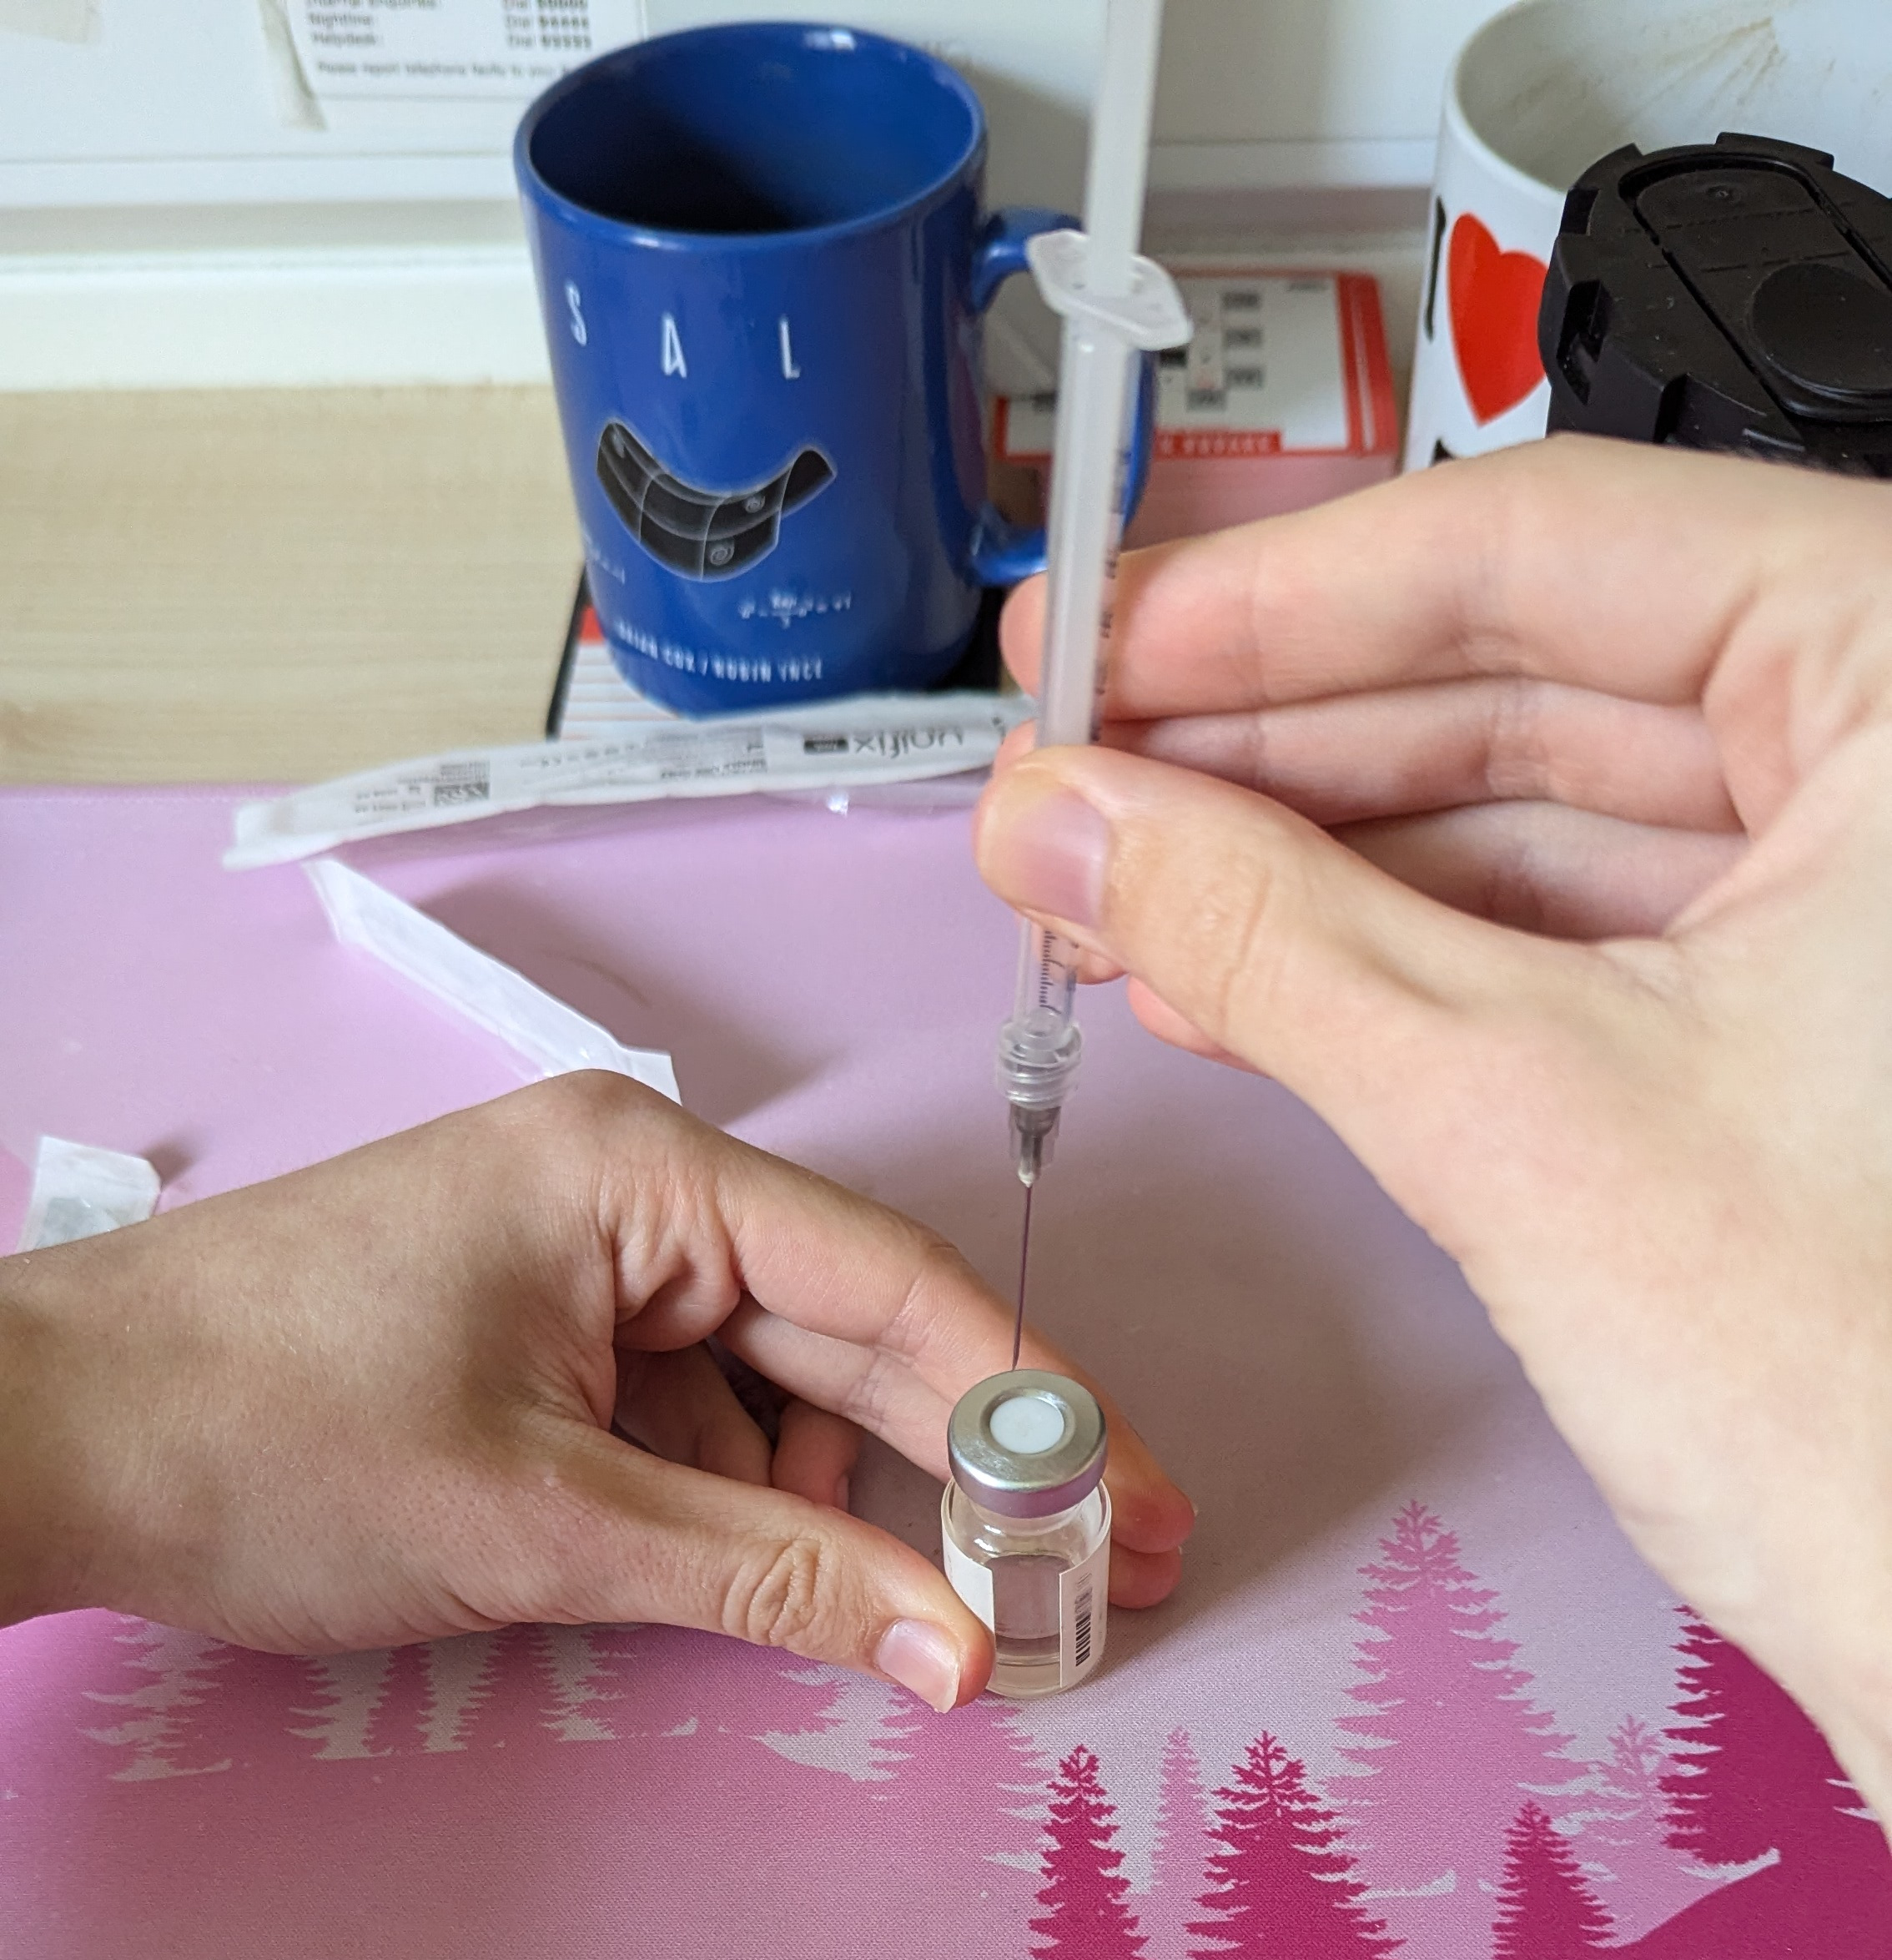
Inject the air above the medication, not into it, you don’t really want to put air bubbles your medication, then pick up the vial and syringe and invert it, so that the vial is above the syringe, and rotate the syringe such that you can see the scale, and push it in/out so that the needle tip is in the medication.
Now, pull back on the syringe, and you’ll see some air come in, then the medication will start to come into the syringe and sit at the bottom by the plunger. Pull back until you clearly have comfortably more there than your dosage (you need to have enough for your dosage plus the dead space!)
then, push back up to where your dosage is.
If you have more dead space in your drawing needle than your injecting needle, then once you have done this a few times, you’ll get a feel for how much extra you get here and can compensate for that. For your first time or if you’re not sure, just go to where your dosage is.
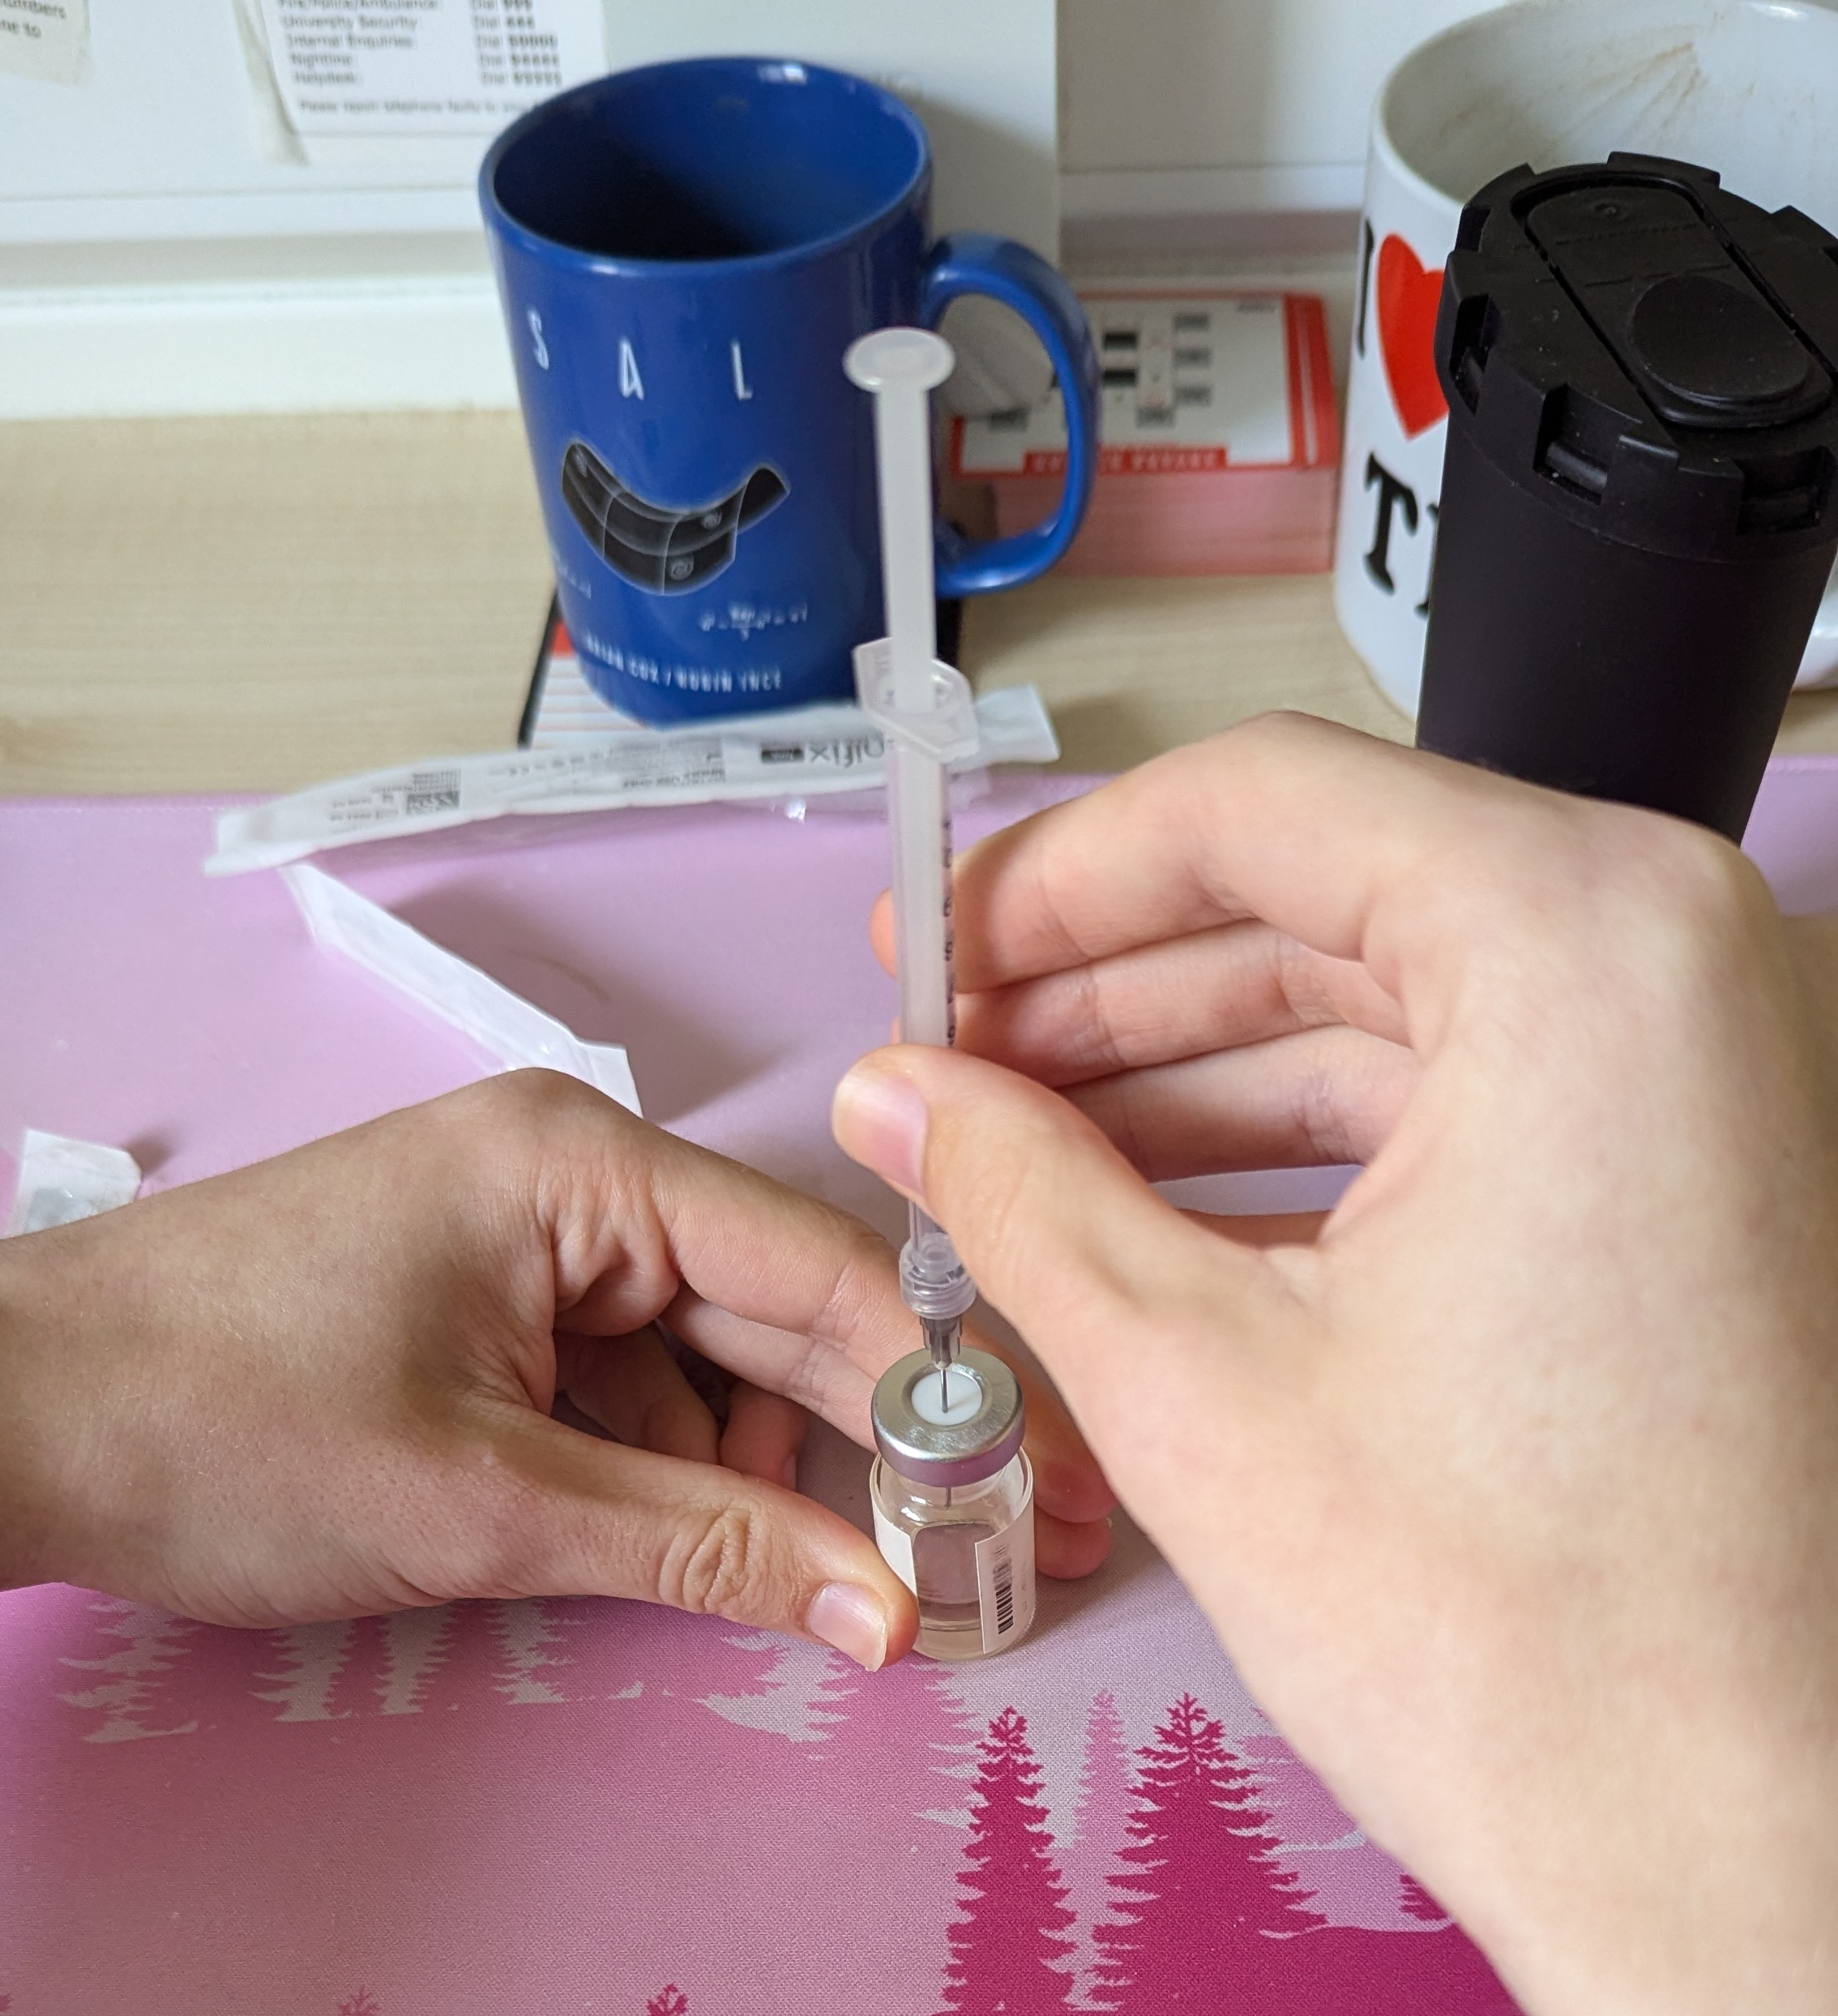
Now, this is where this guide diverges from the Plume guide. Push the syringe into the vial and get the end of the needle into the air space in the vial, and just pull some of this in, so your syringe looks pretty much the same as before you dialed the amount in, but now it contains exactly your dosage + the dead space. You want to pull in so that the reading on the syringe is the same as before you injected air into the vial (this guide recommended 0.5ml earlier).
The reason to do this instead of just switching needles directly from the dialed in stage is that it makes it easier to get air bubbles out by allowing all the air to form together at the top, and makes learning the dead space delta between your two needles easier.
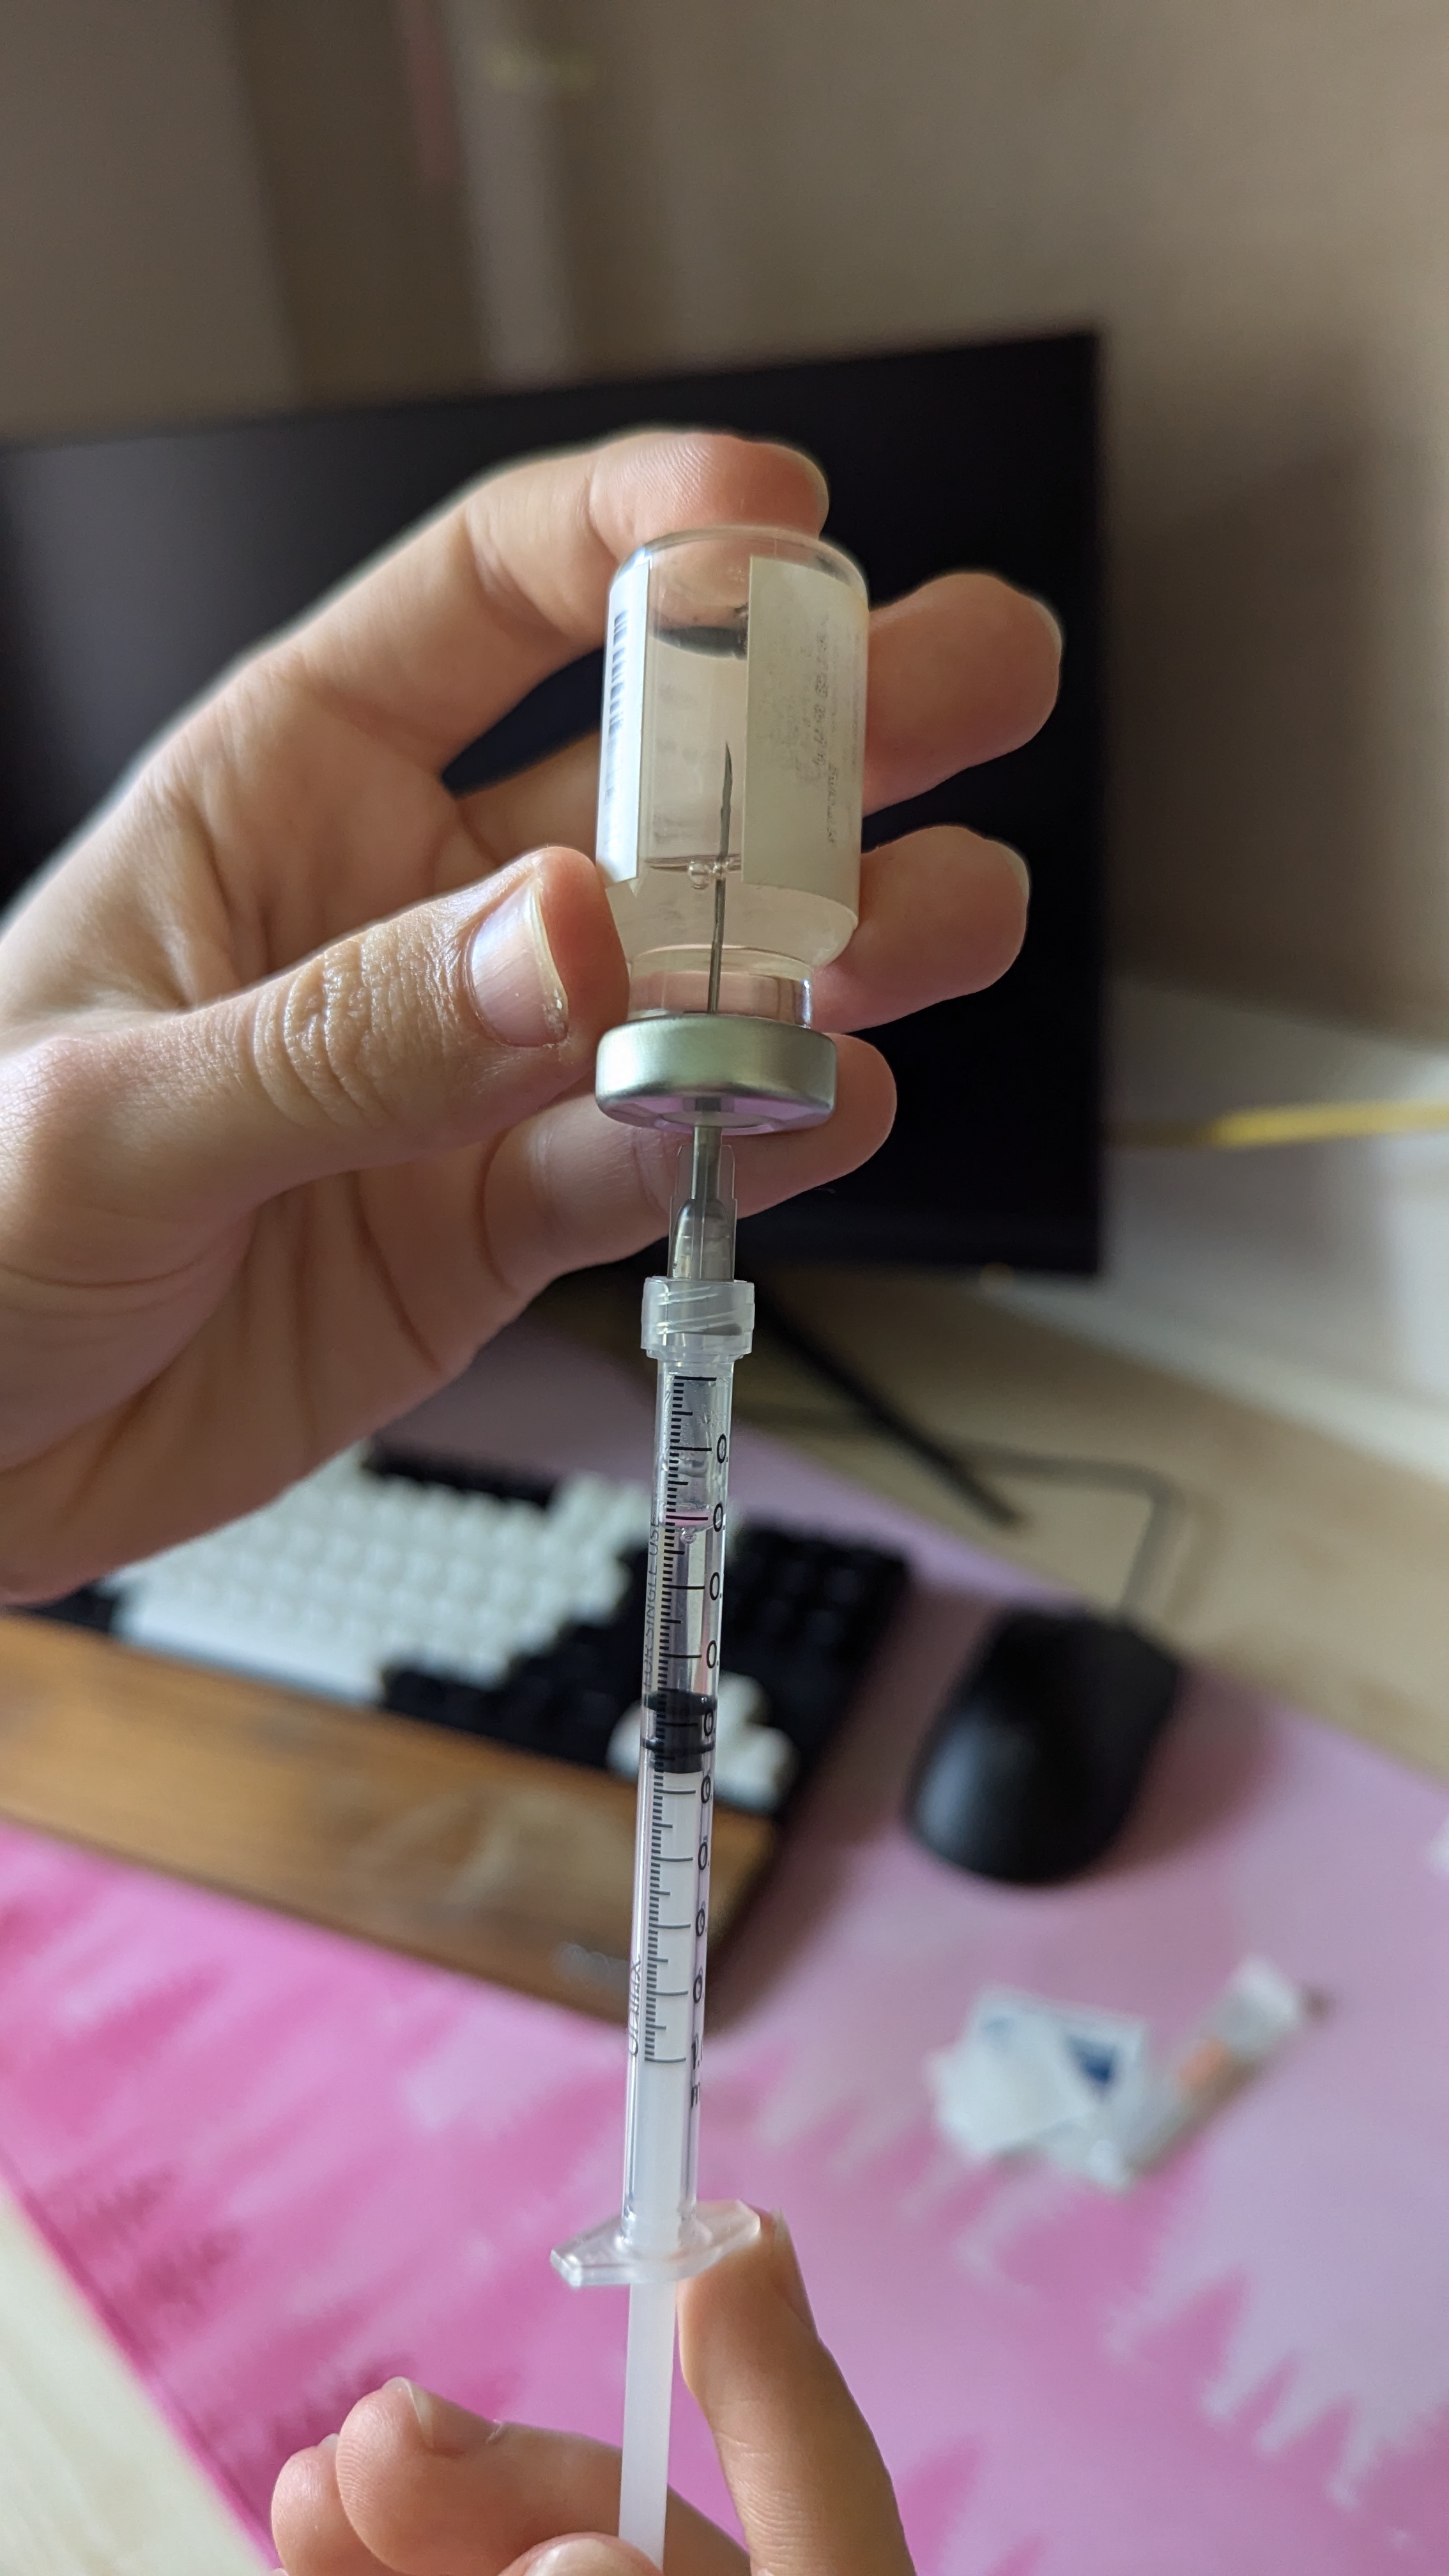
Now, you can flip the vial and syringe over, doing your best not to wiggle them around too much in relation to each other as this increases coring. Now, holding the vial still, pull the syringe smoothly up and out of it, then push the needle carefully into the cap and hook it upwards onto it, allowing you to click it down safely into place.

Congrats! You’ve drawn up. This is the longest stage of needle prep.
You can now put your medication vial away, and you’ll be able to discard the drawing needle after the next step, switching the needles.
Prep: The Injecting Needle
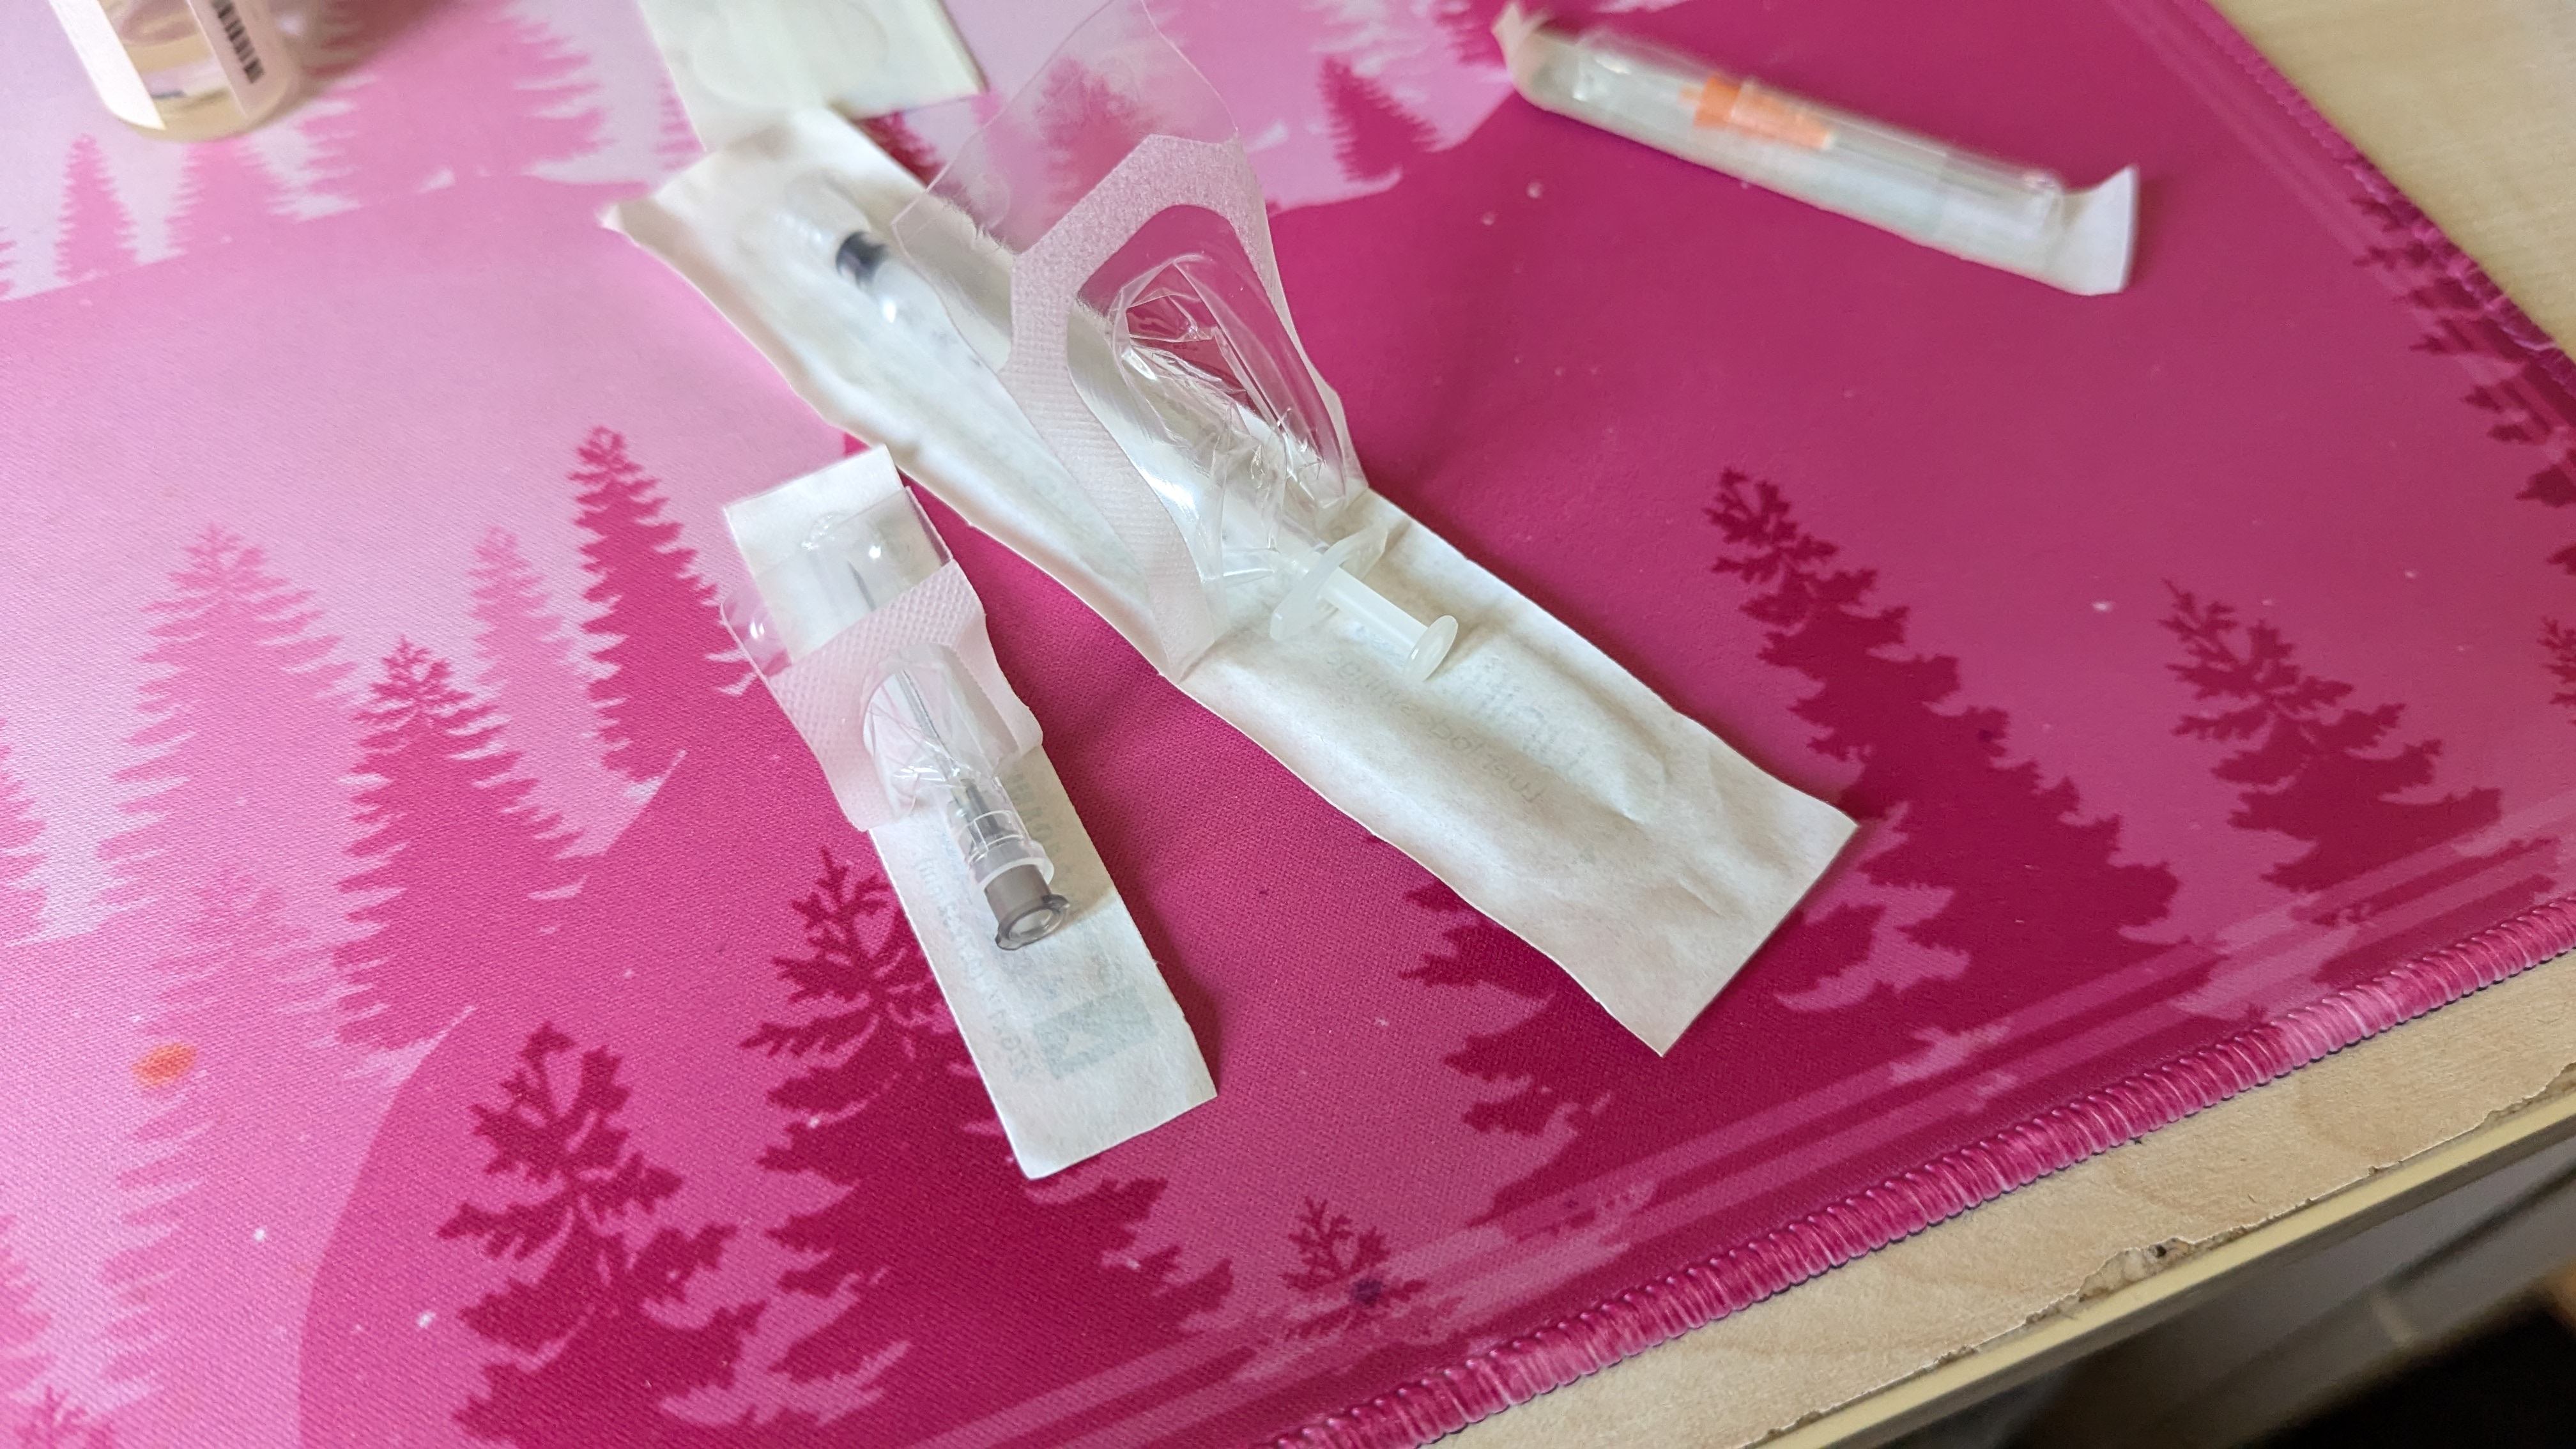
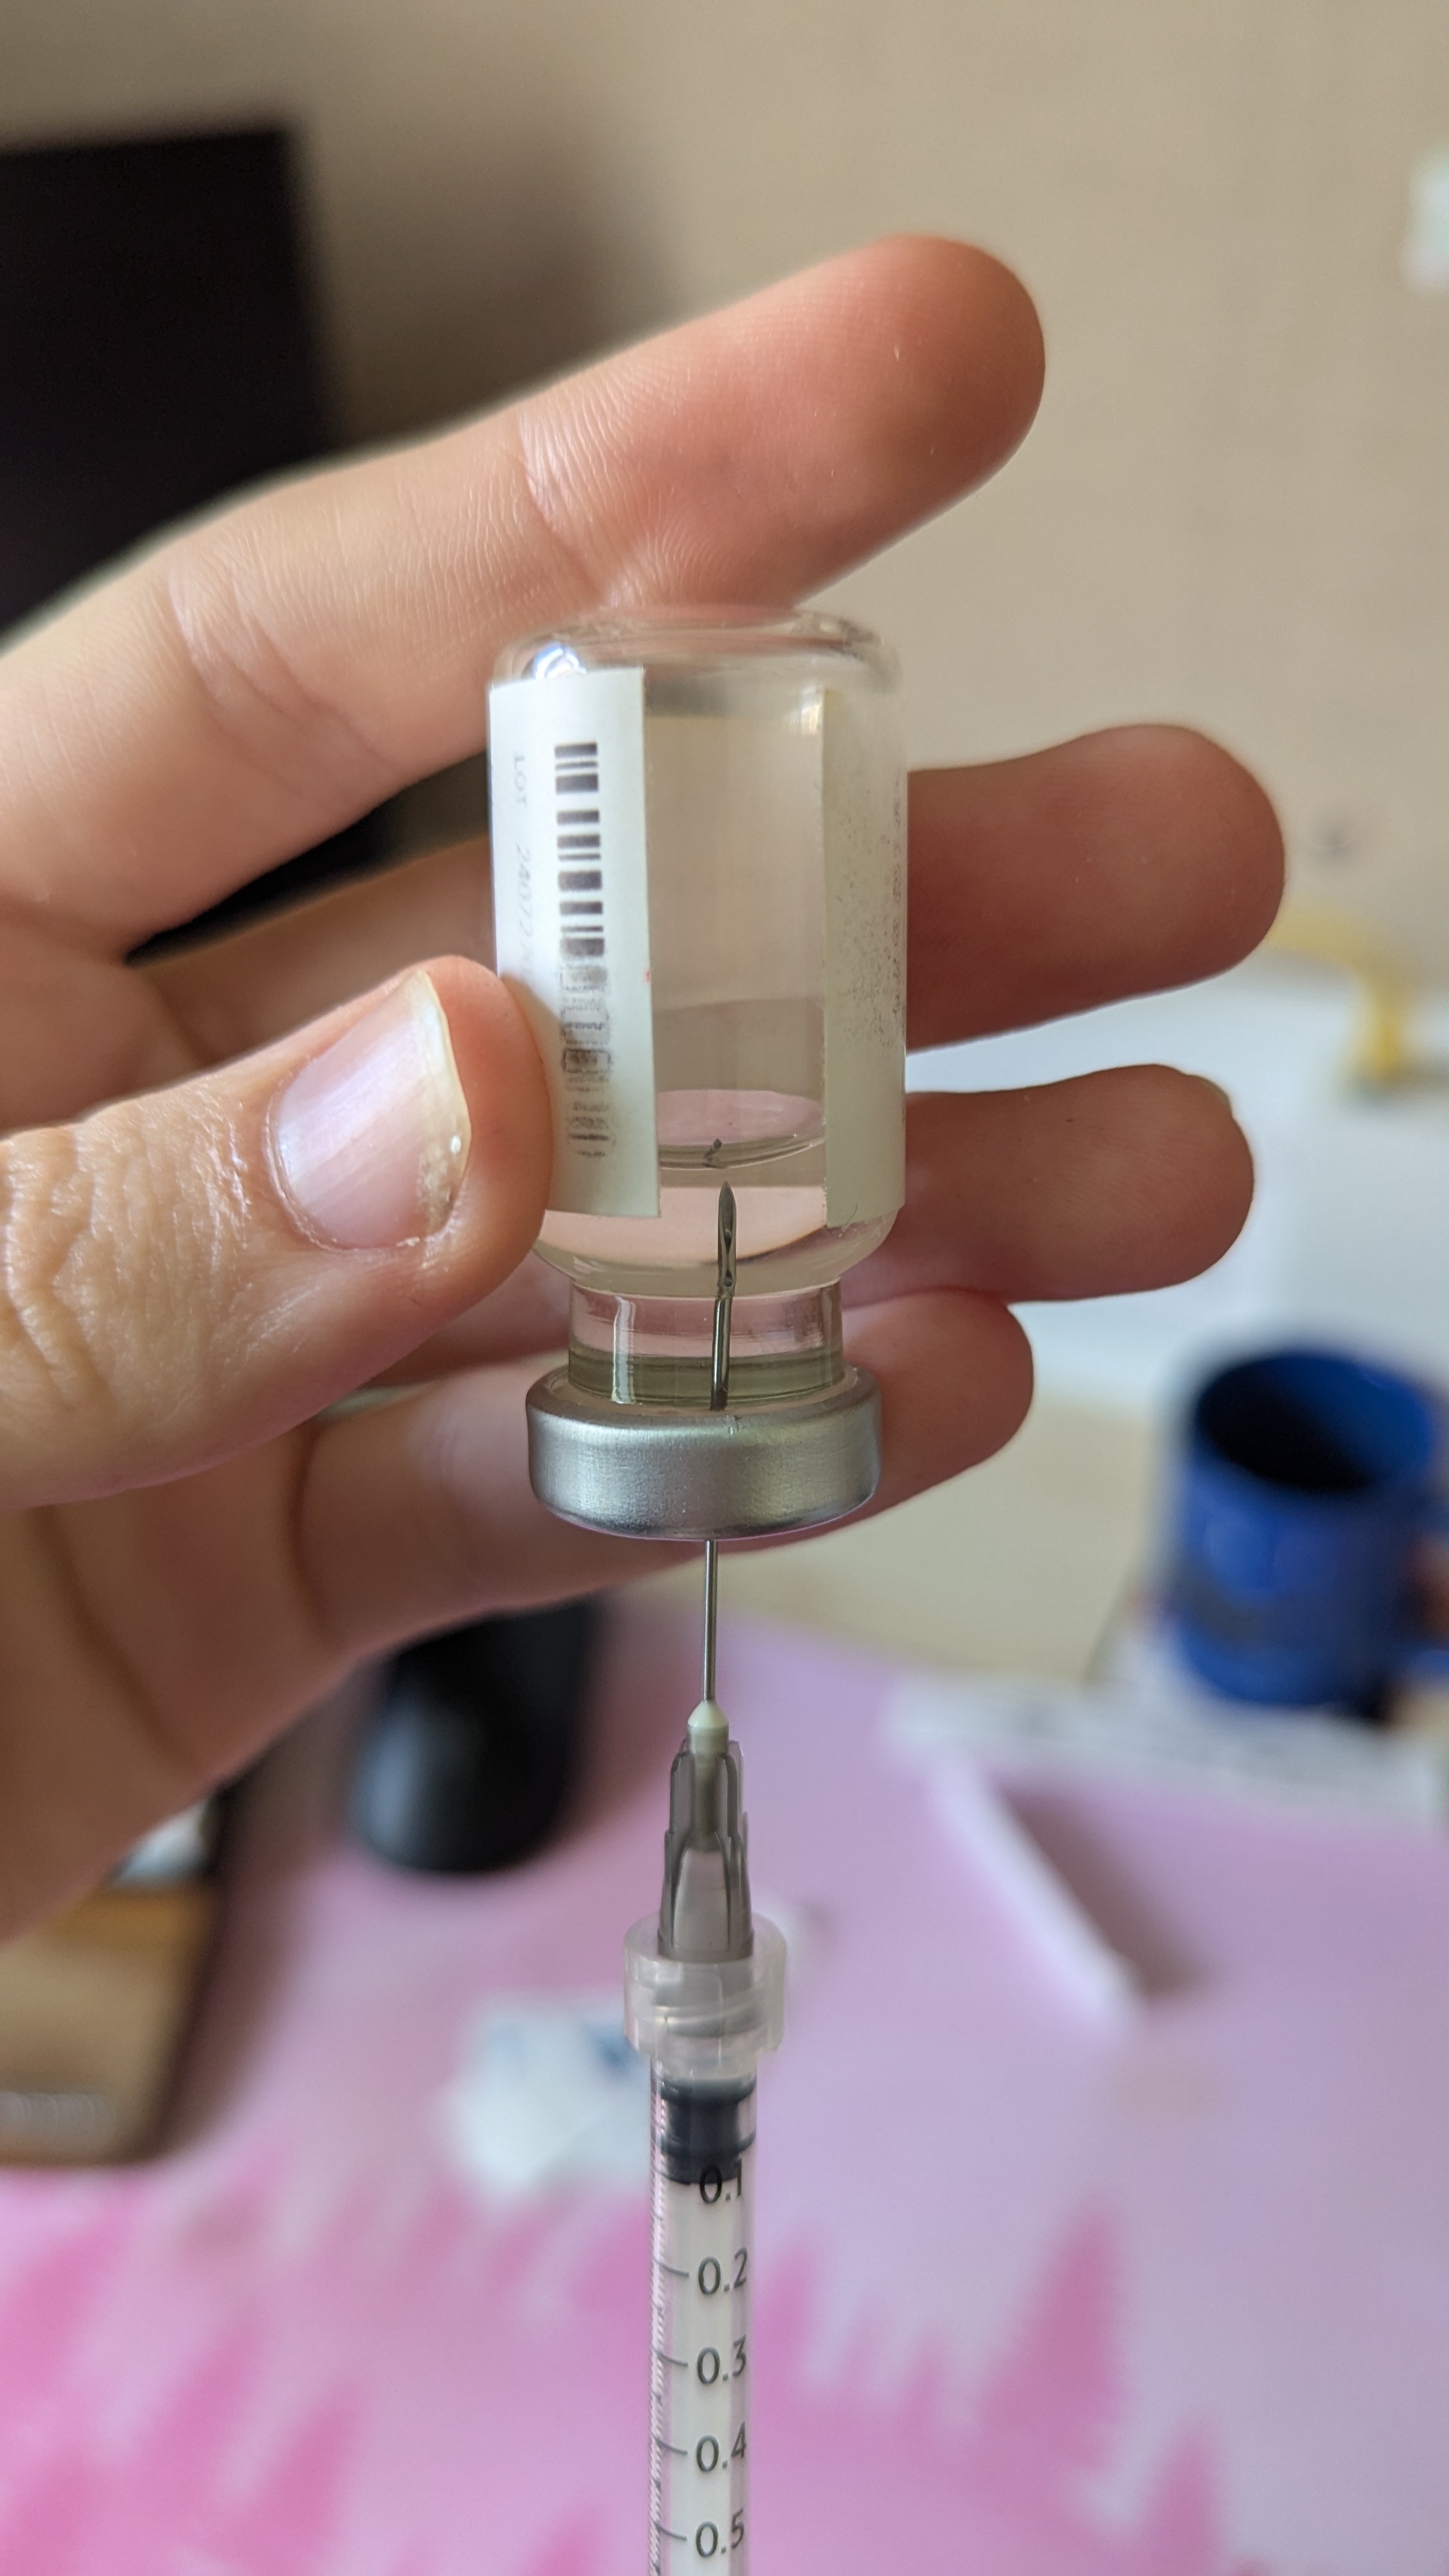
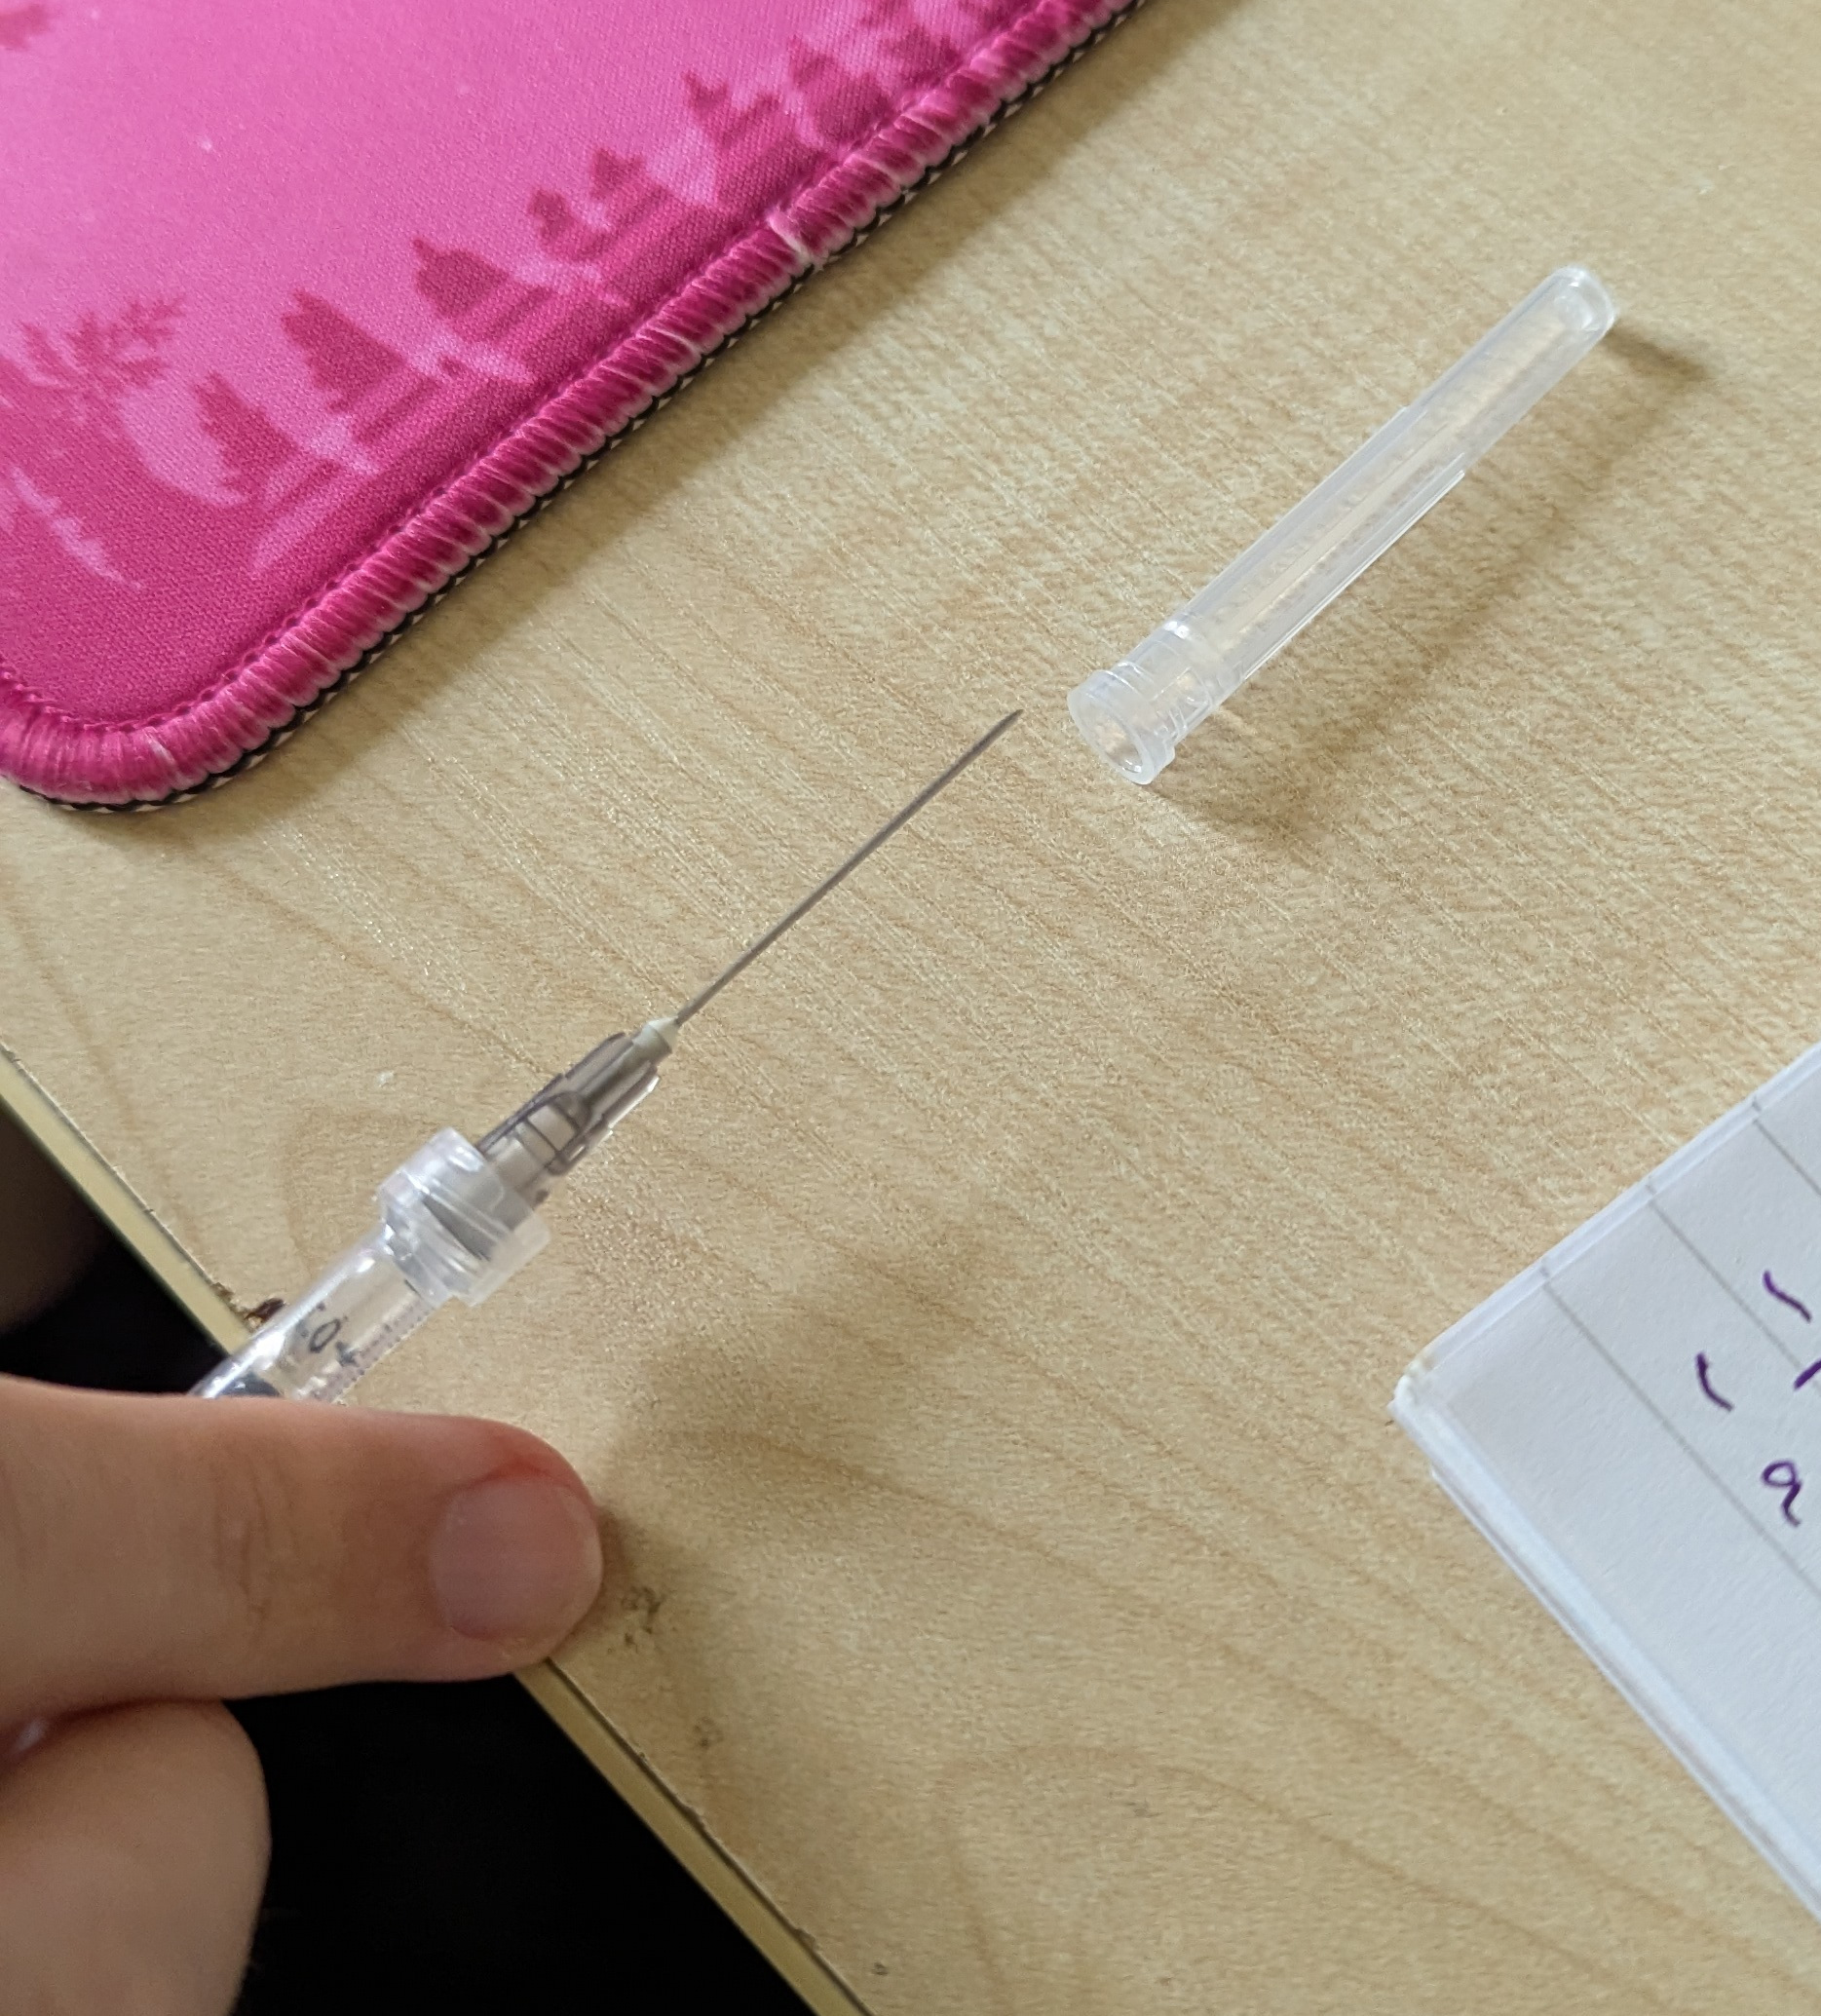
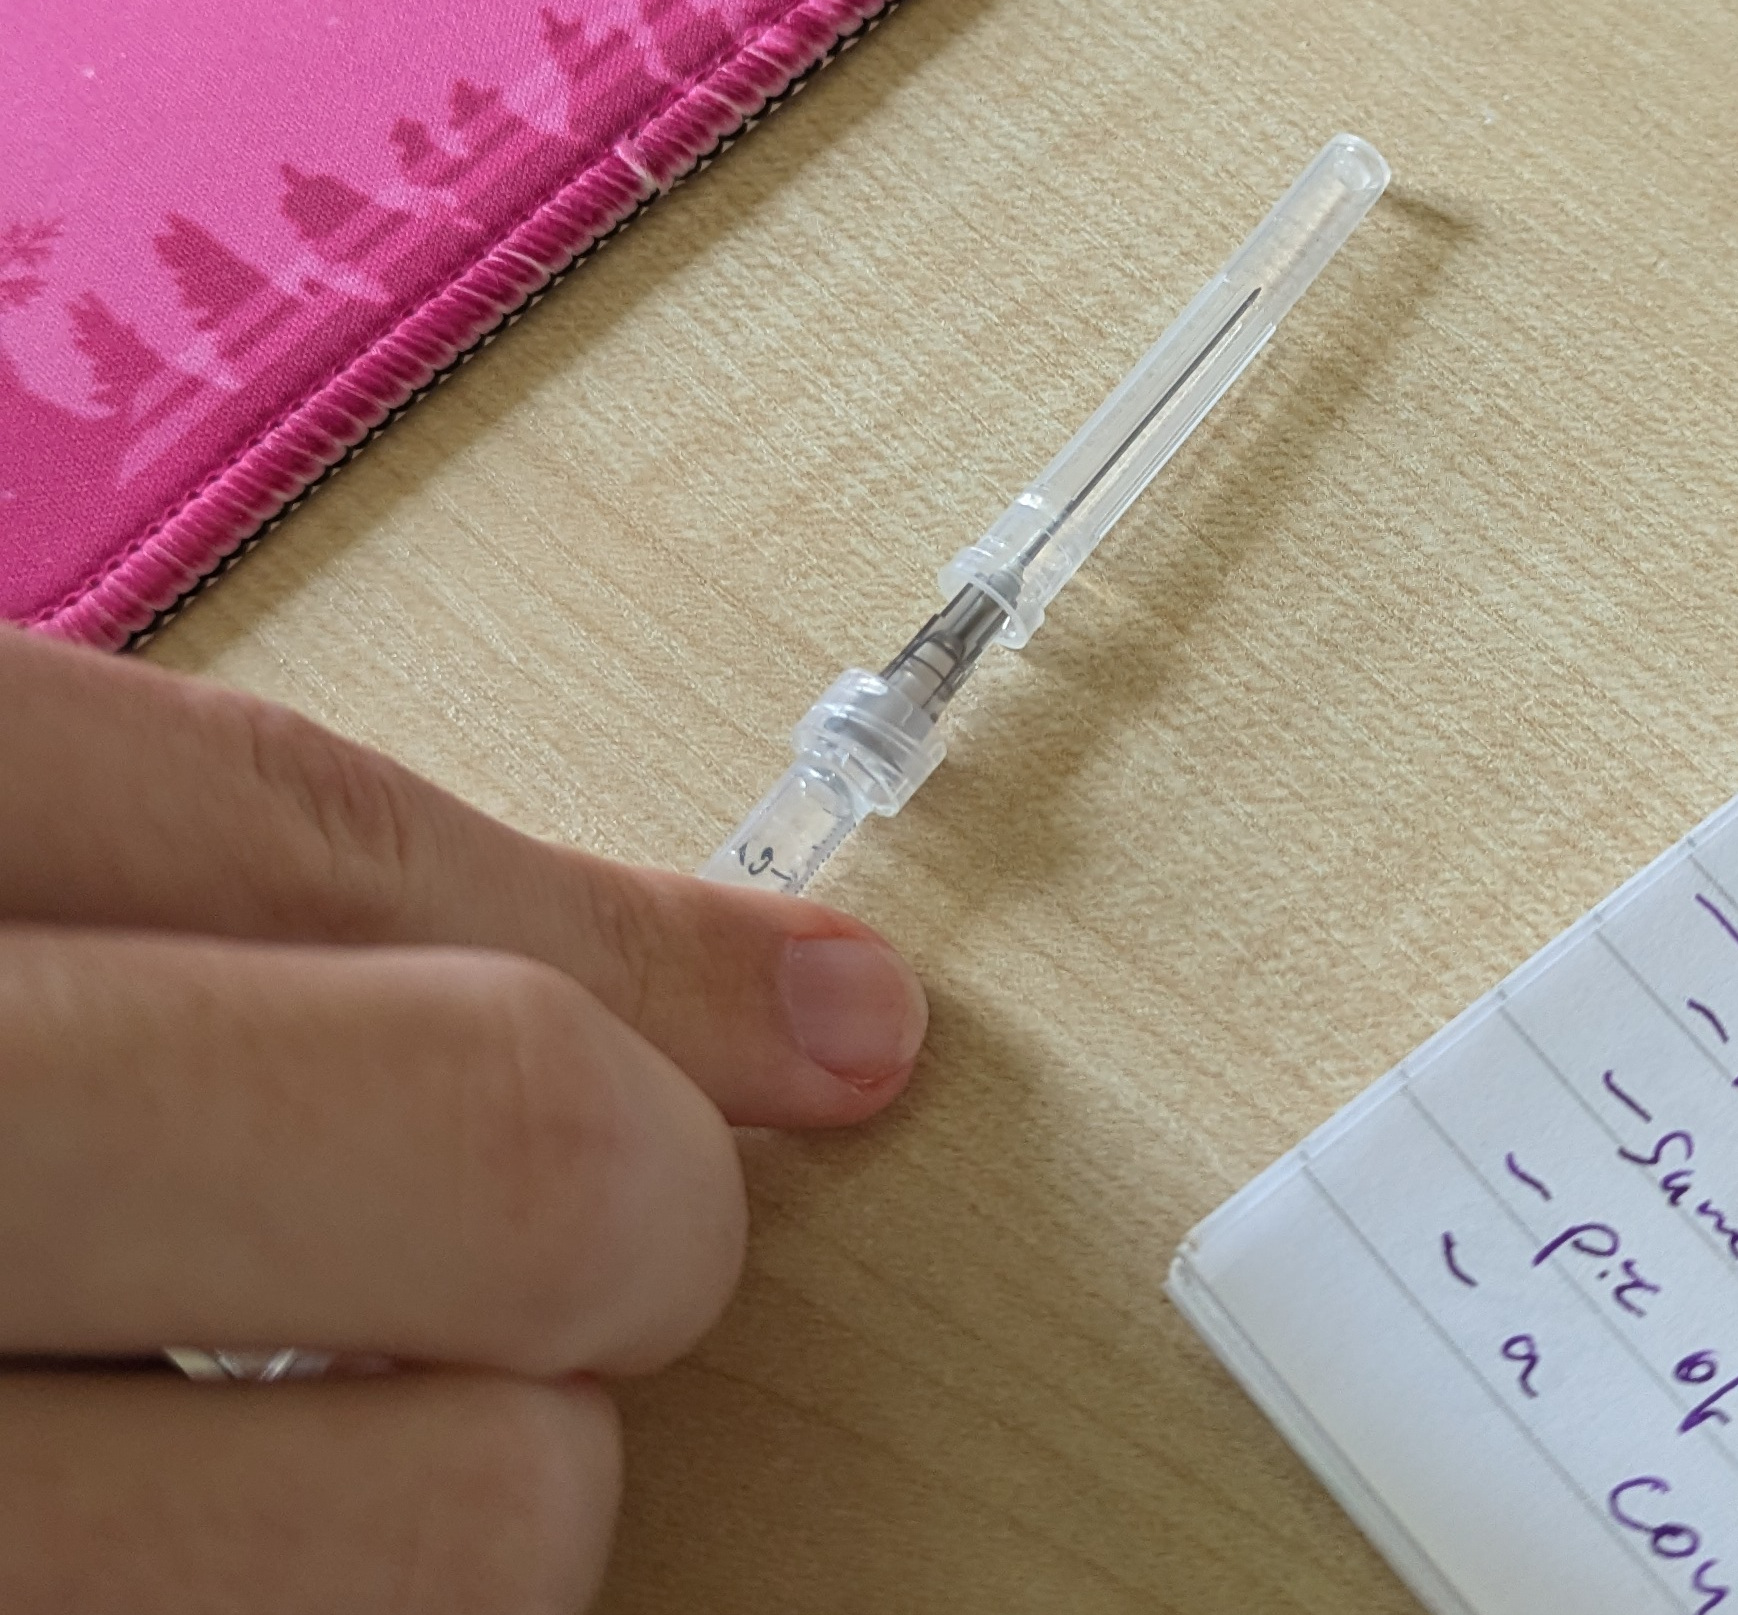
Take your injection needle out of its blister package, take off the drawing needle and discard it into the sharps bin, and put the injection needle onto the syringe.
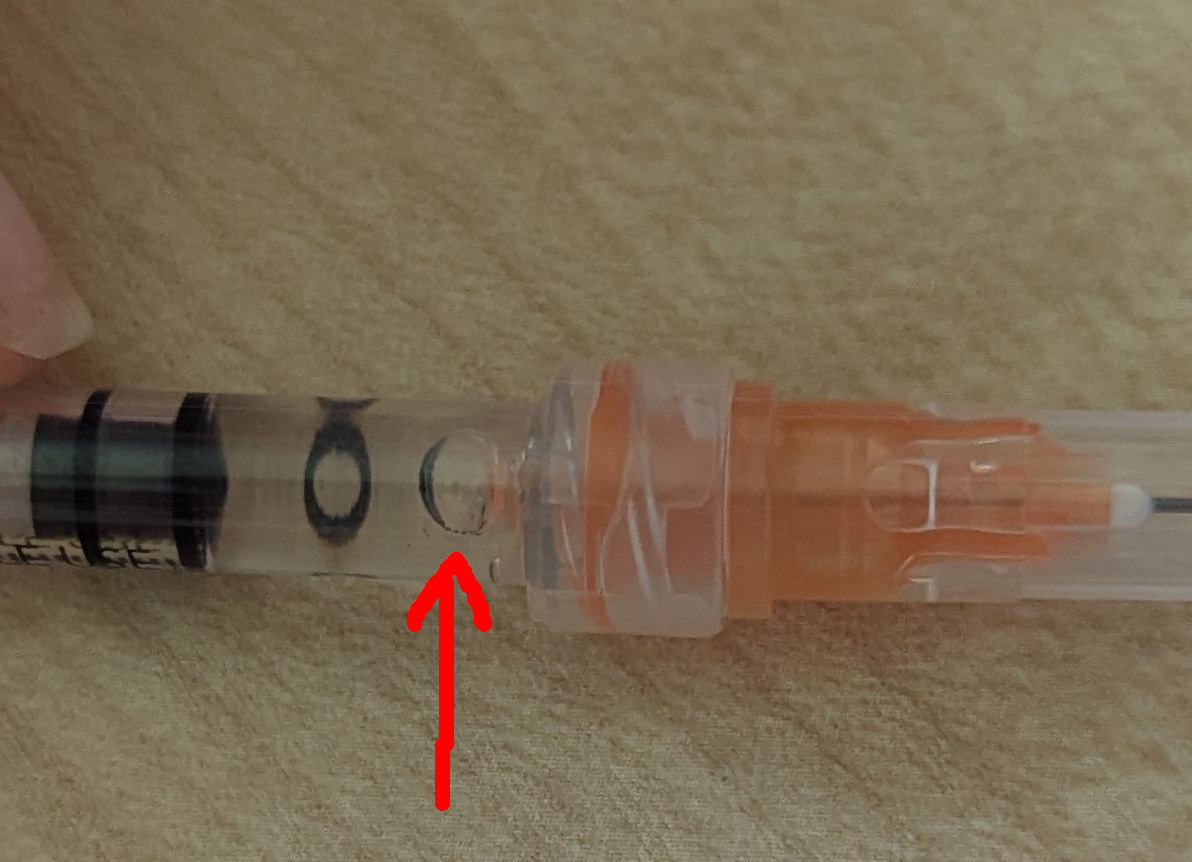
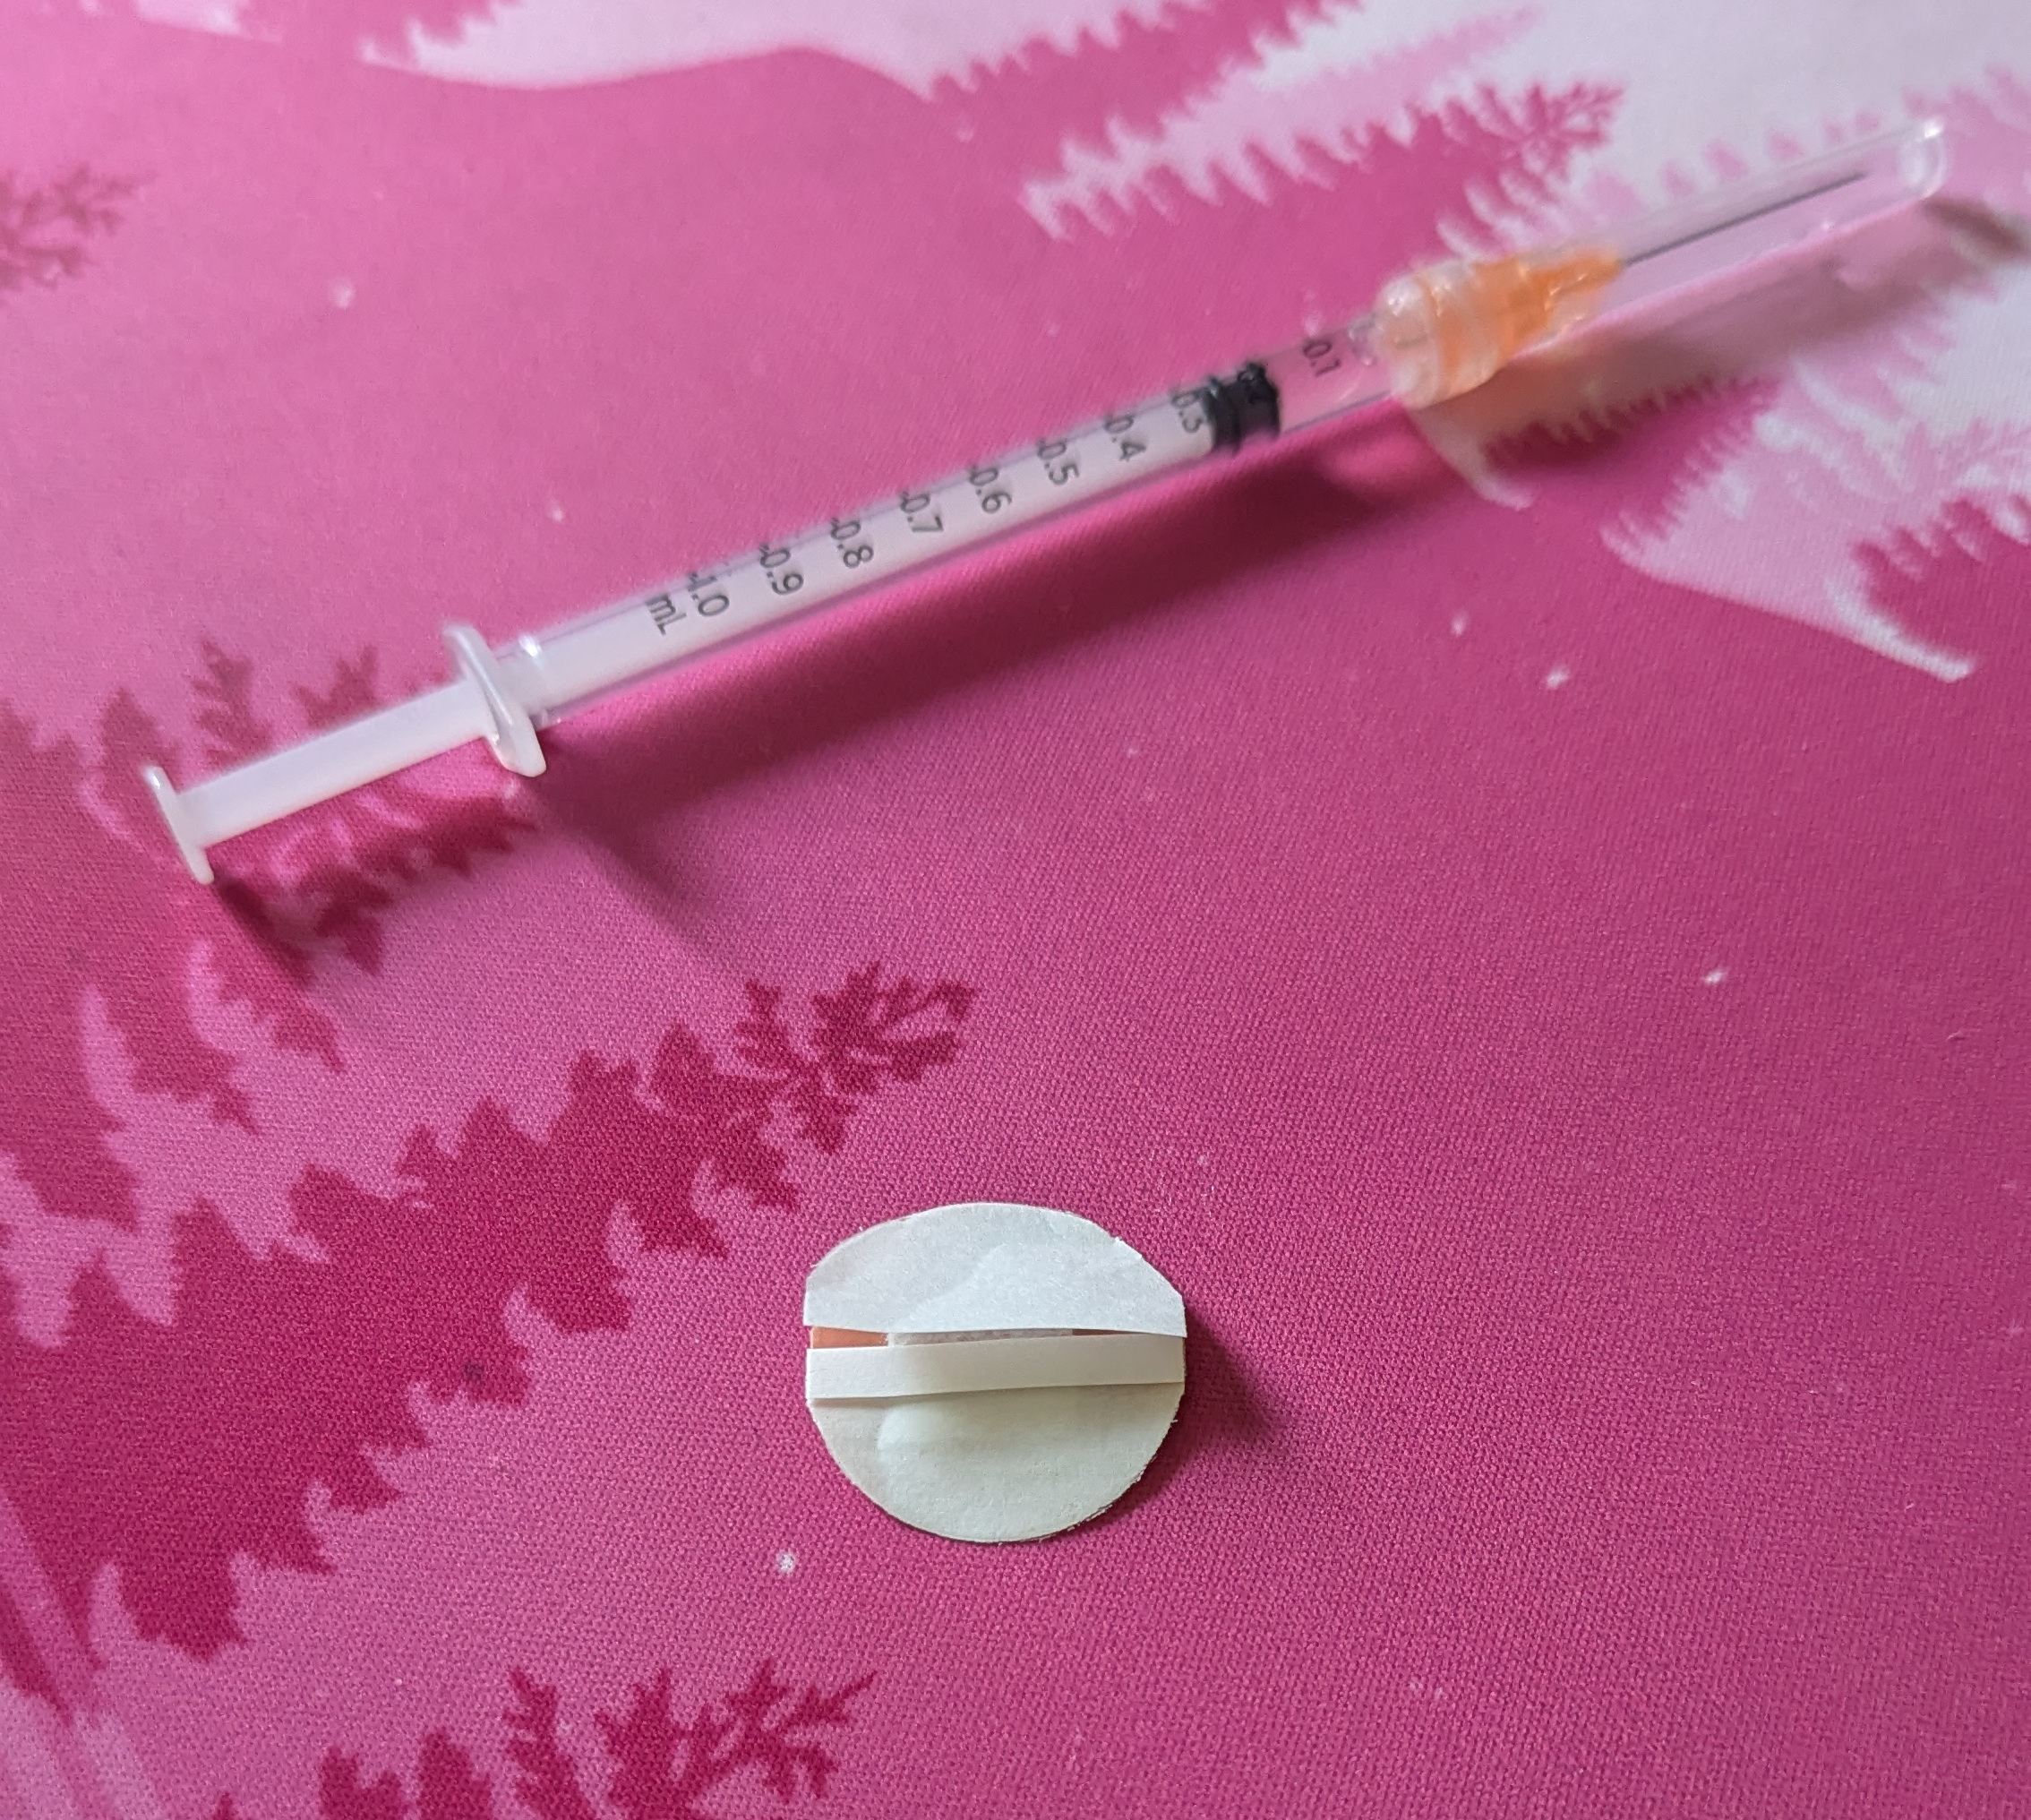
If you don’t know what the difference is, visually, between a low dead space and standard needle, take a moment to look at the pictures here (the orange one is the low-dead-space). You can use a low dead space needle for one, the other, both, none, it does not matter, but you can see how they look and how they interface with the syringe here :)
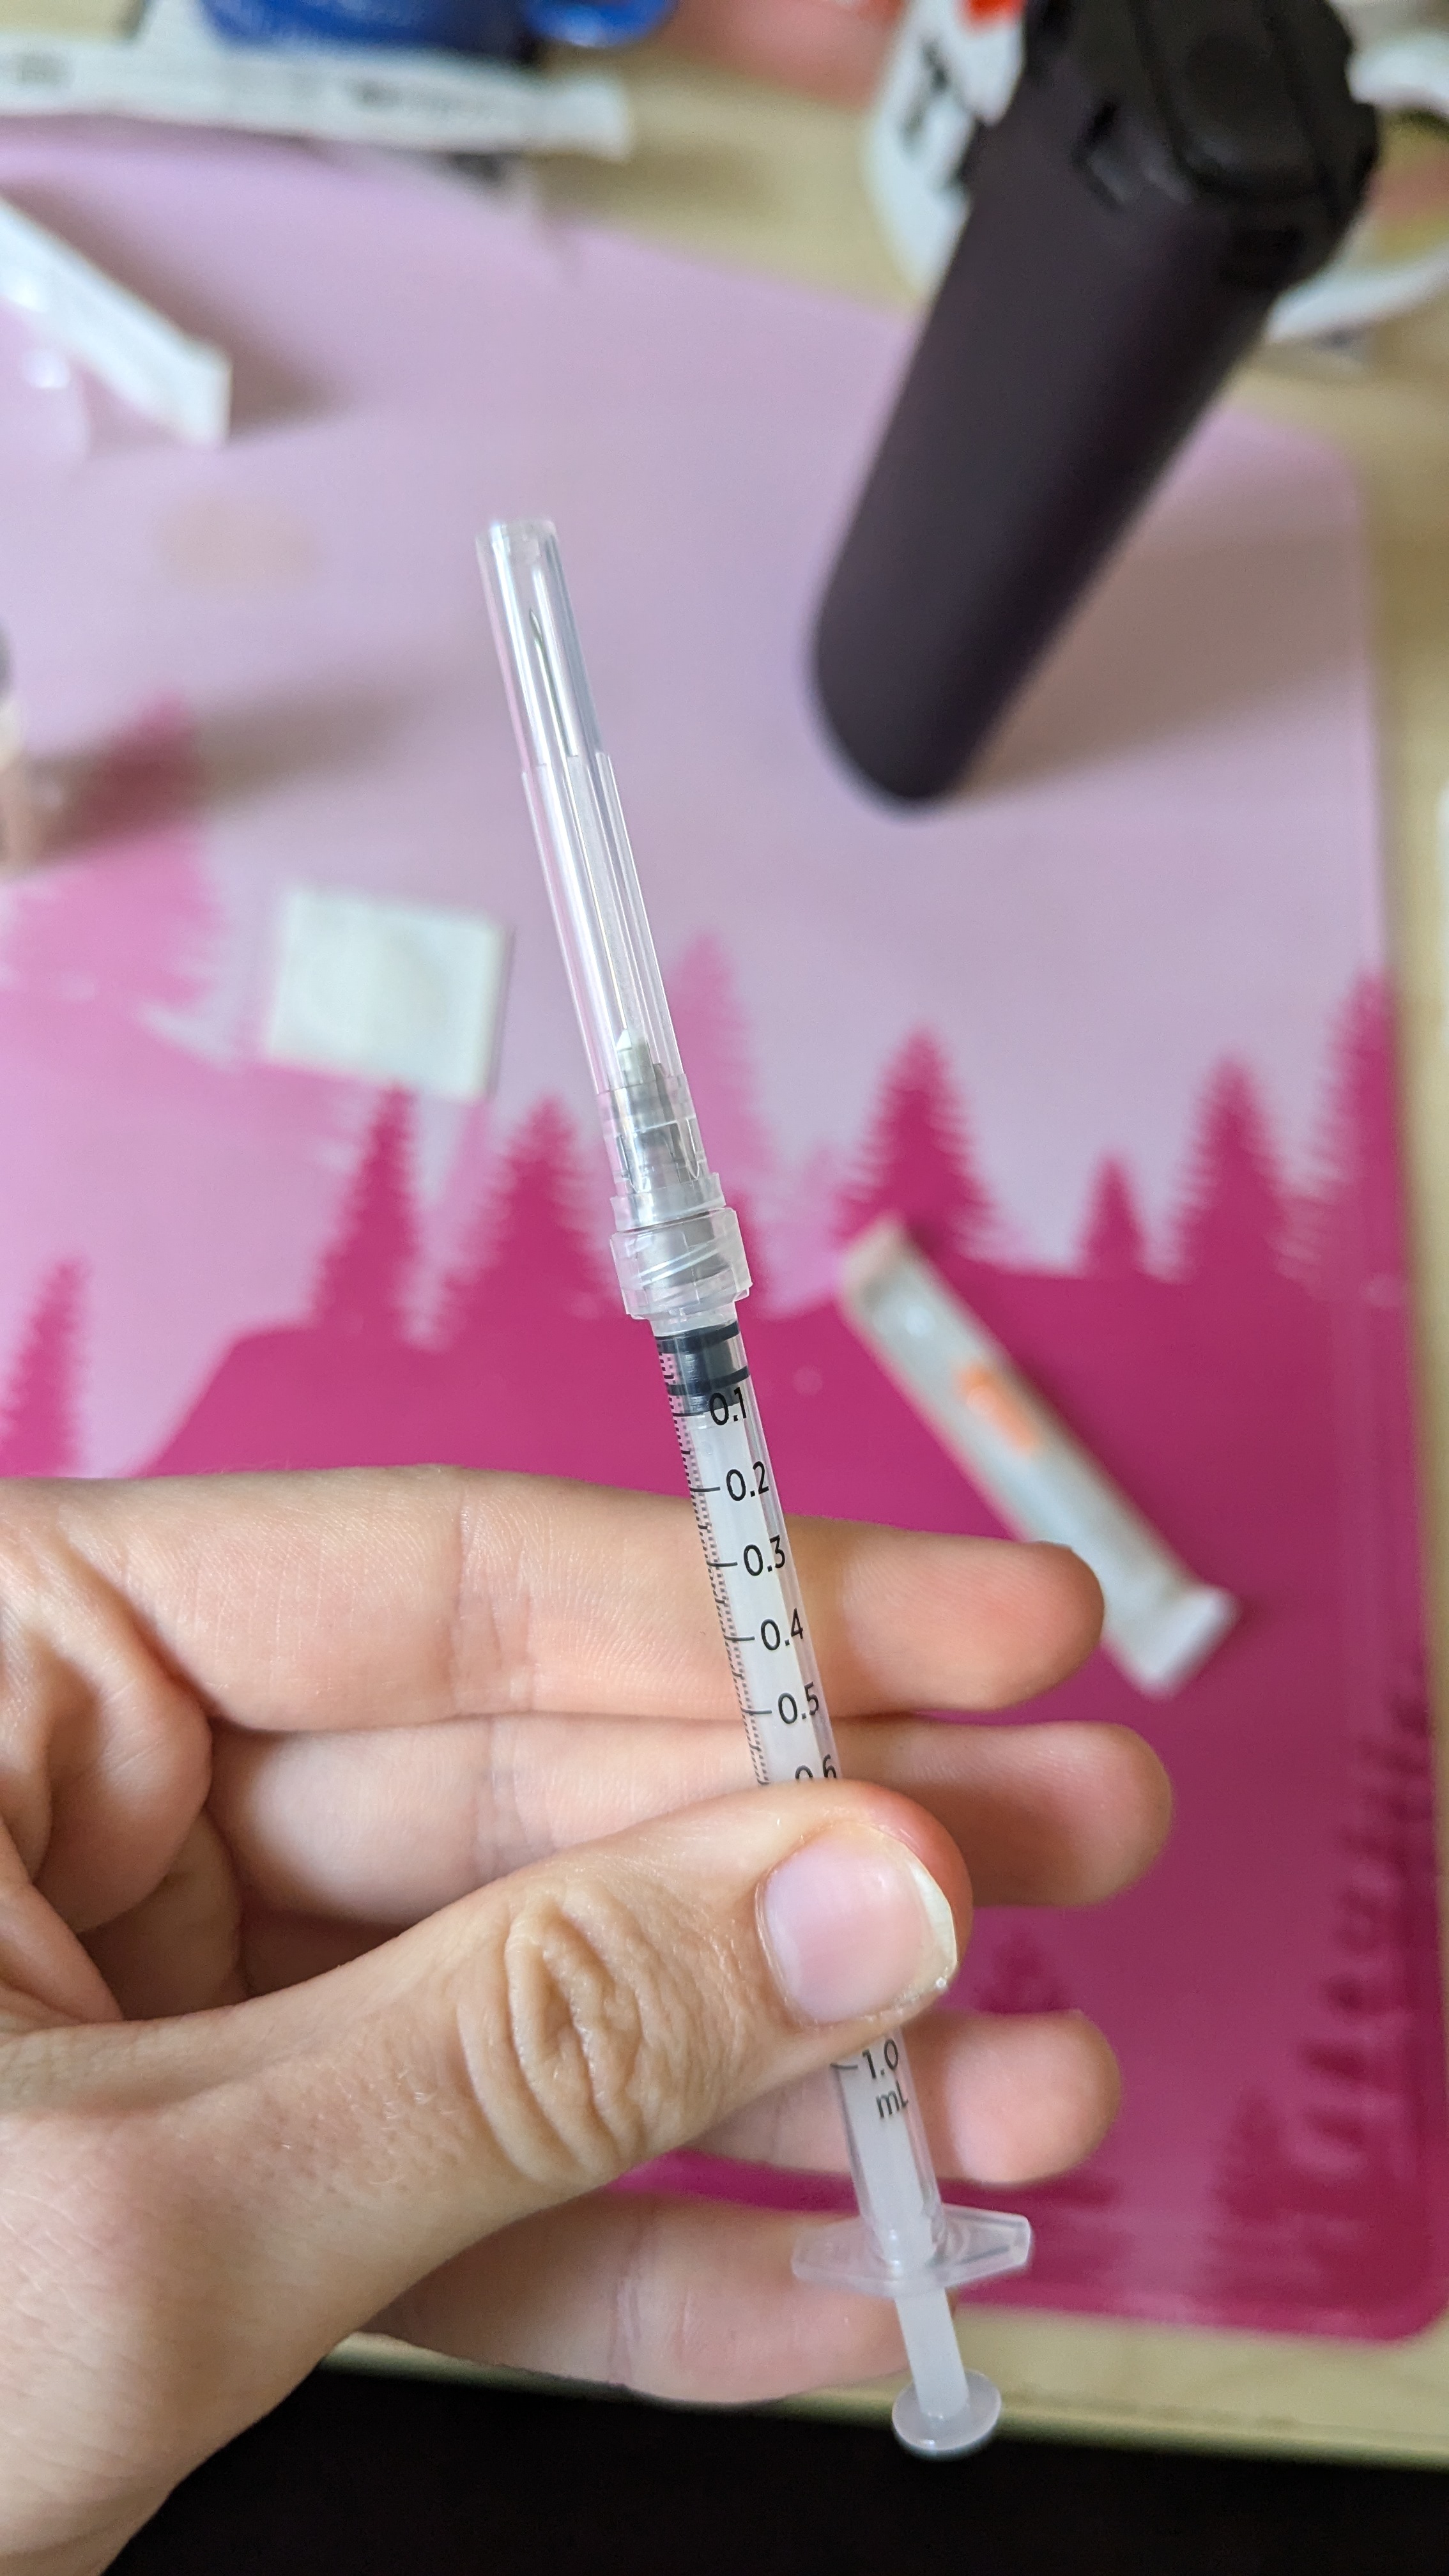
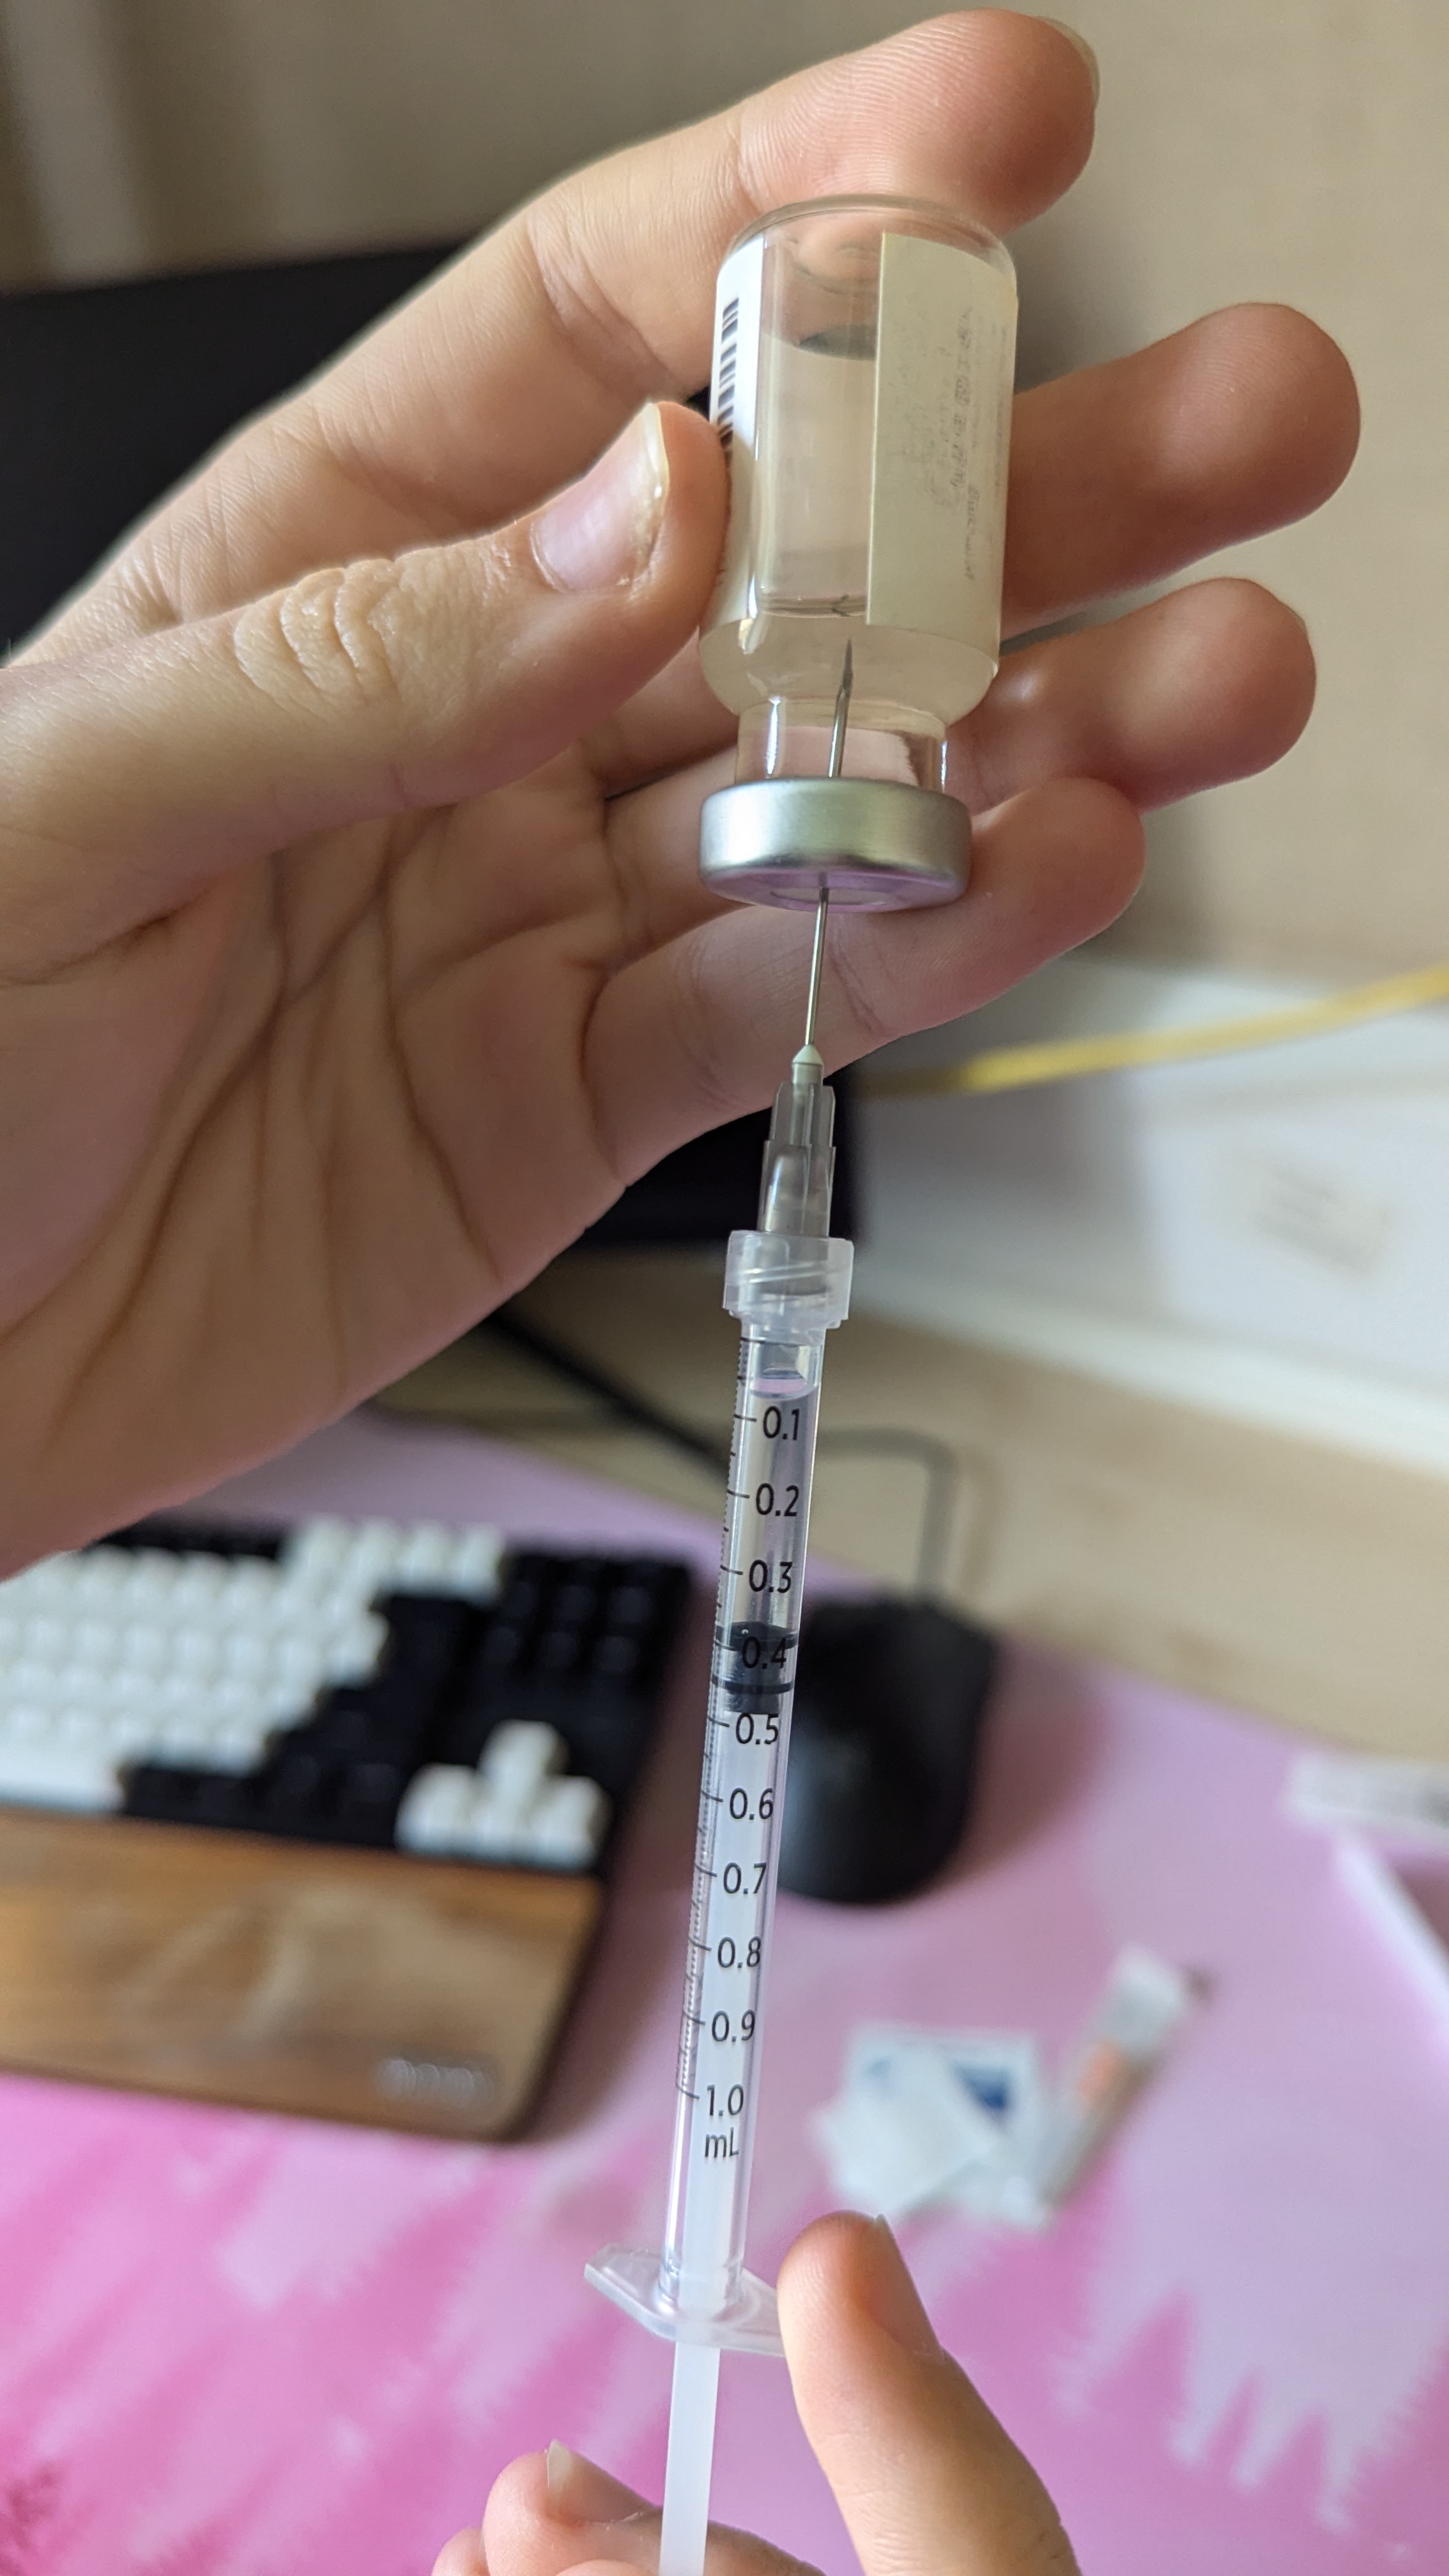
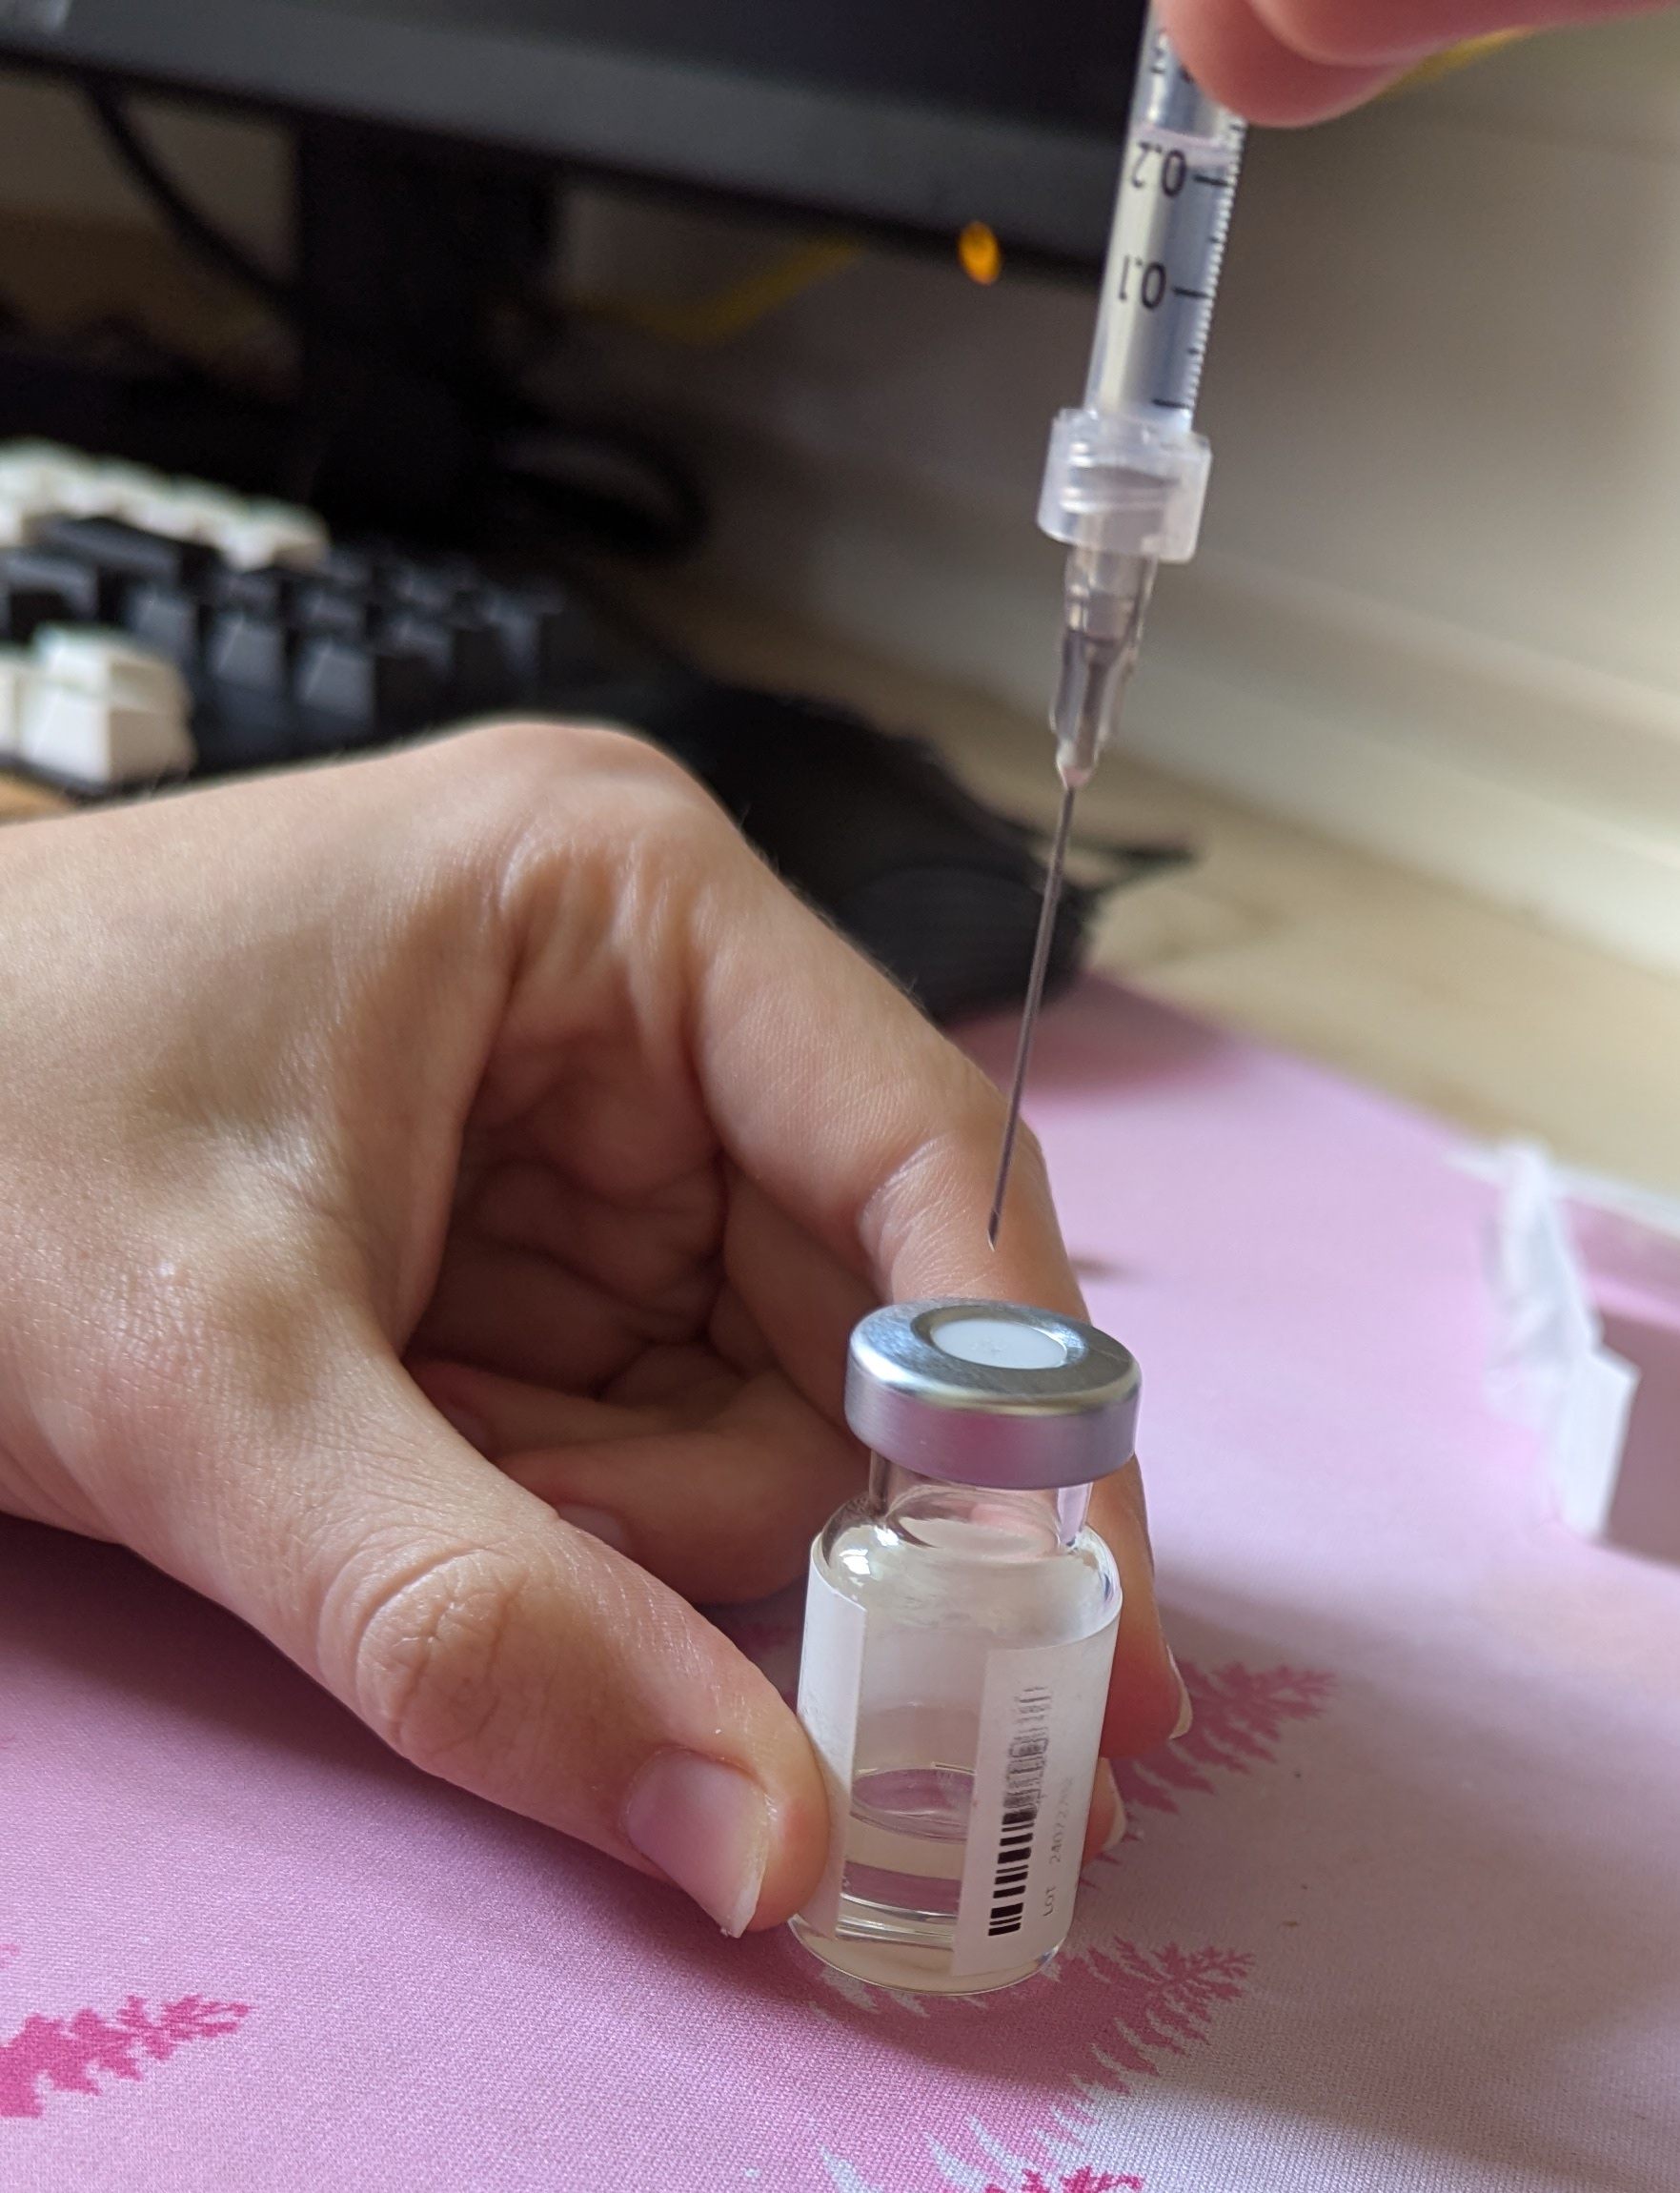
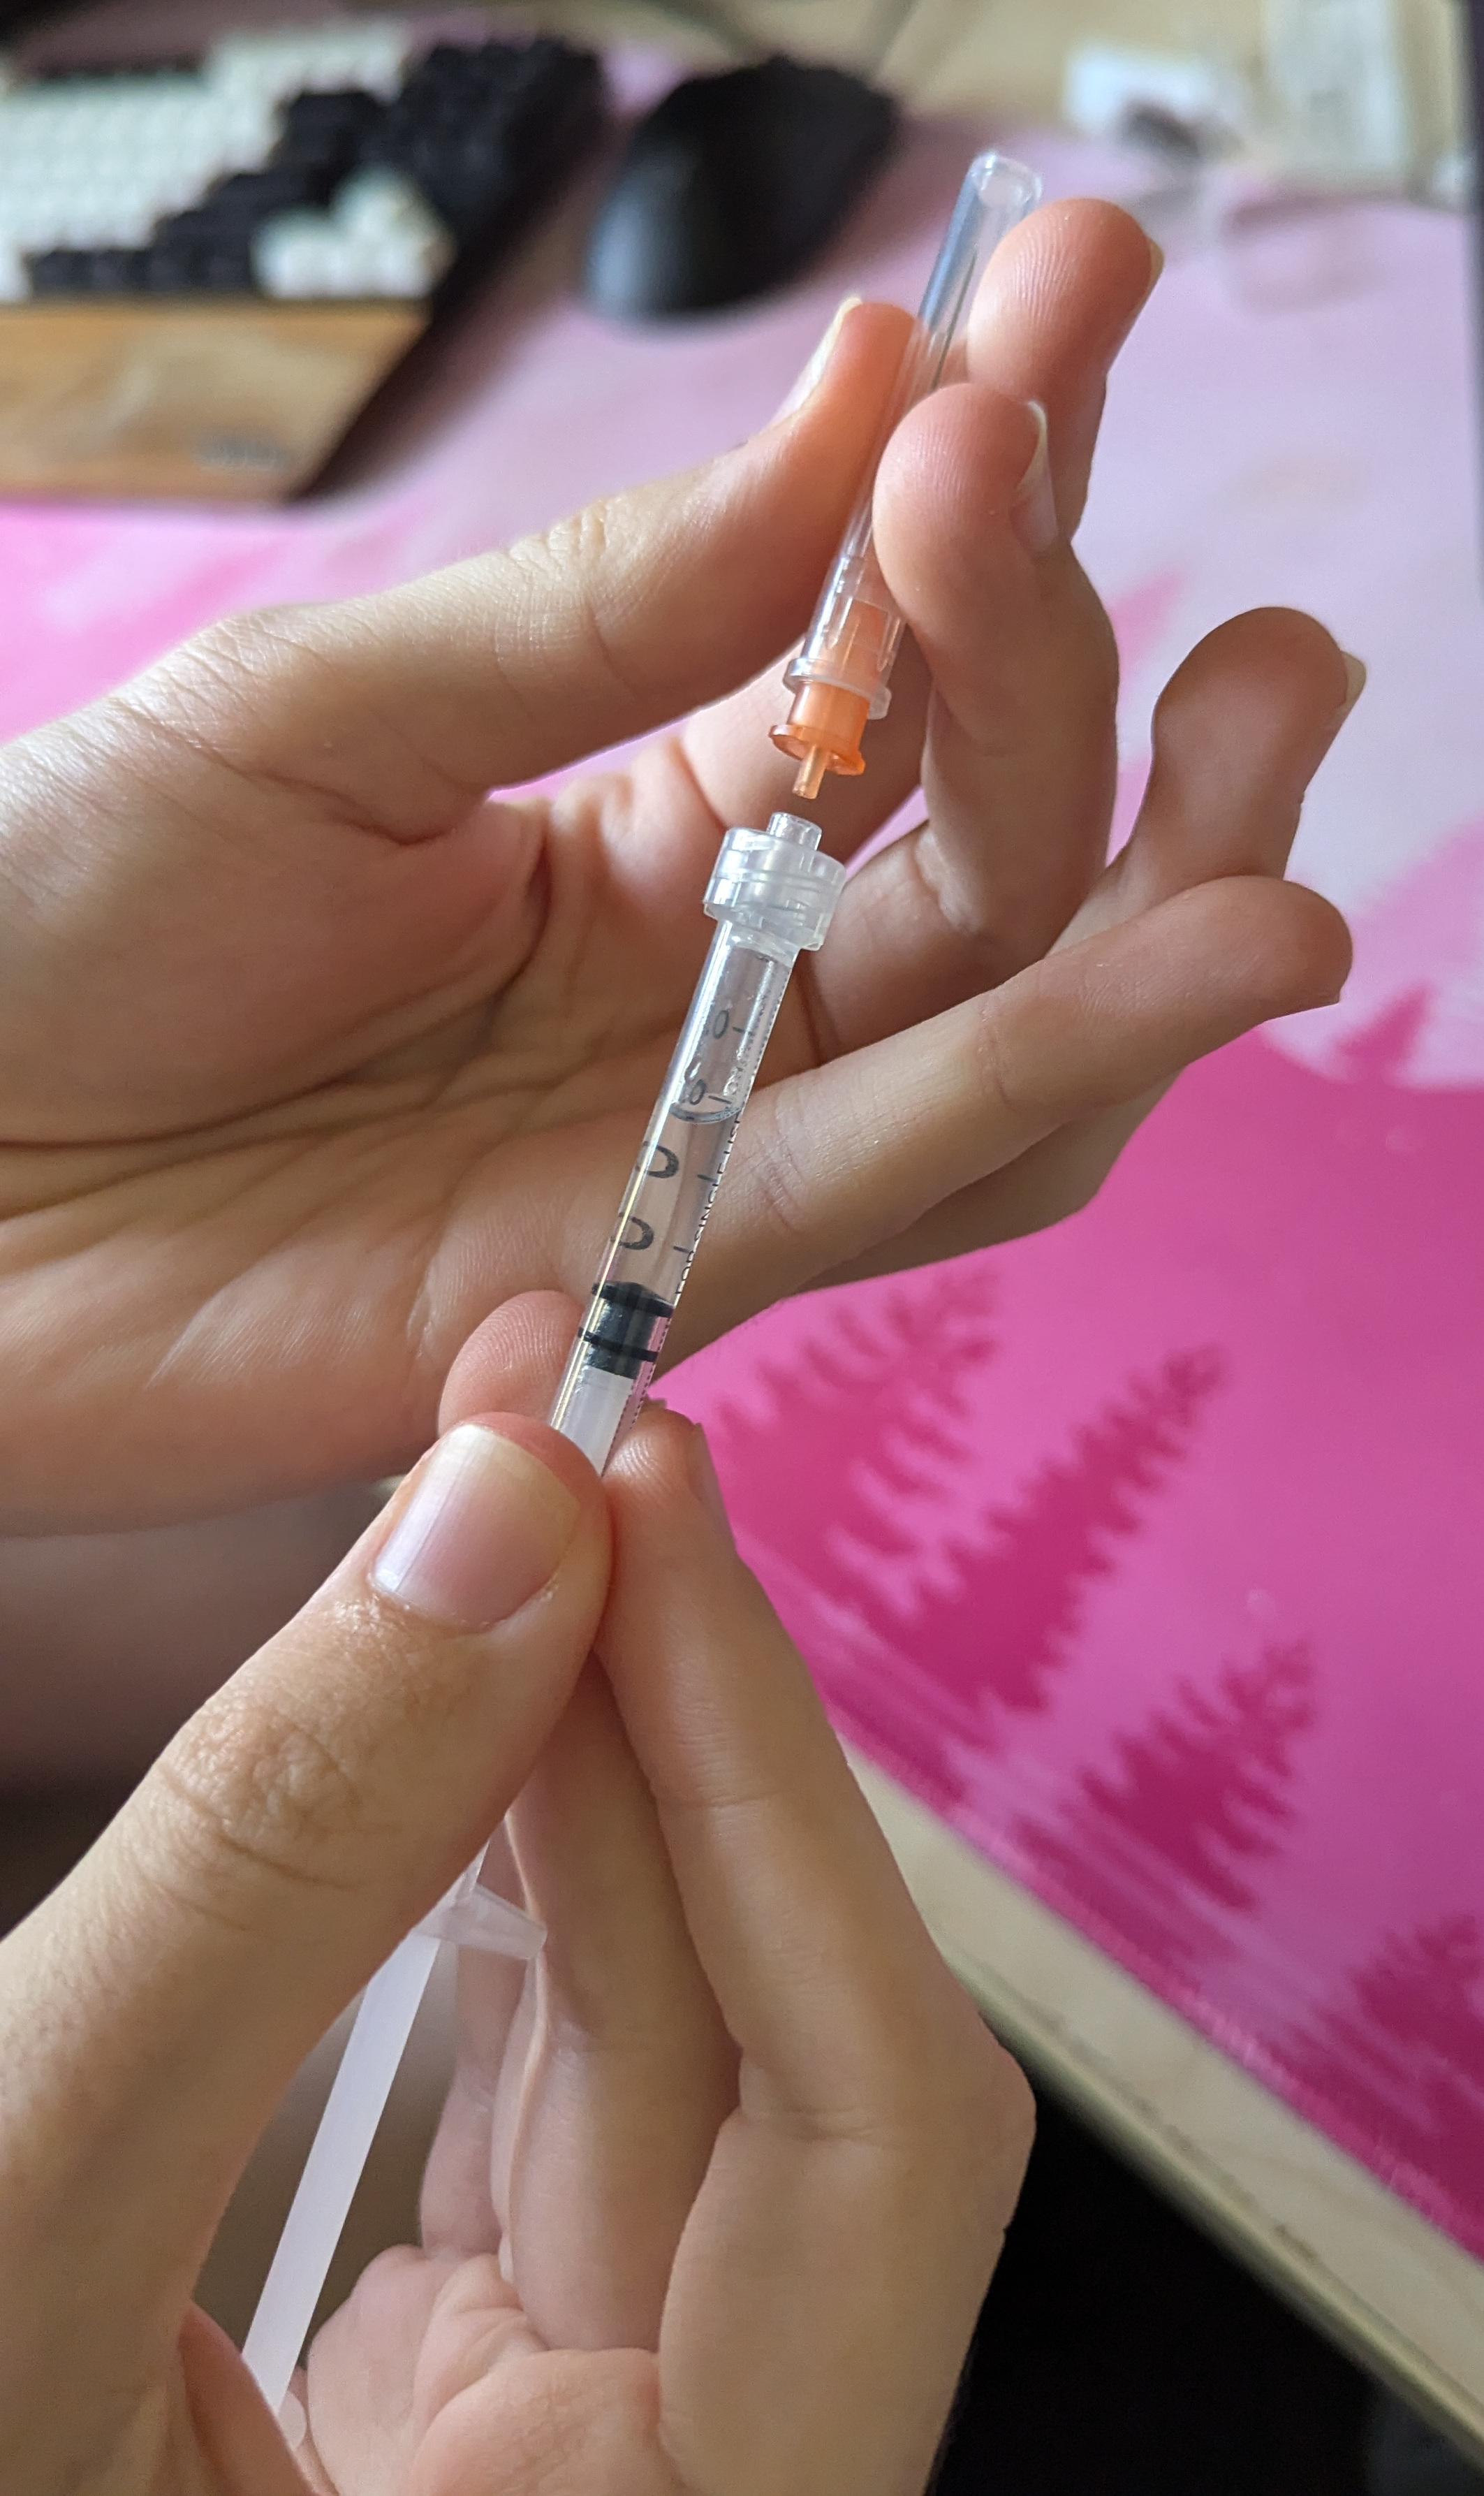
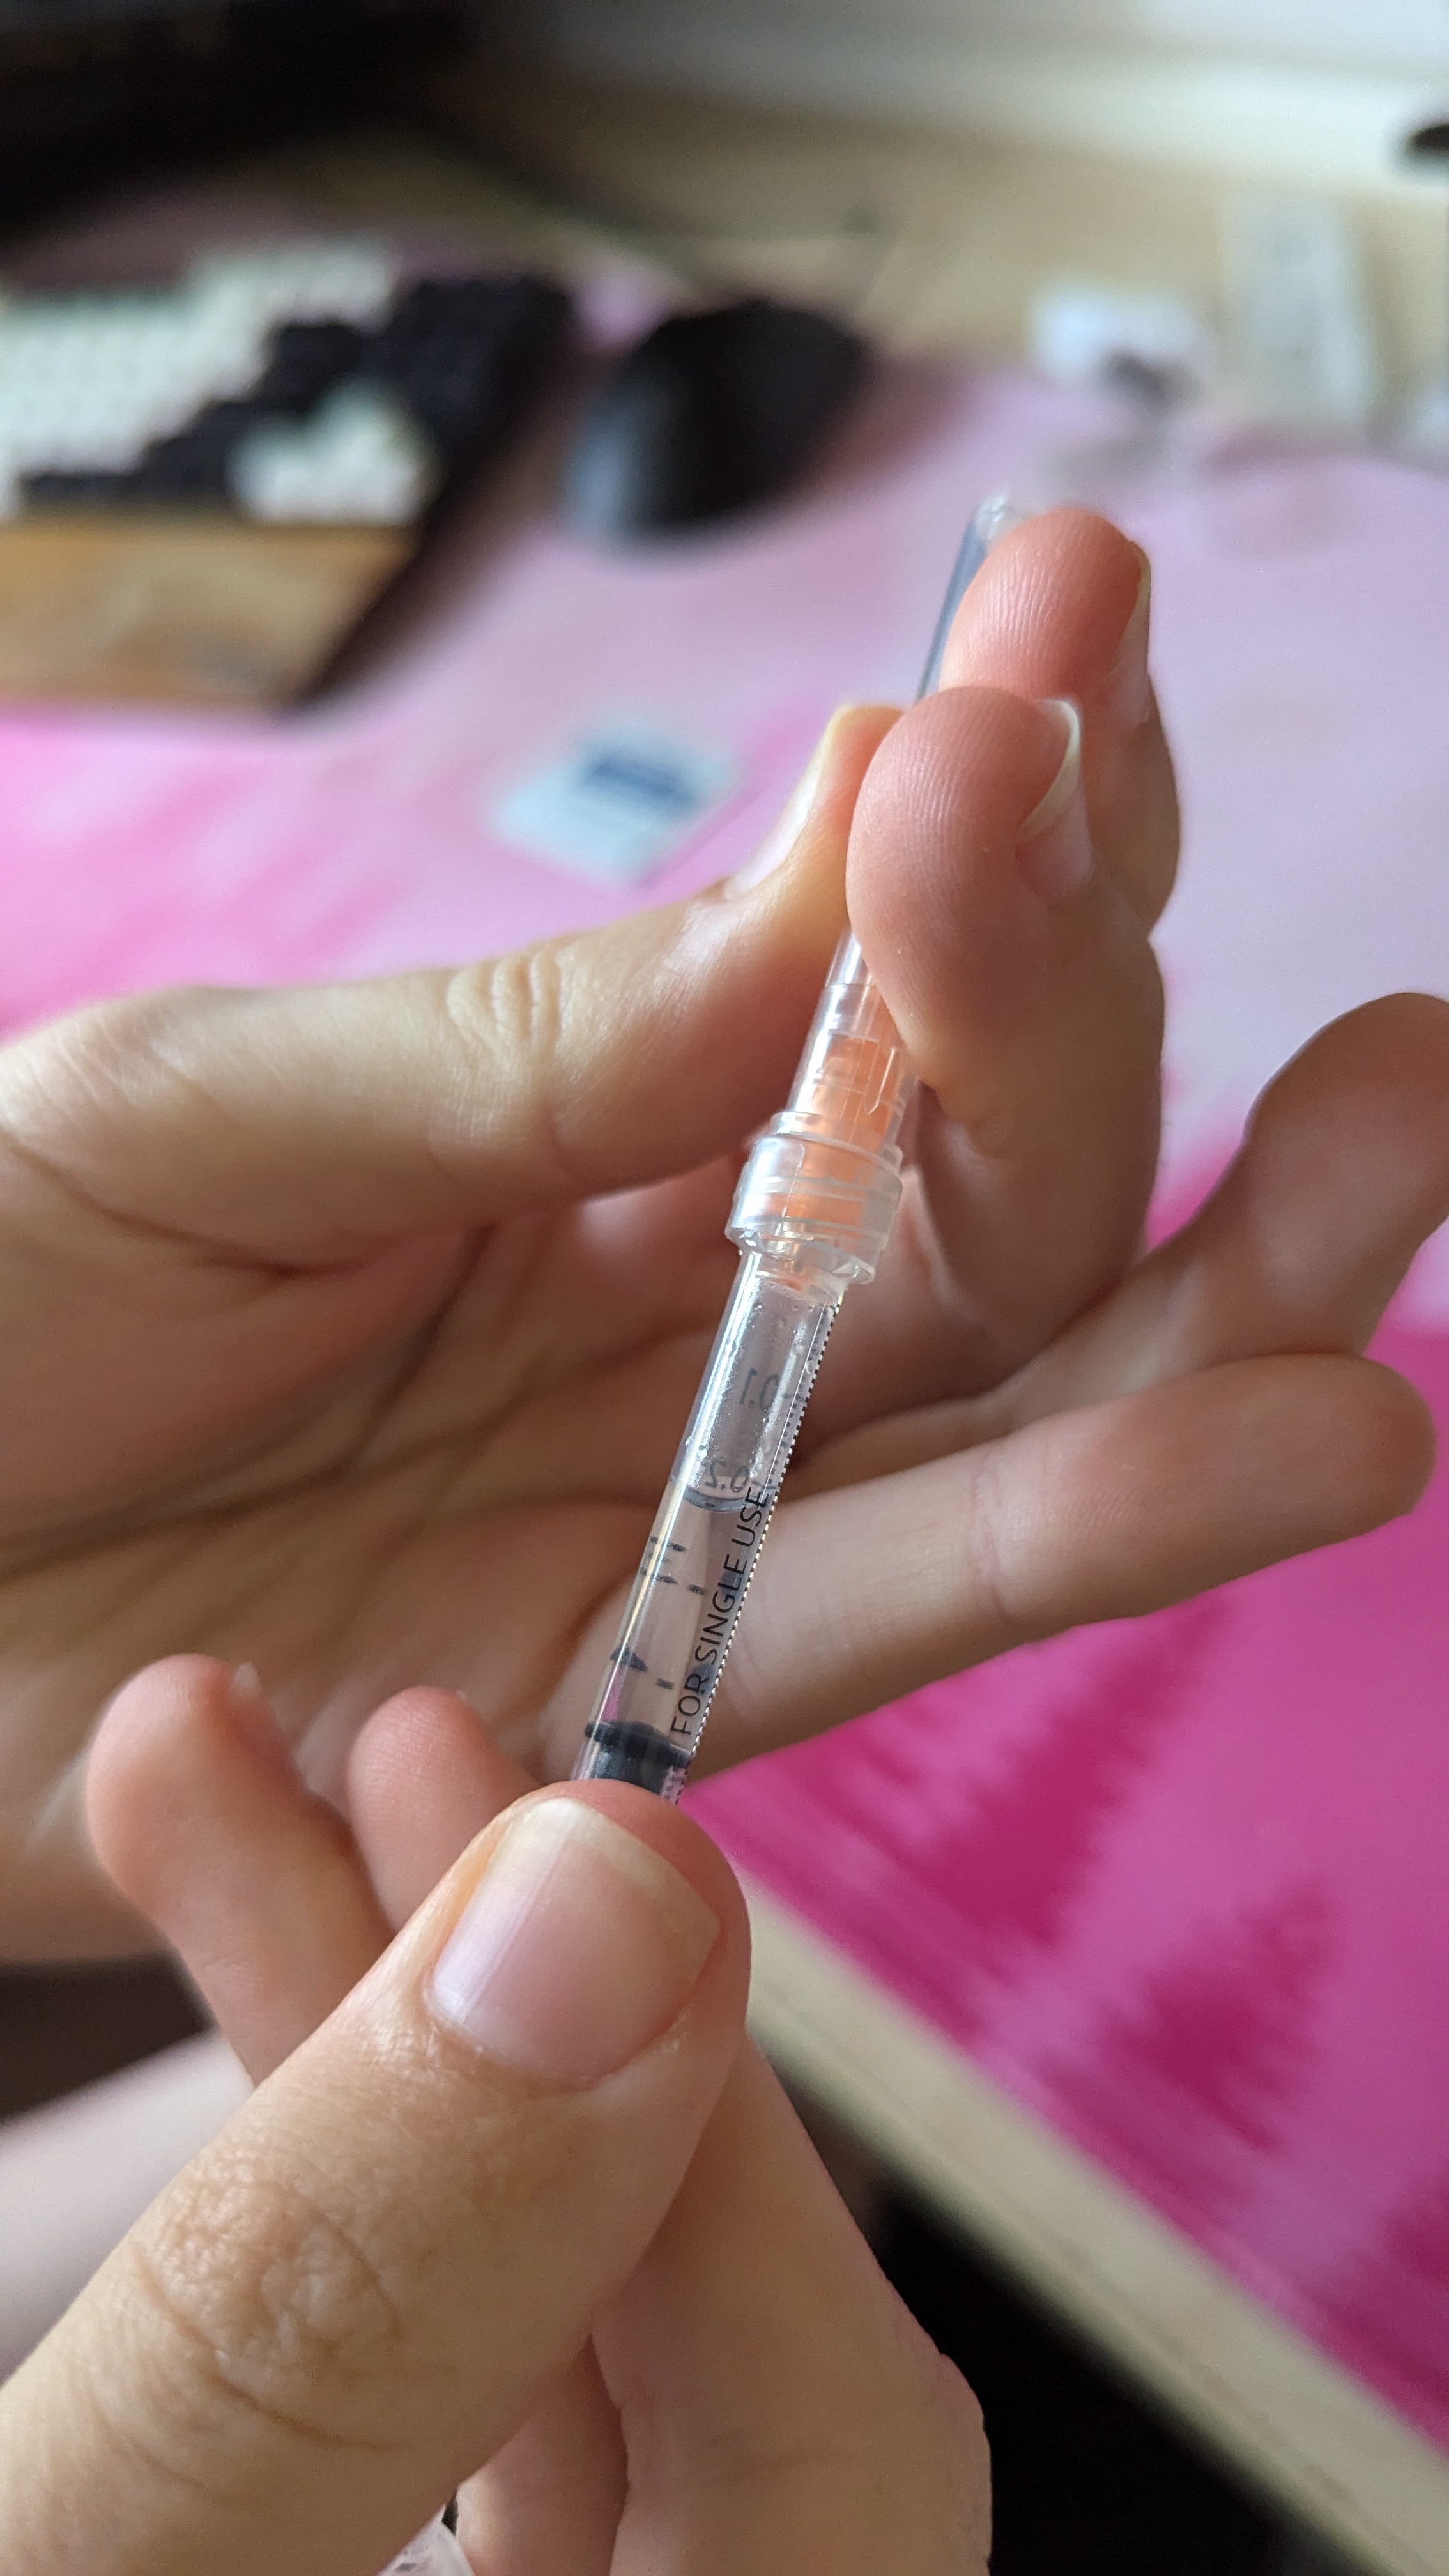
Now, holding the syringe needle-side-up and securely at around the midpoint, flick the top side of the syringe or the needle cap to encourage any air bubbles that may be in the medication up and towards the top to merge with the air gap. You can do this with reasonable force!
Now for the step where you get your dosage just perfect: push the syringe in until you hit the dosage you want on the syringe. You may lose some medication out of the end of the needle in this step. That’s fine, that’s the difference in dead space between the first and second needle. After you’ve done this a few times and are comfortable with the process, you can study when exactly that happens and account for it.
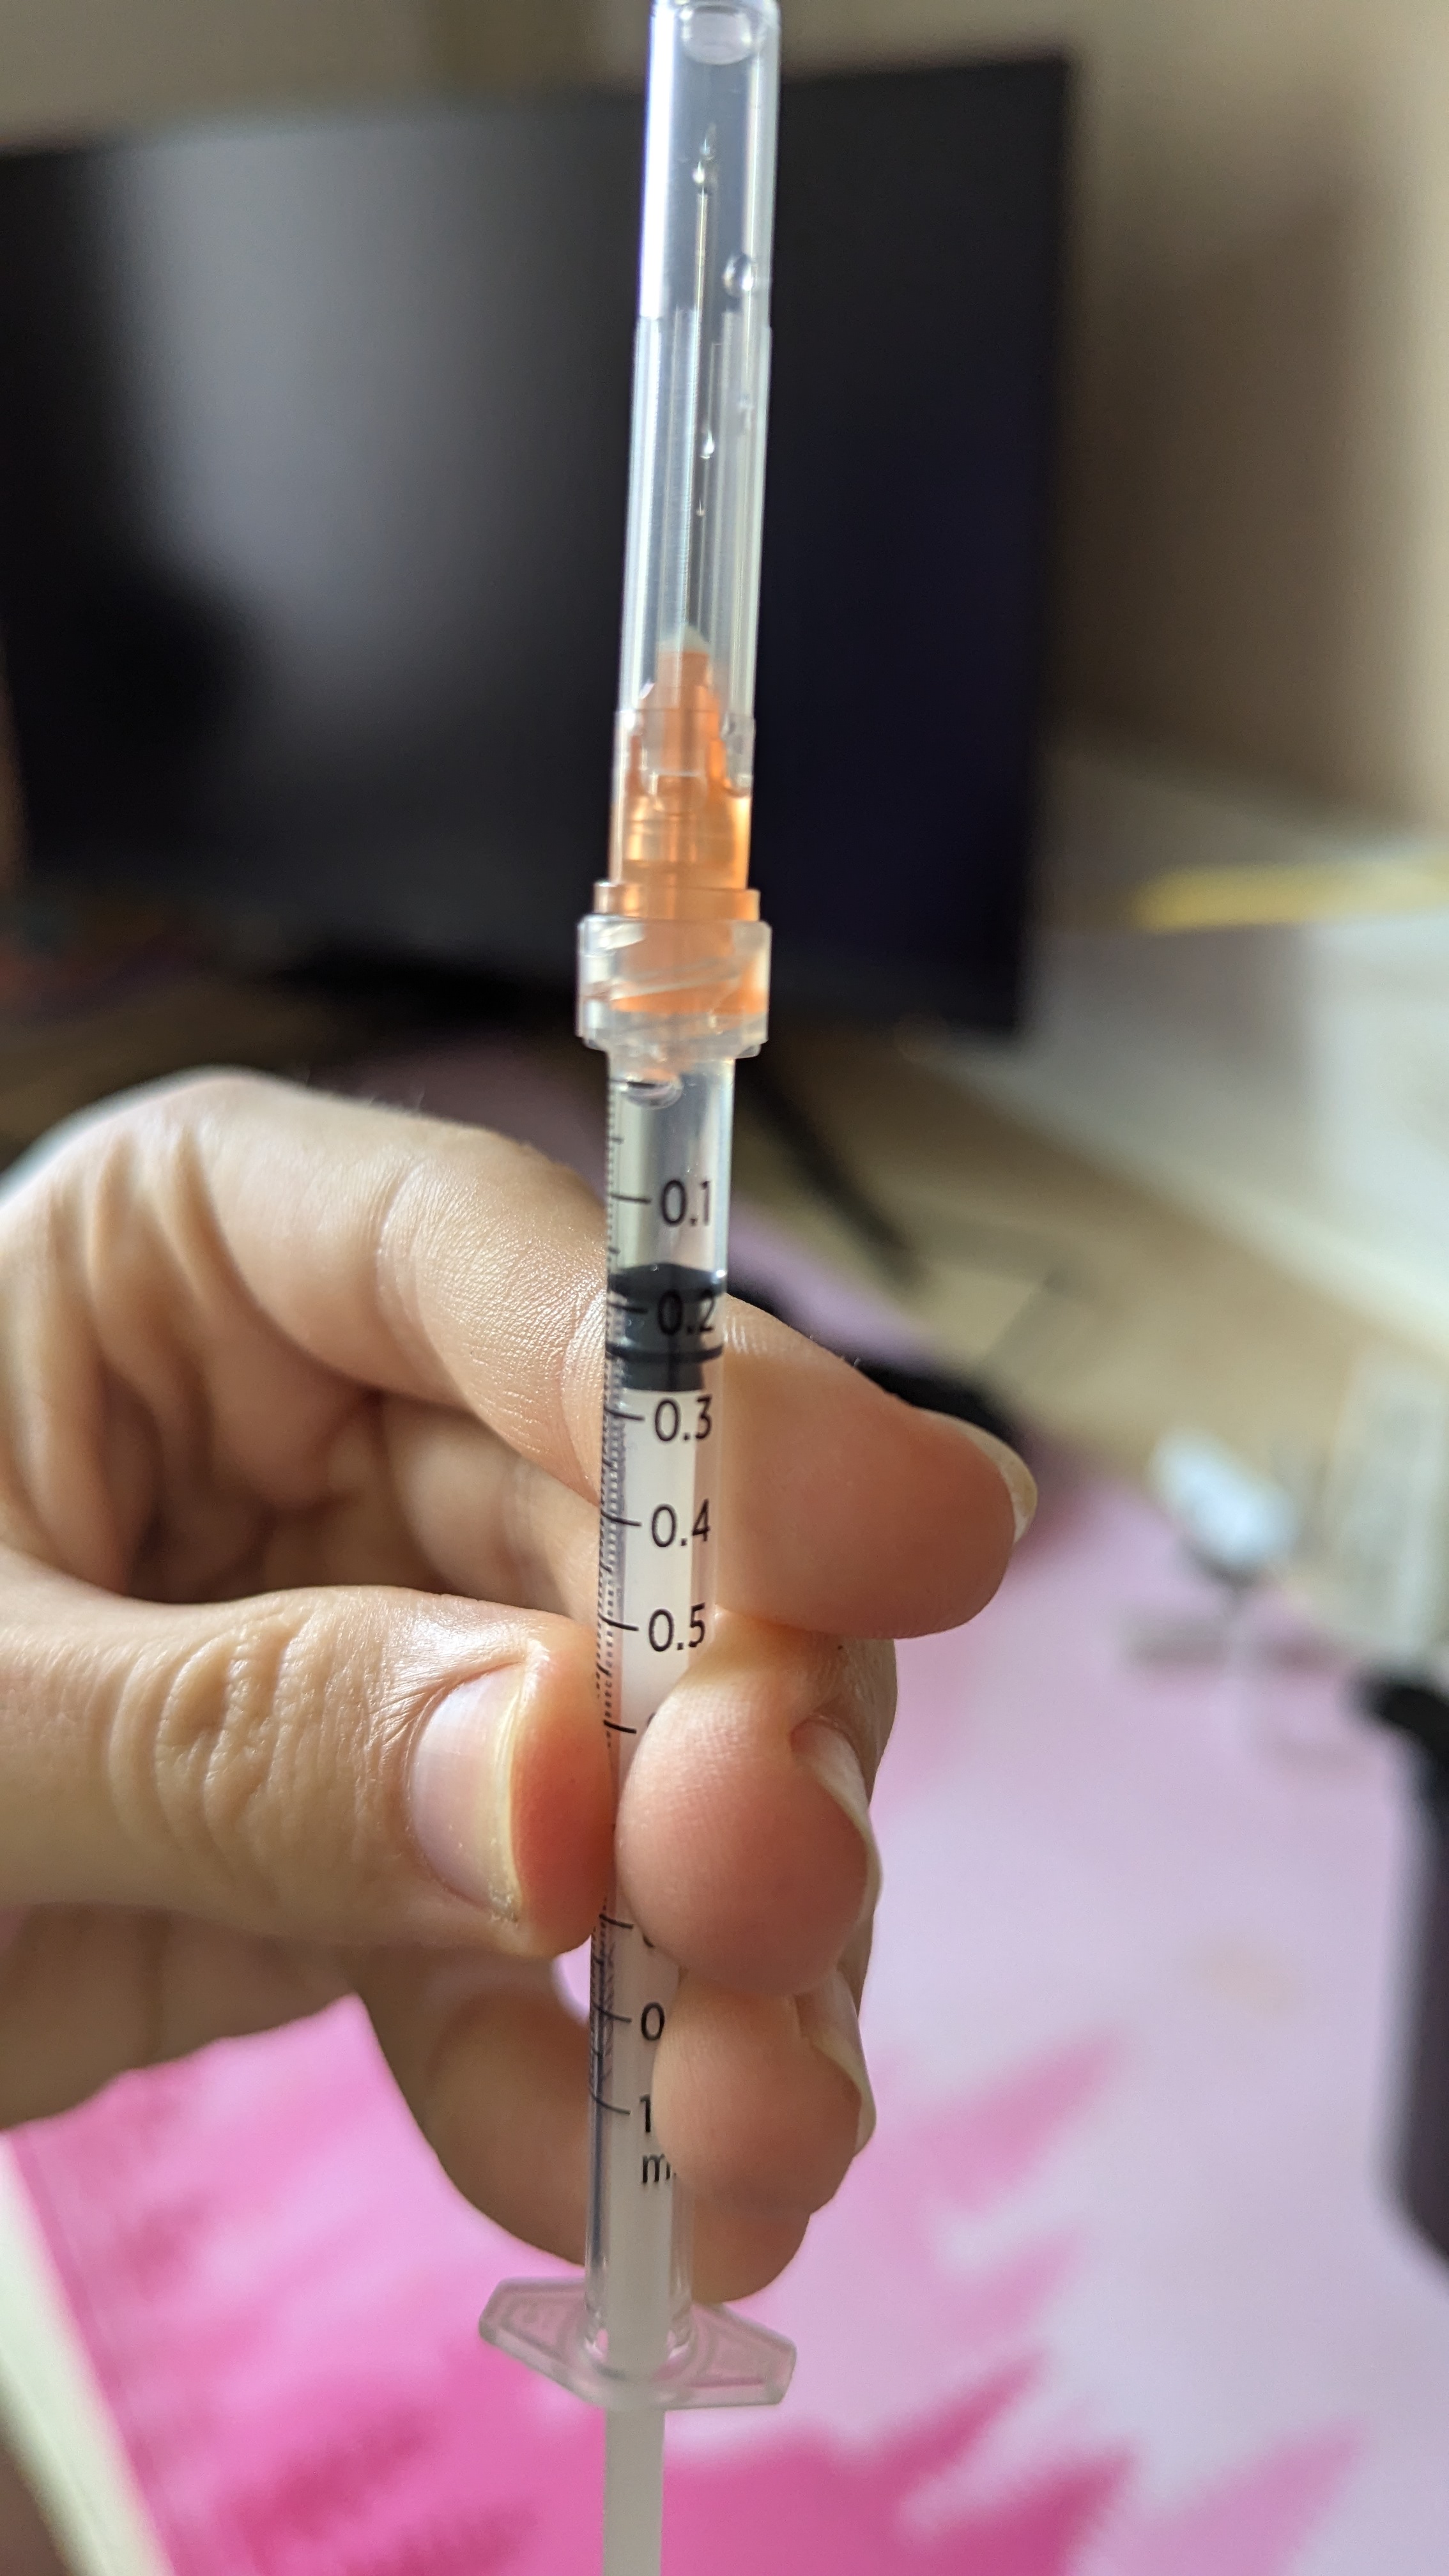
Note: You may see an air bubble push back into the syringe no matter how hard you try to keep it out. This is okay, don’t sweat it, assuming its ~pretty small. I’m not going to cover airlocking here, but a little air actually doesn’t hurt at all and can even be used to your advantage. The warnings you may hear about injecting air being potentially lethal are referring only to intravenous (into the bloodstream) injections, and are true, but not relevant for HRT injections, so don’t sweat it. You need to be as calm as you can manage for the injection! So being reassured about things that might just happen as you prep is good. The bubble pictured is totally chill:
Prep: The Injection Site
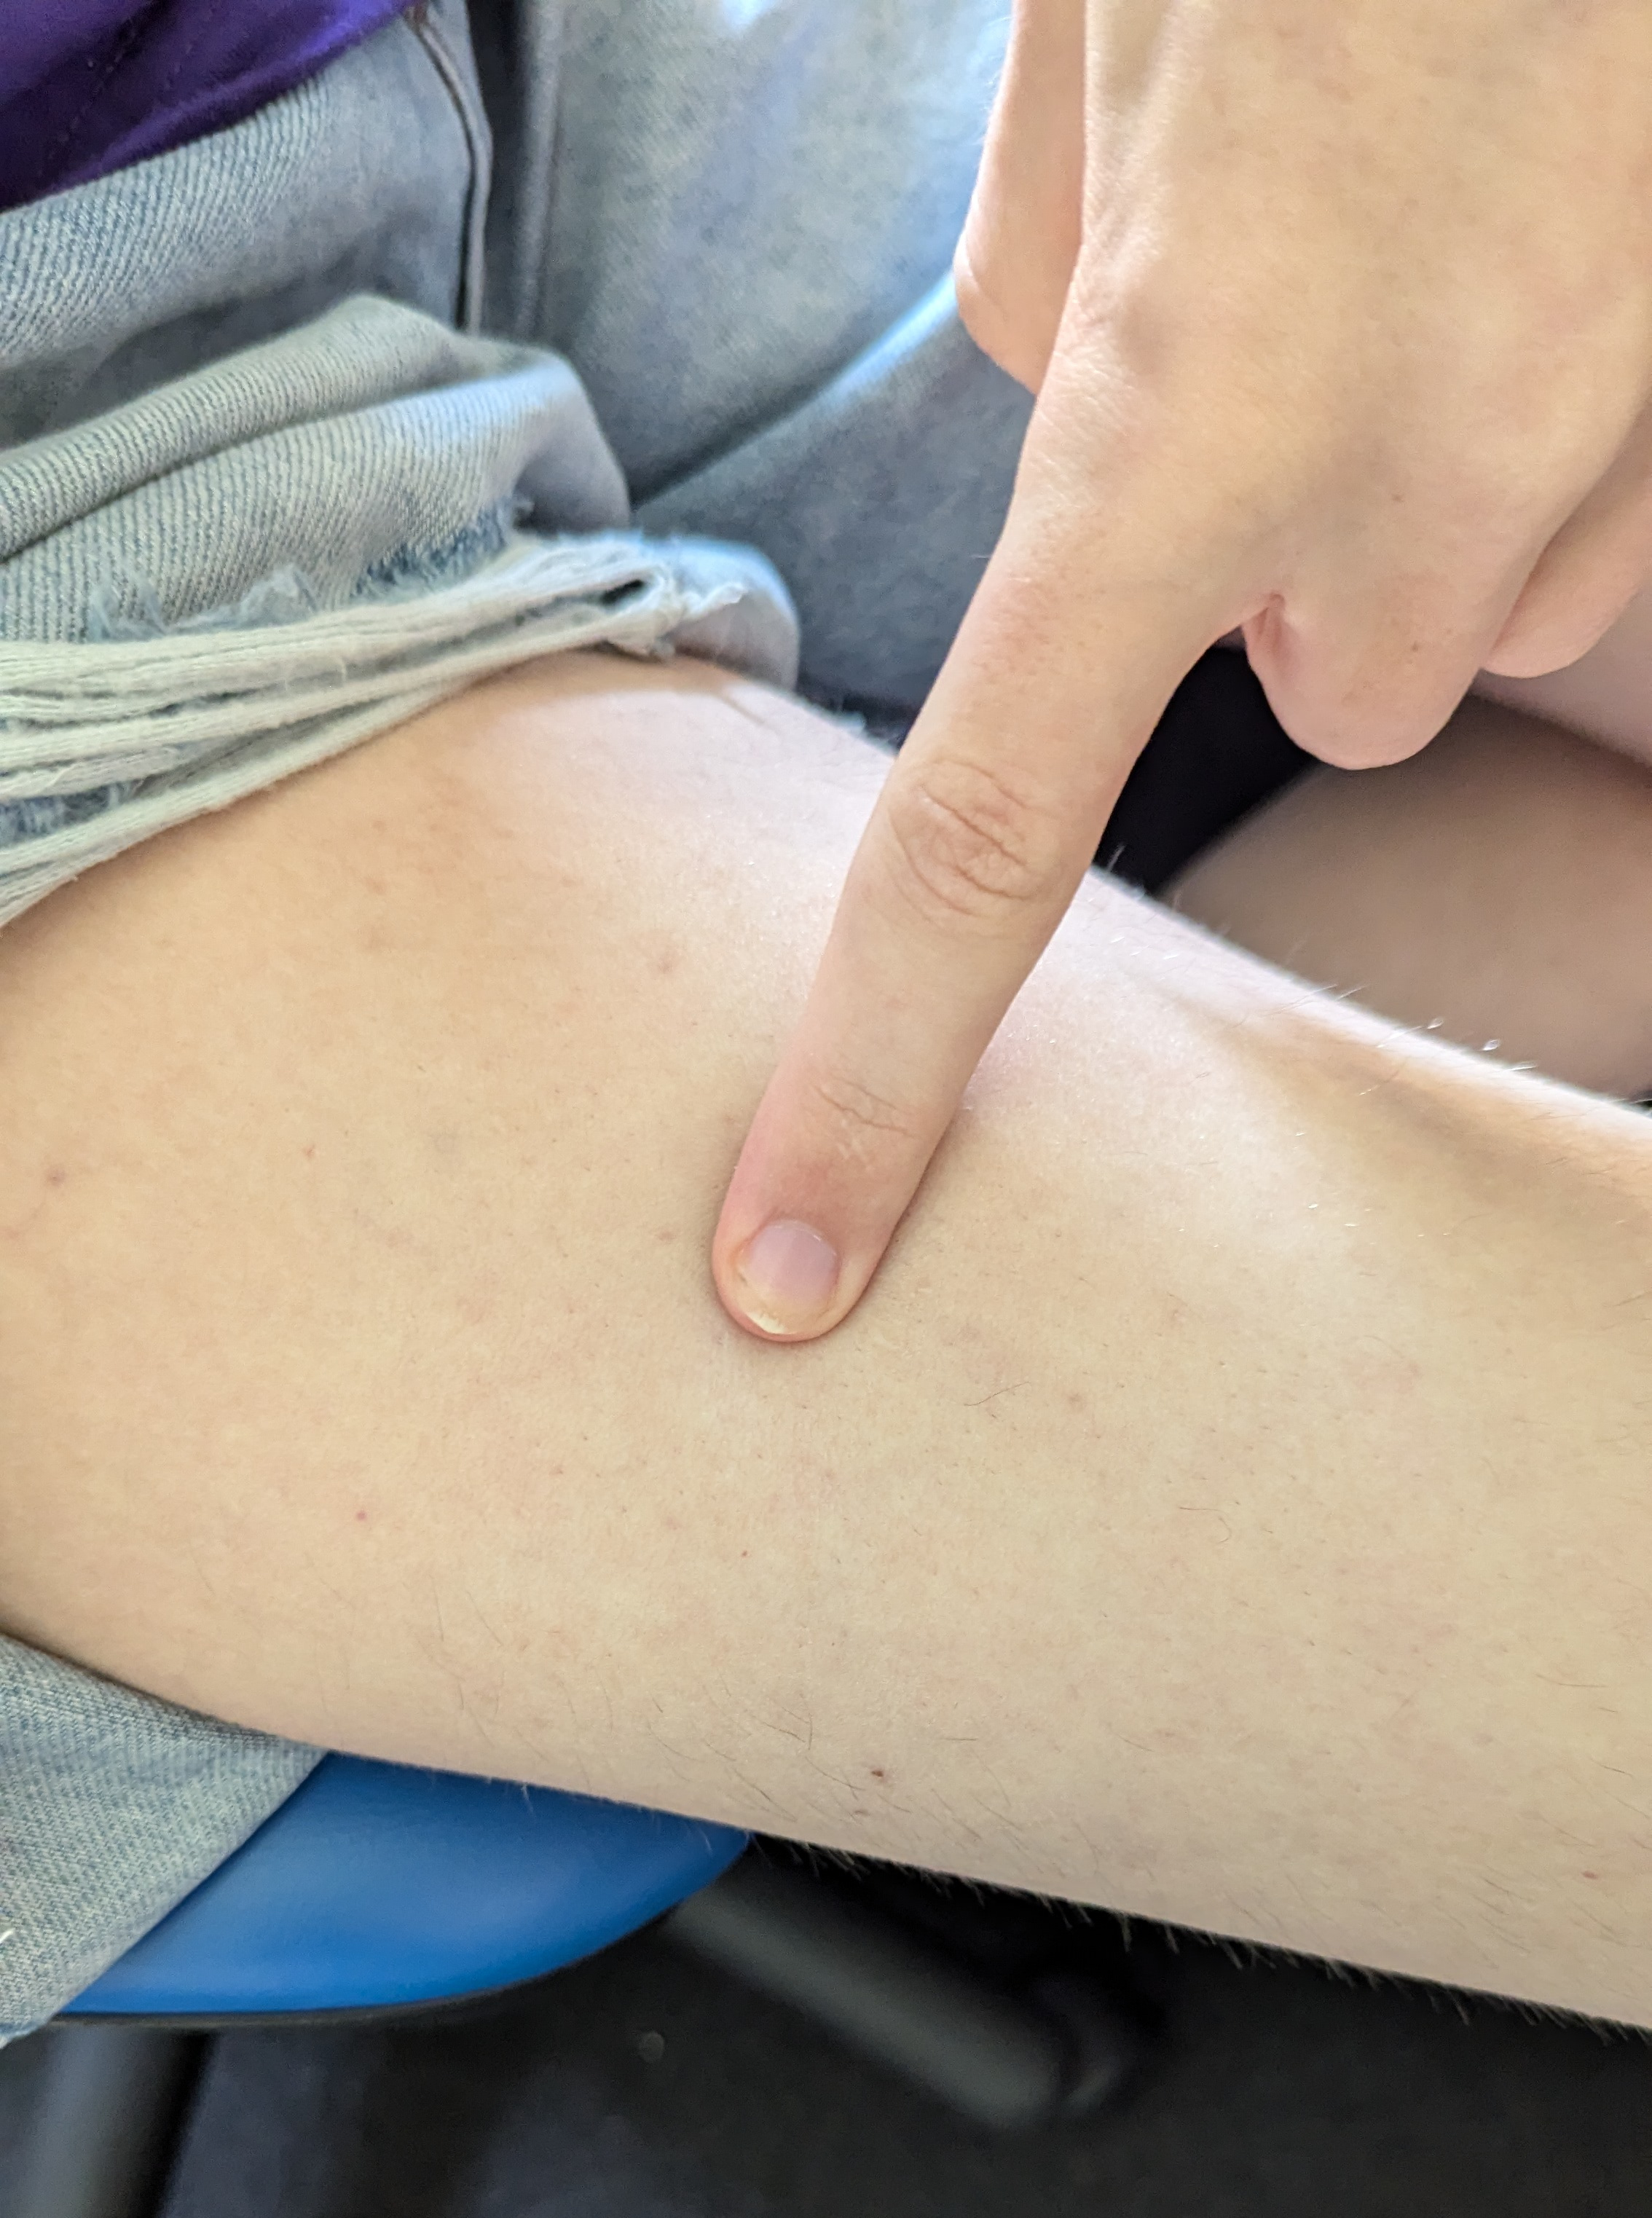
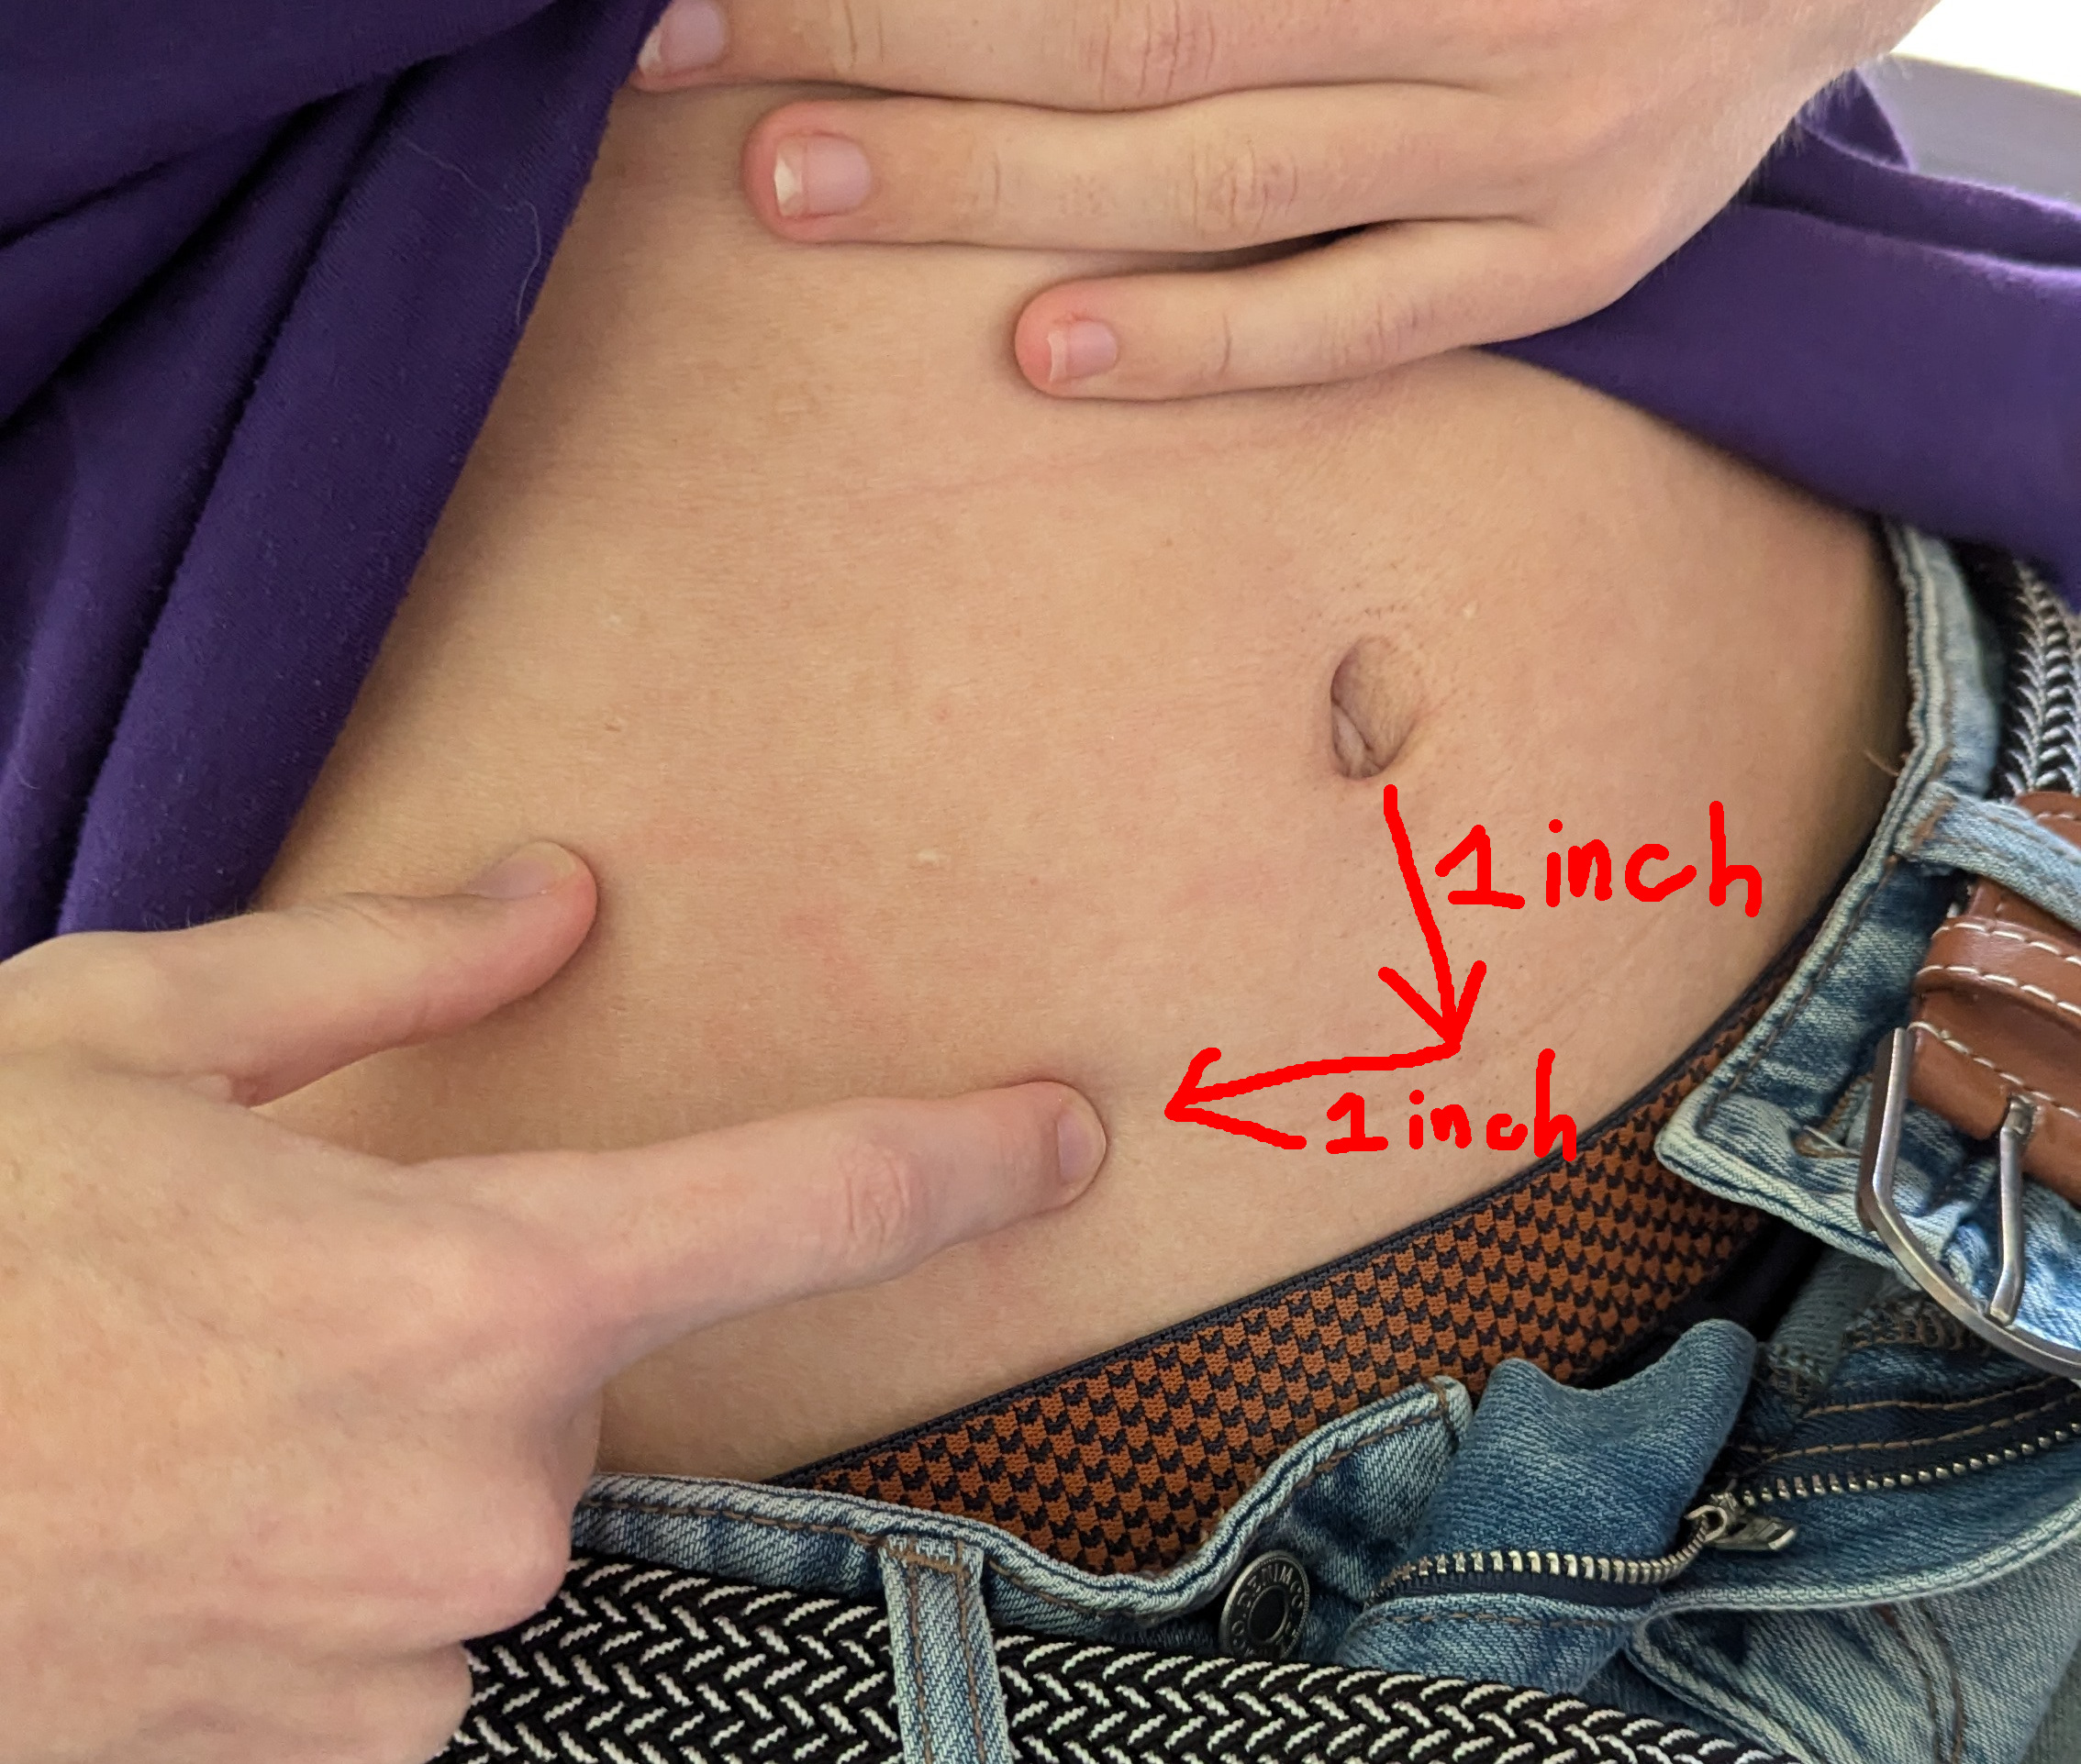
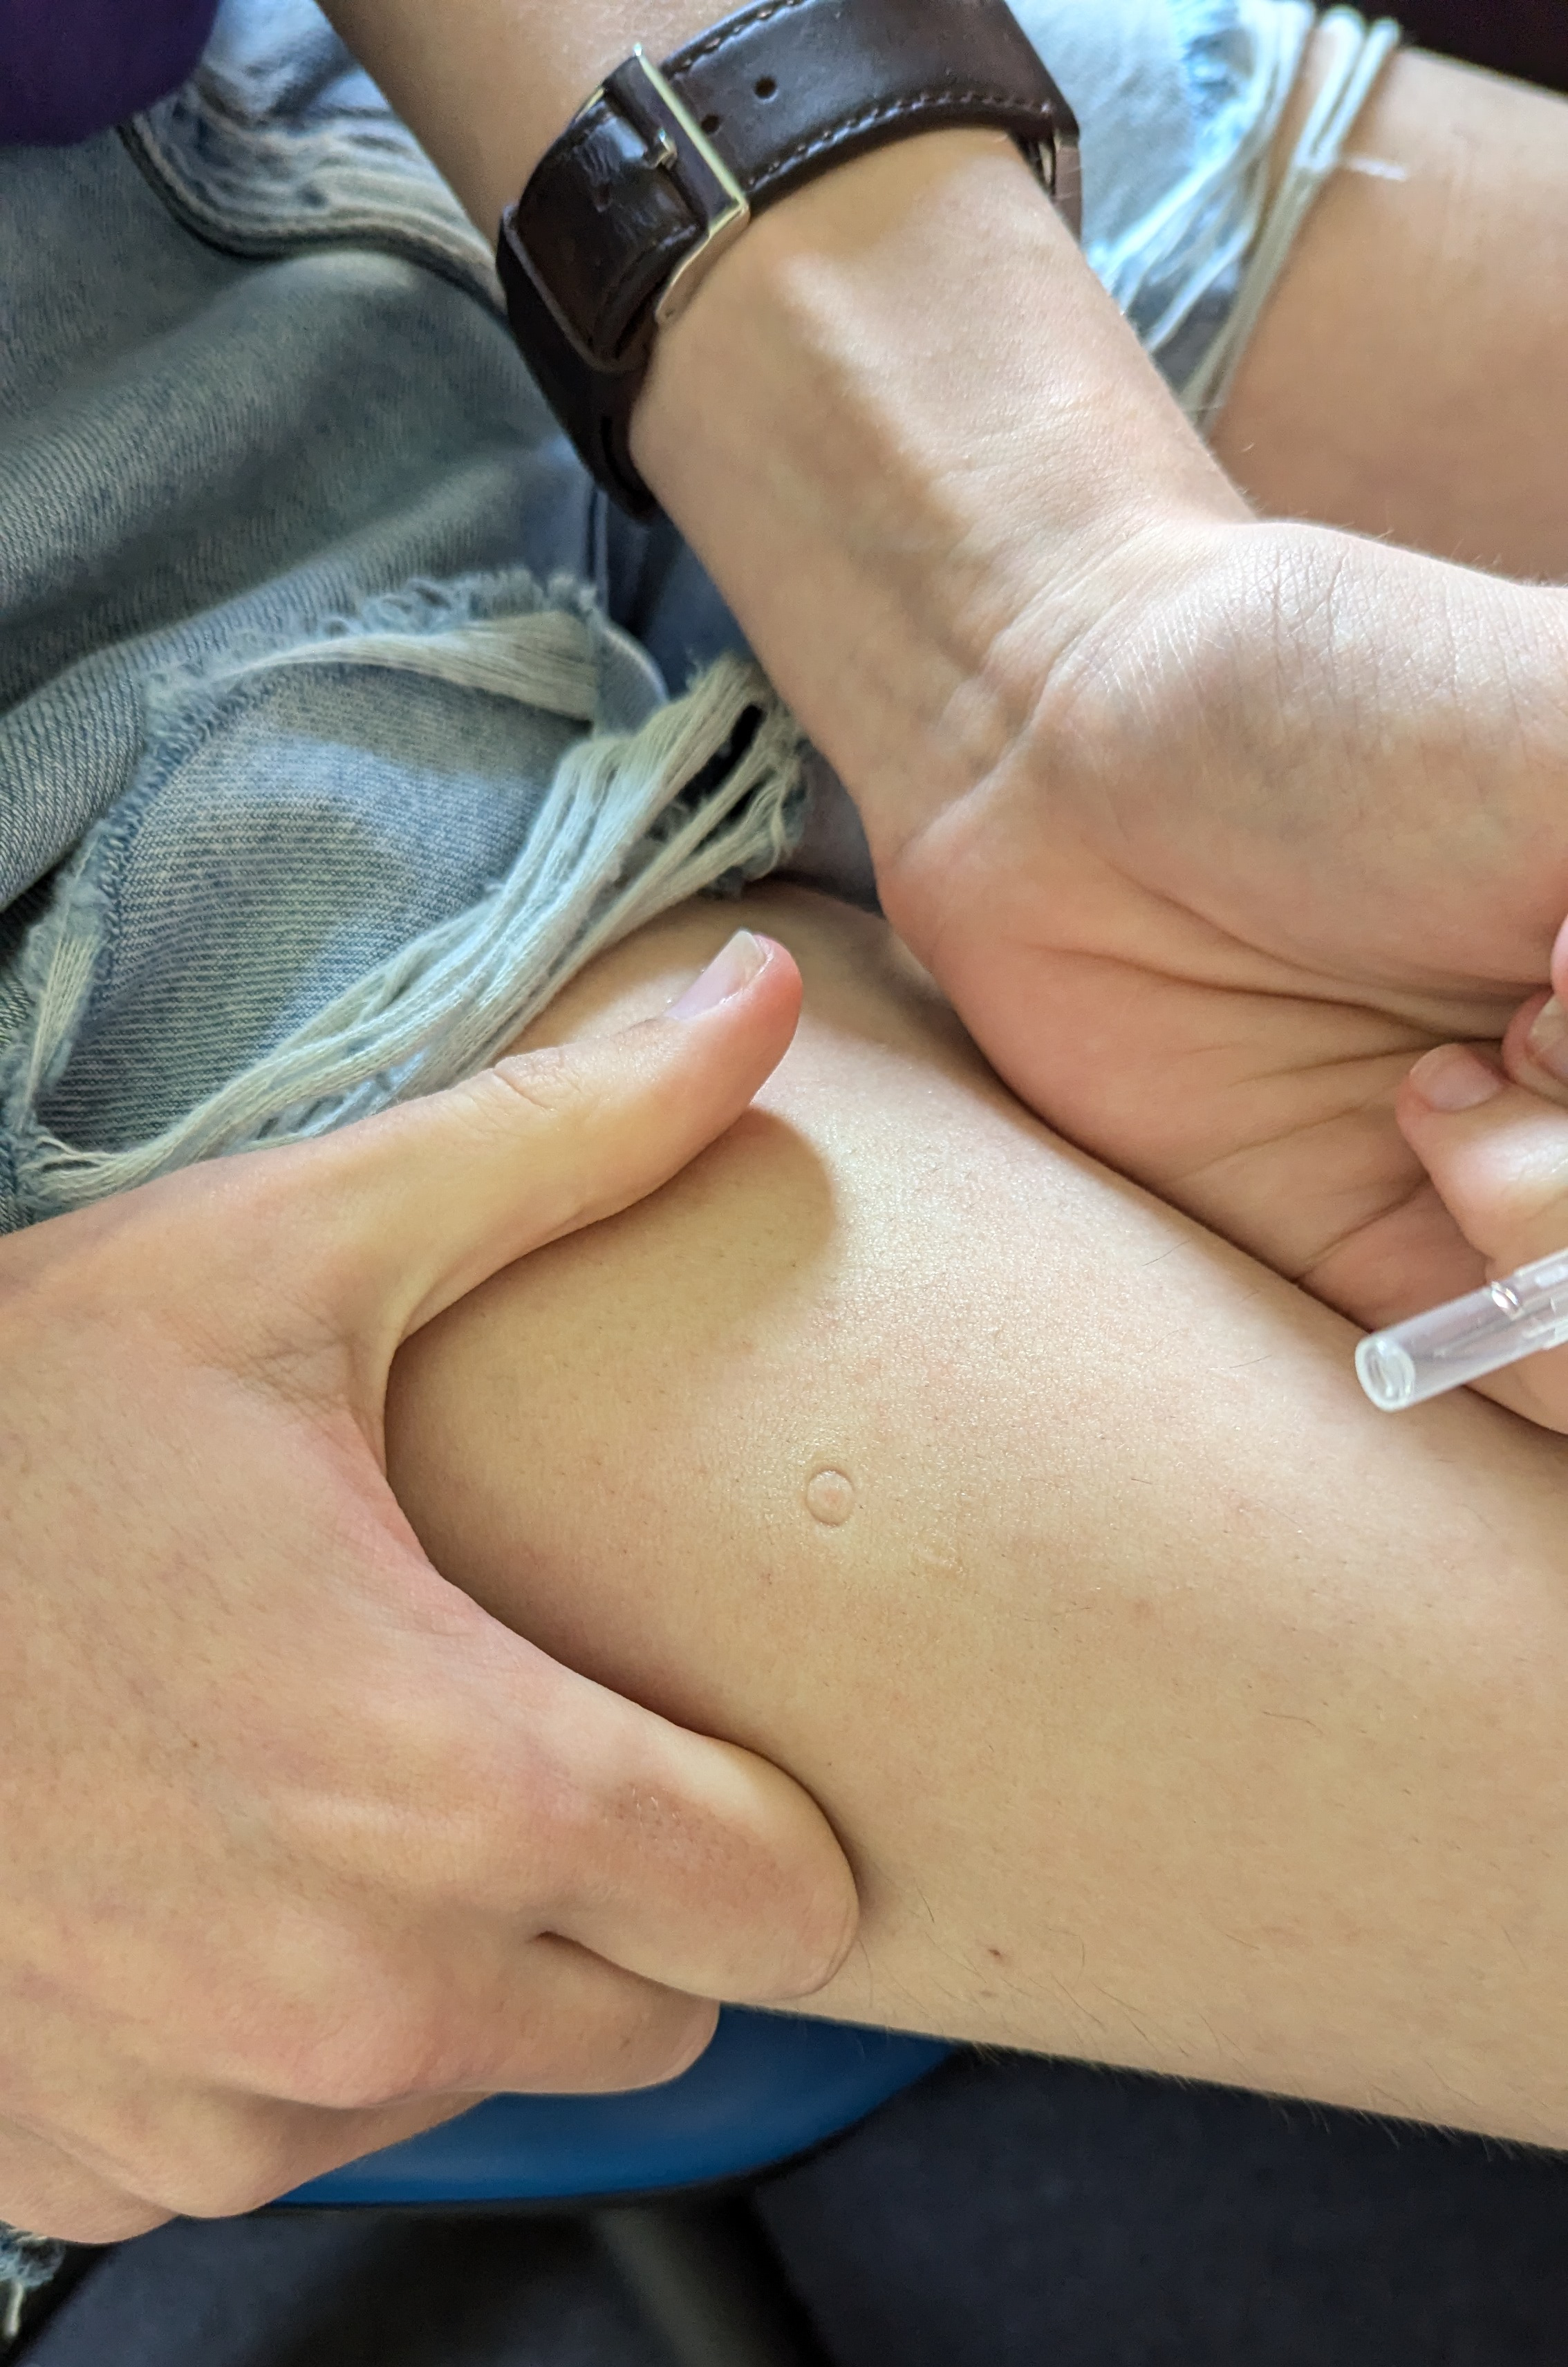
Now, you need to find your injection site. For intramuscular injections (which this guide is not about!) you should watch the Plume IM video linked above, as you really need to watch someone do this I think. For subcutaneous injections, your injection sites are the tummy and thighs. On your tummy, you go from your belly button down one inch and to the left/right one inch. On your thighs, you basically just want anywhere you can grab a good fold of fatty skin. I find that I just kinda go for a suitable spot on my thighs naturally, so see where on my thigh I’m doing it in these pictures:
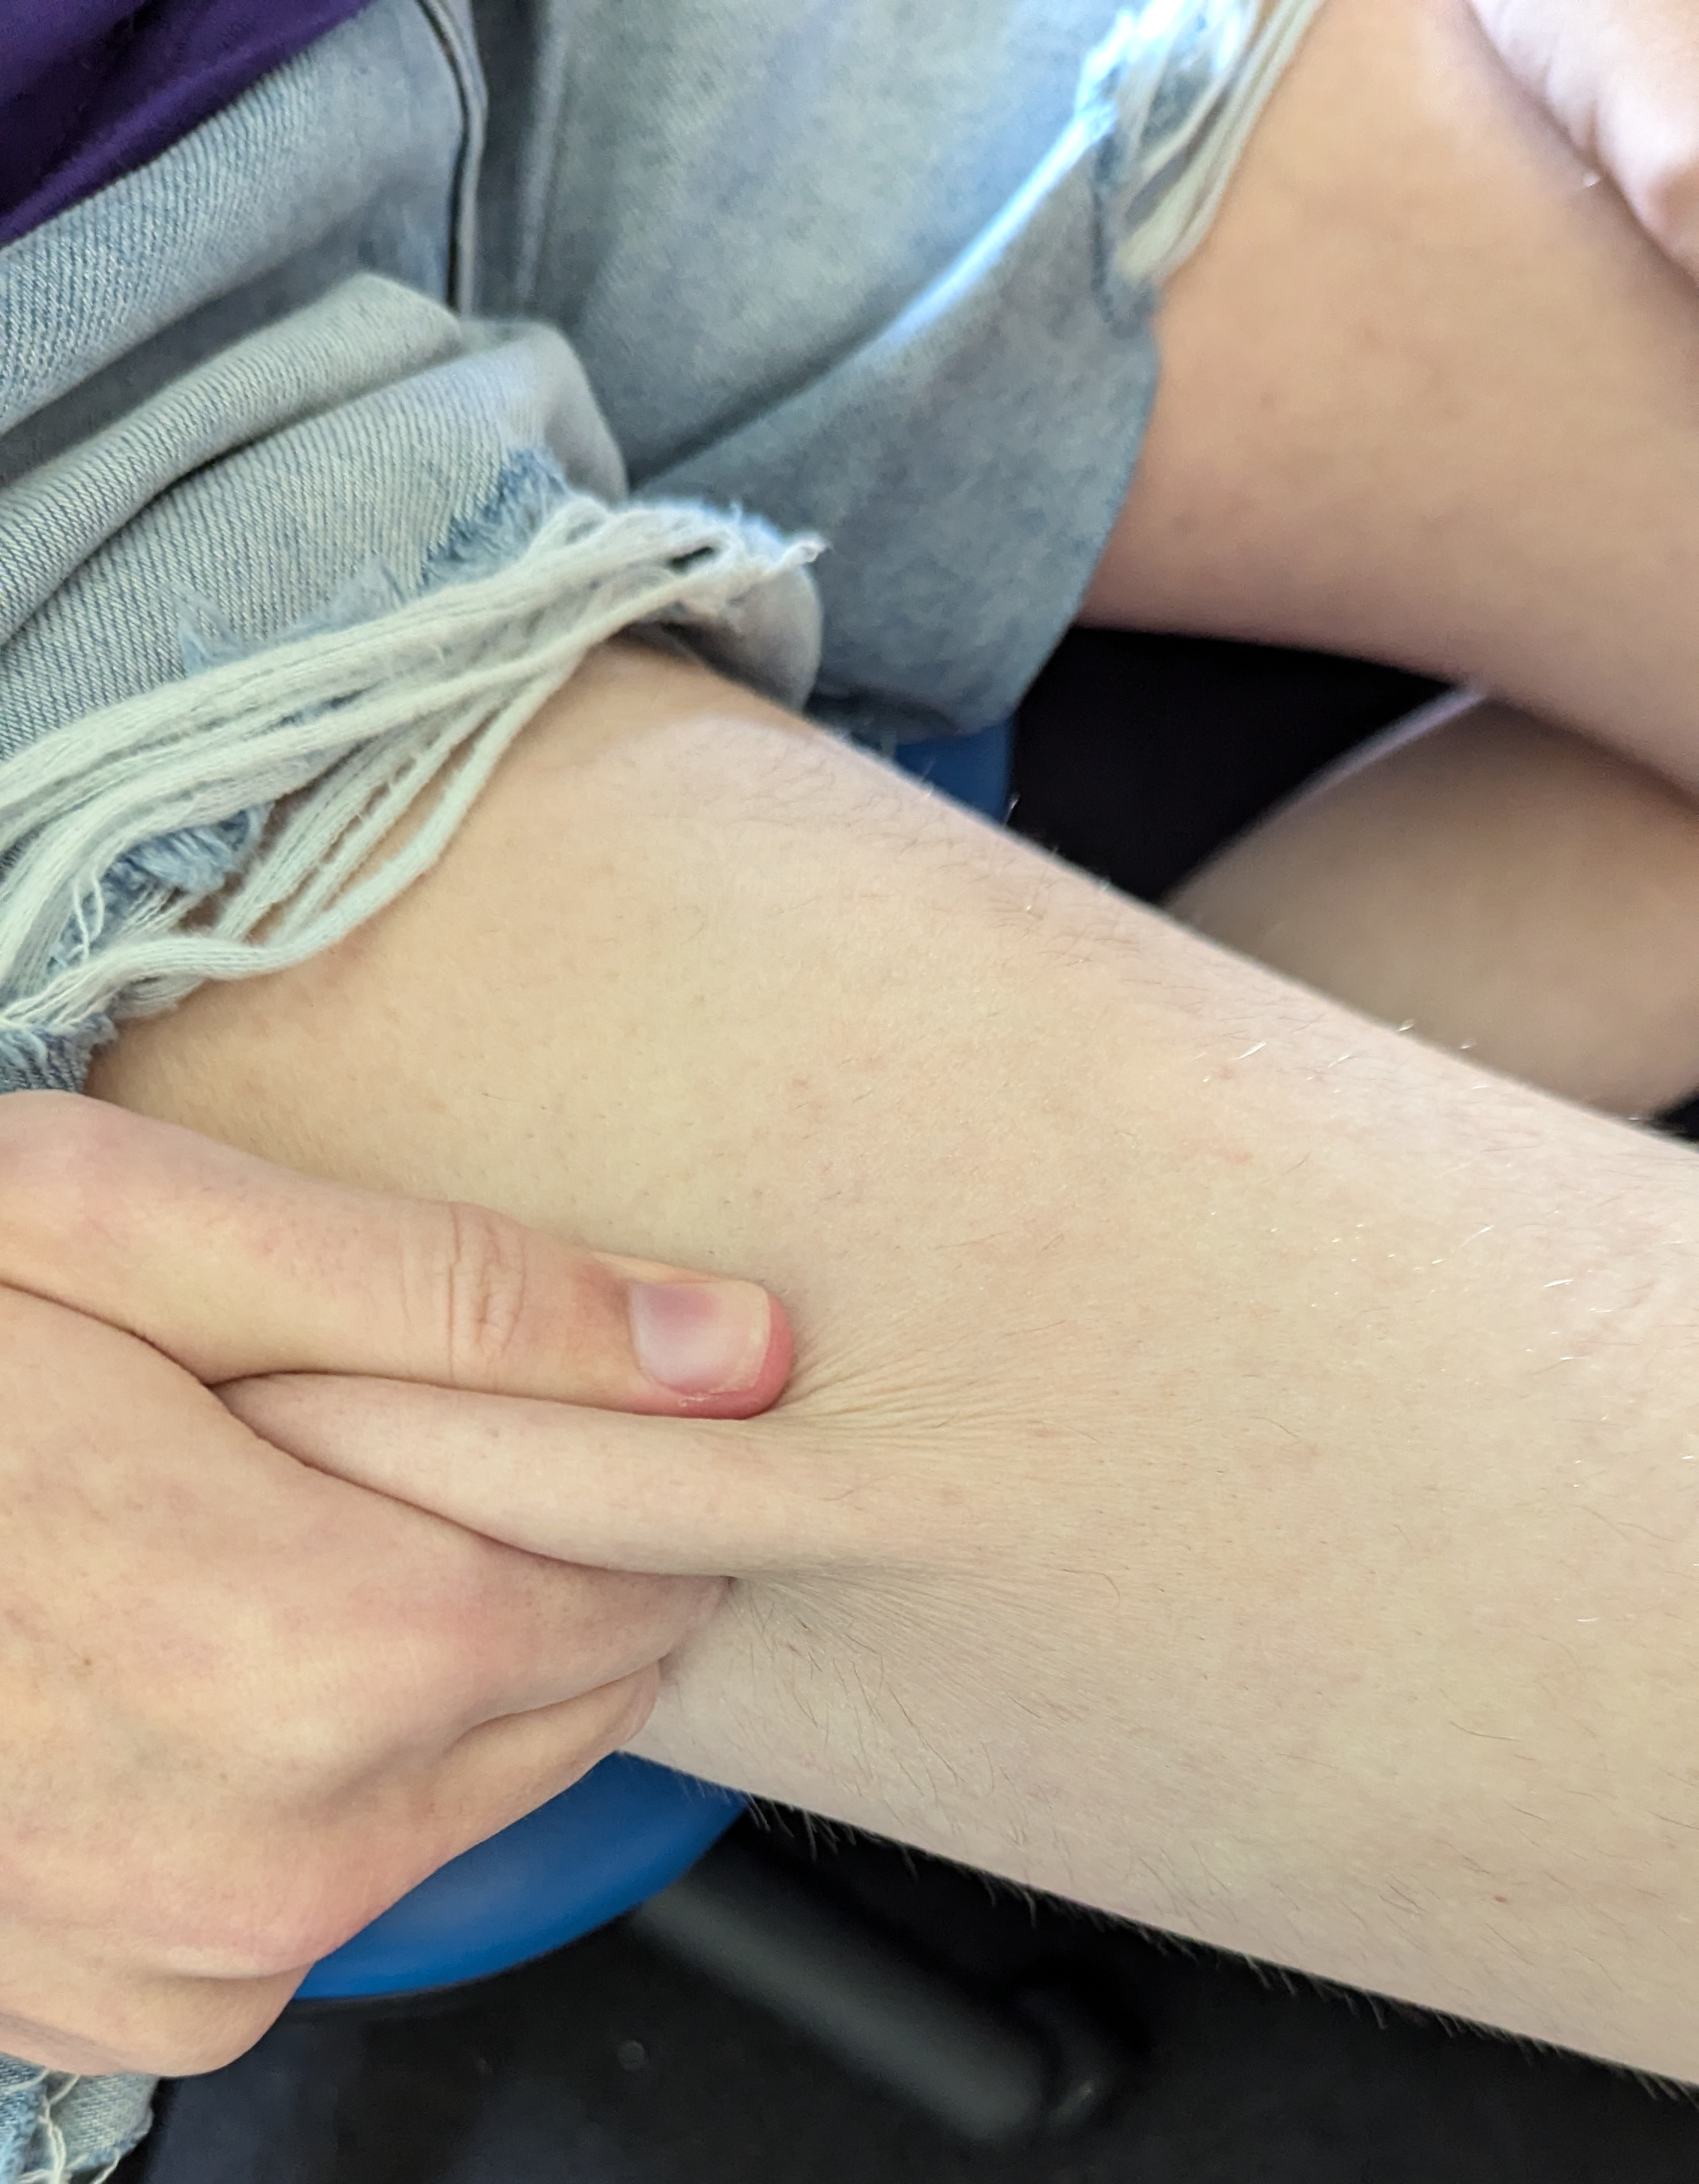
You’ll want to rotate sites each time - so if you did the left side last time do the right side this time, or perhaps rotate between tummy and thigh. My personal recommendation is not to bother with the tummy, it’s less lenient to find your spot, and it hurts and bleeds more if you mess up.
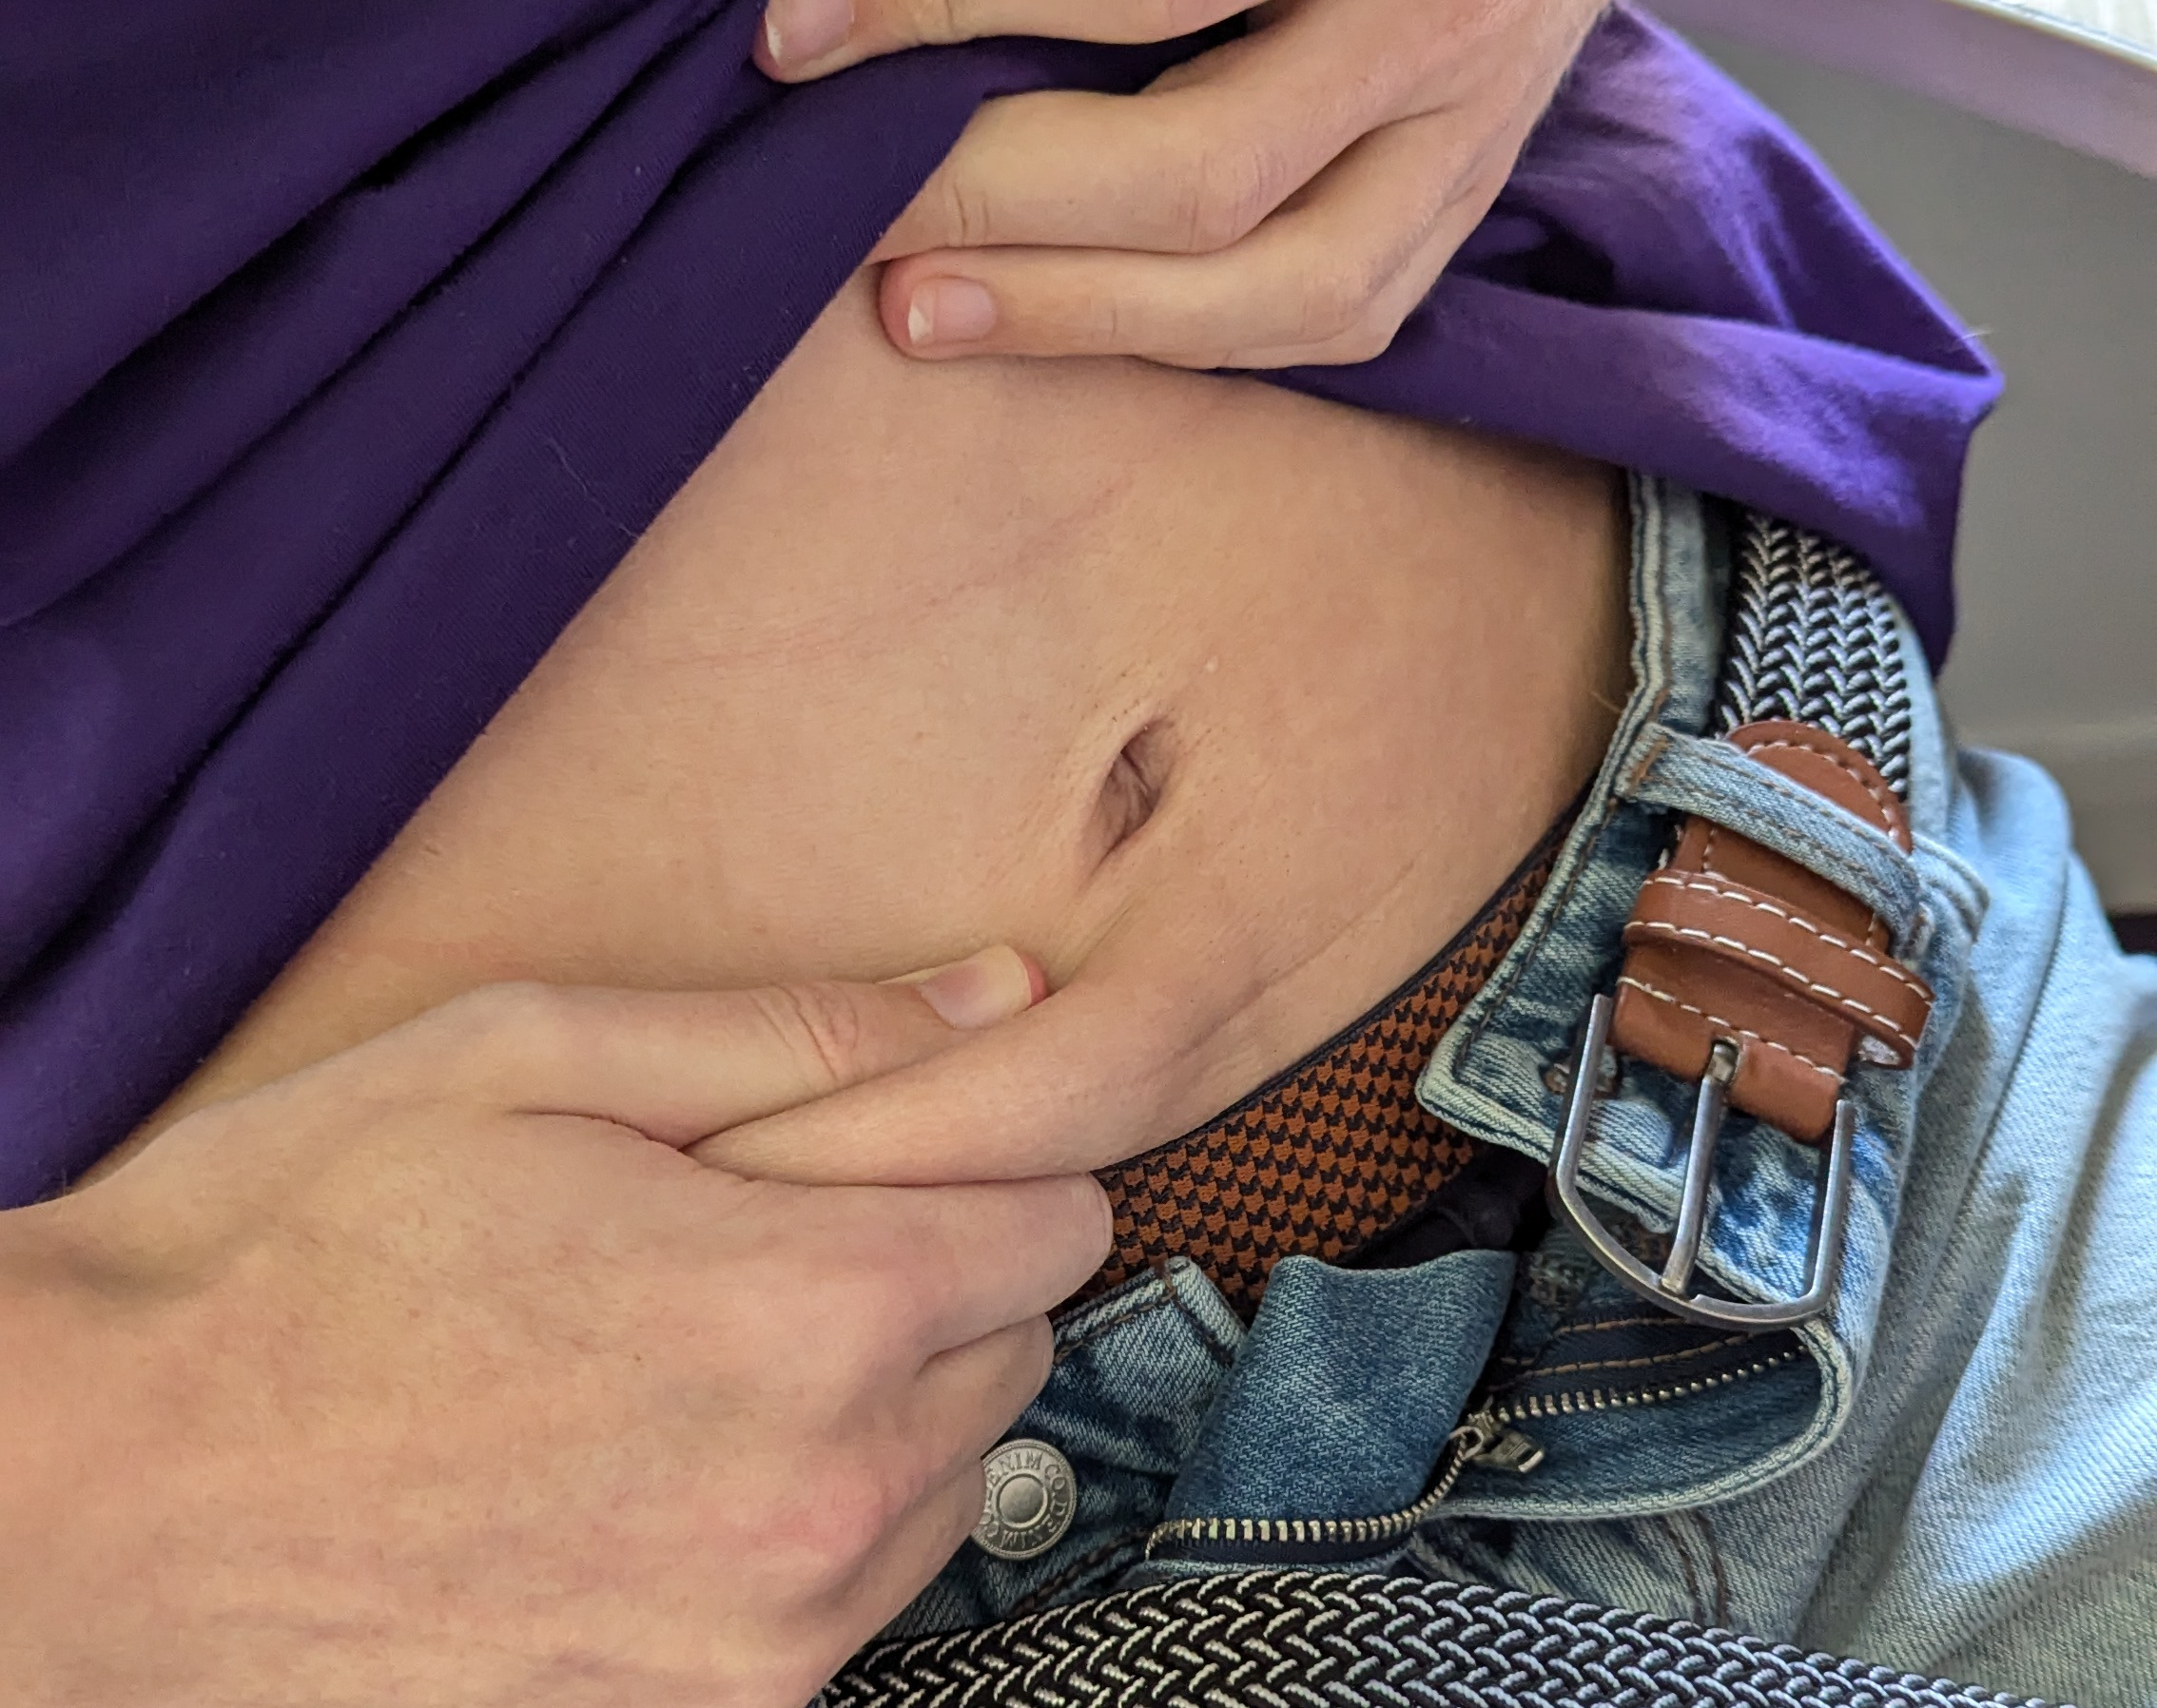
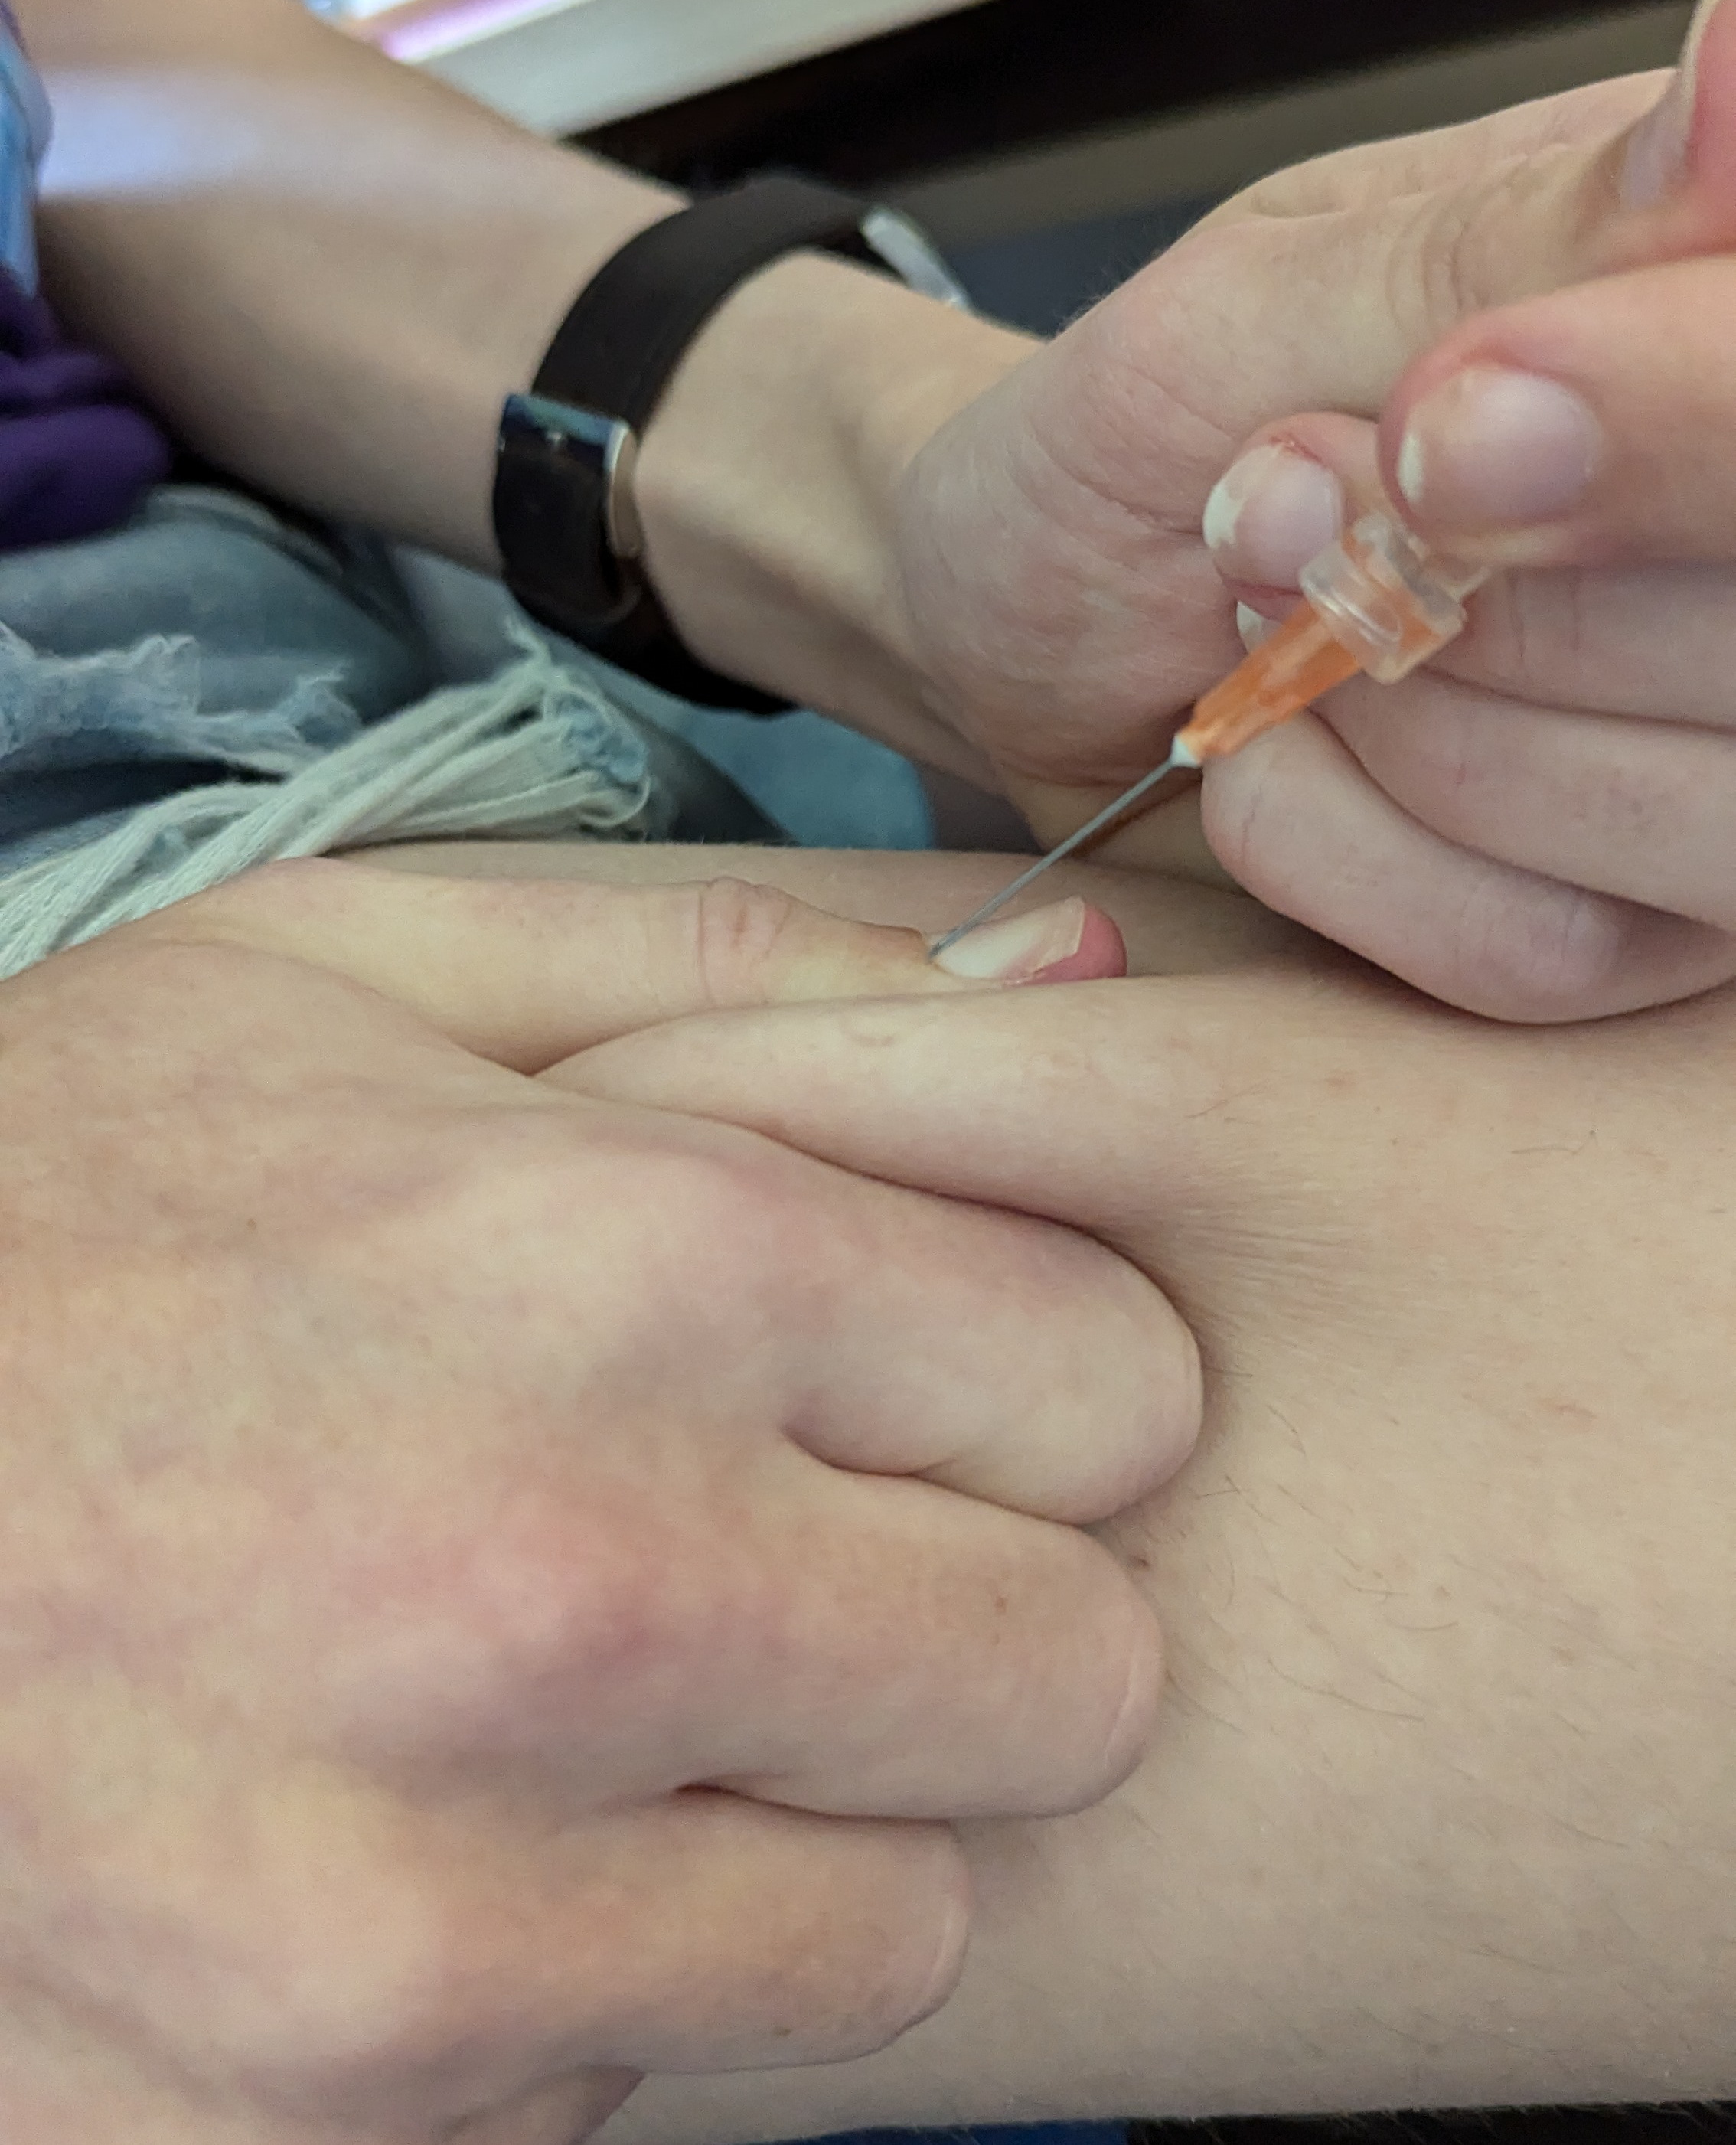
Now, grab a fold of skin, like I have in the picture above. You want it to be as much as you can manage to grab really, it needs to be enough to put the needle into the site and it to stay entirely within the fold you have grabbed. Now, to give yourself a clear visual target, take the syringe and needle STILL IN ITS CAP and push it relatively hard into the fold of skin as shown in the picture. Yes, this step will hurt a bit, actually more than the injection itself, but the point here is to leave a nice clear circular mark so that you can see exactly where your injection site is. This is harmless as long as you don’t go overboard!
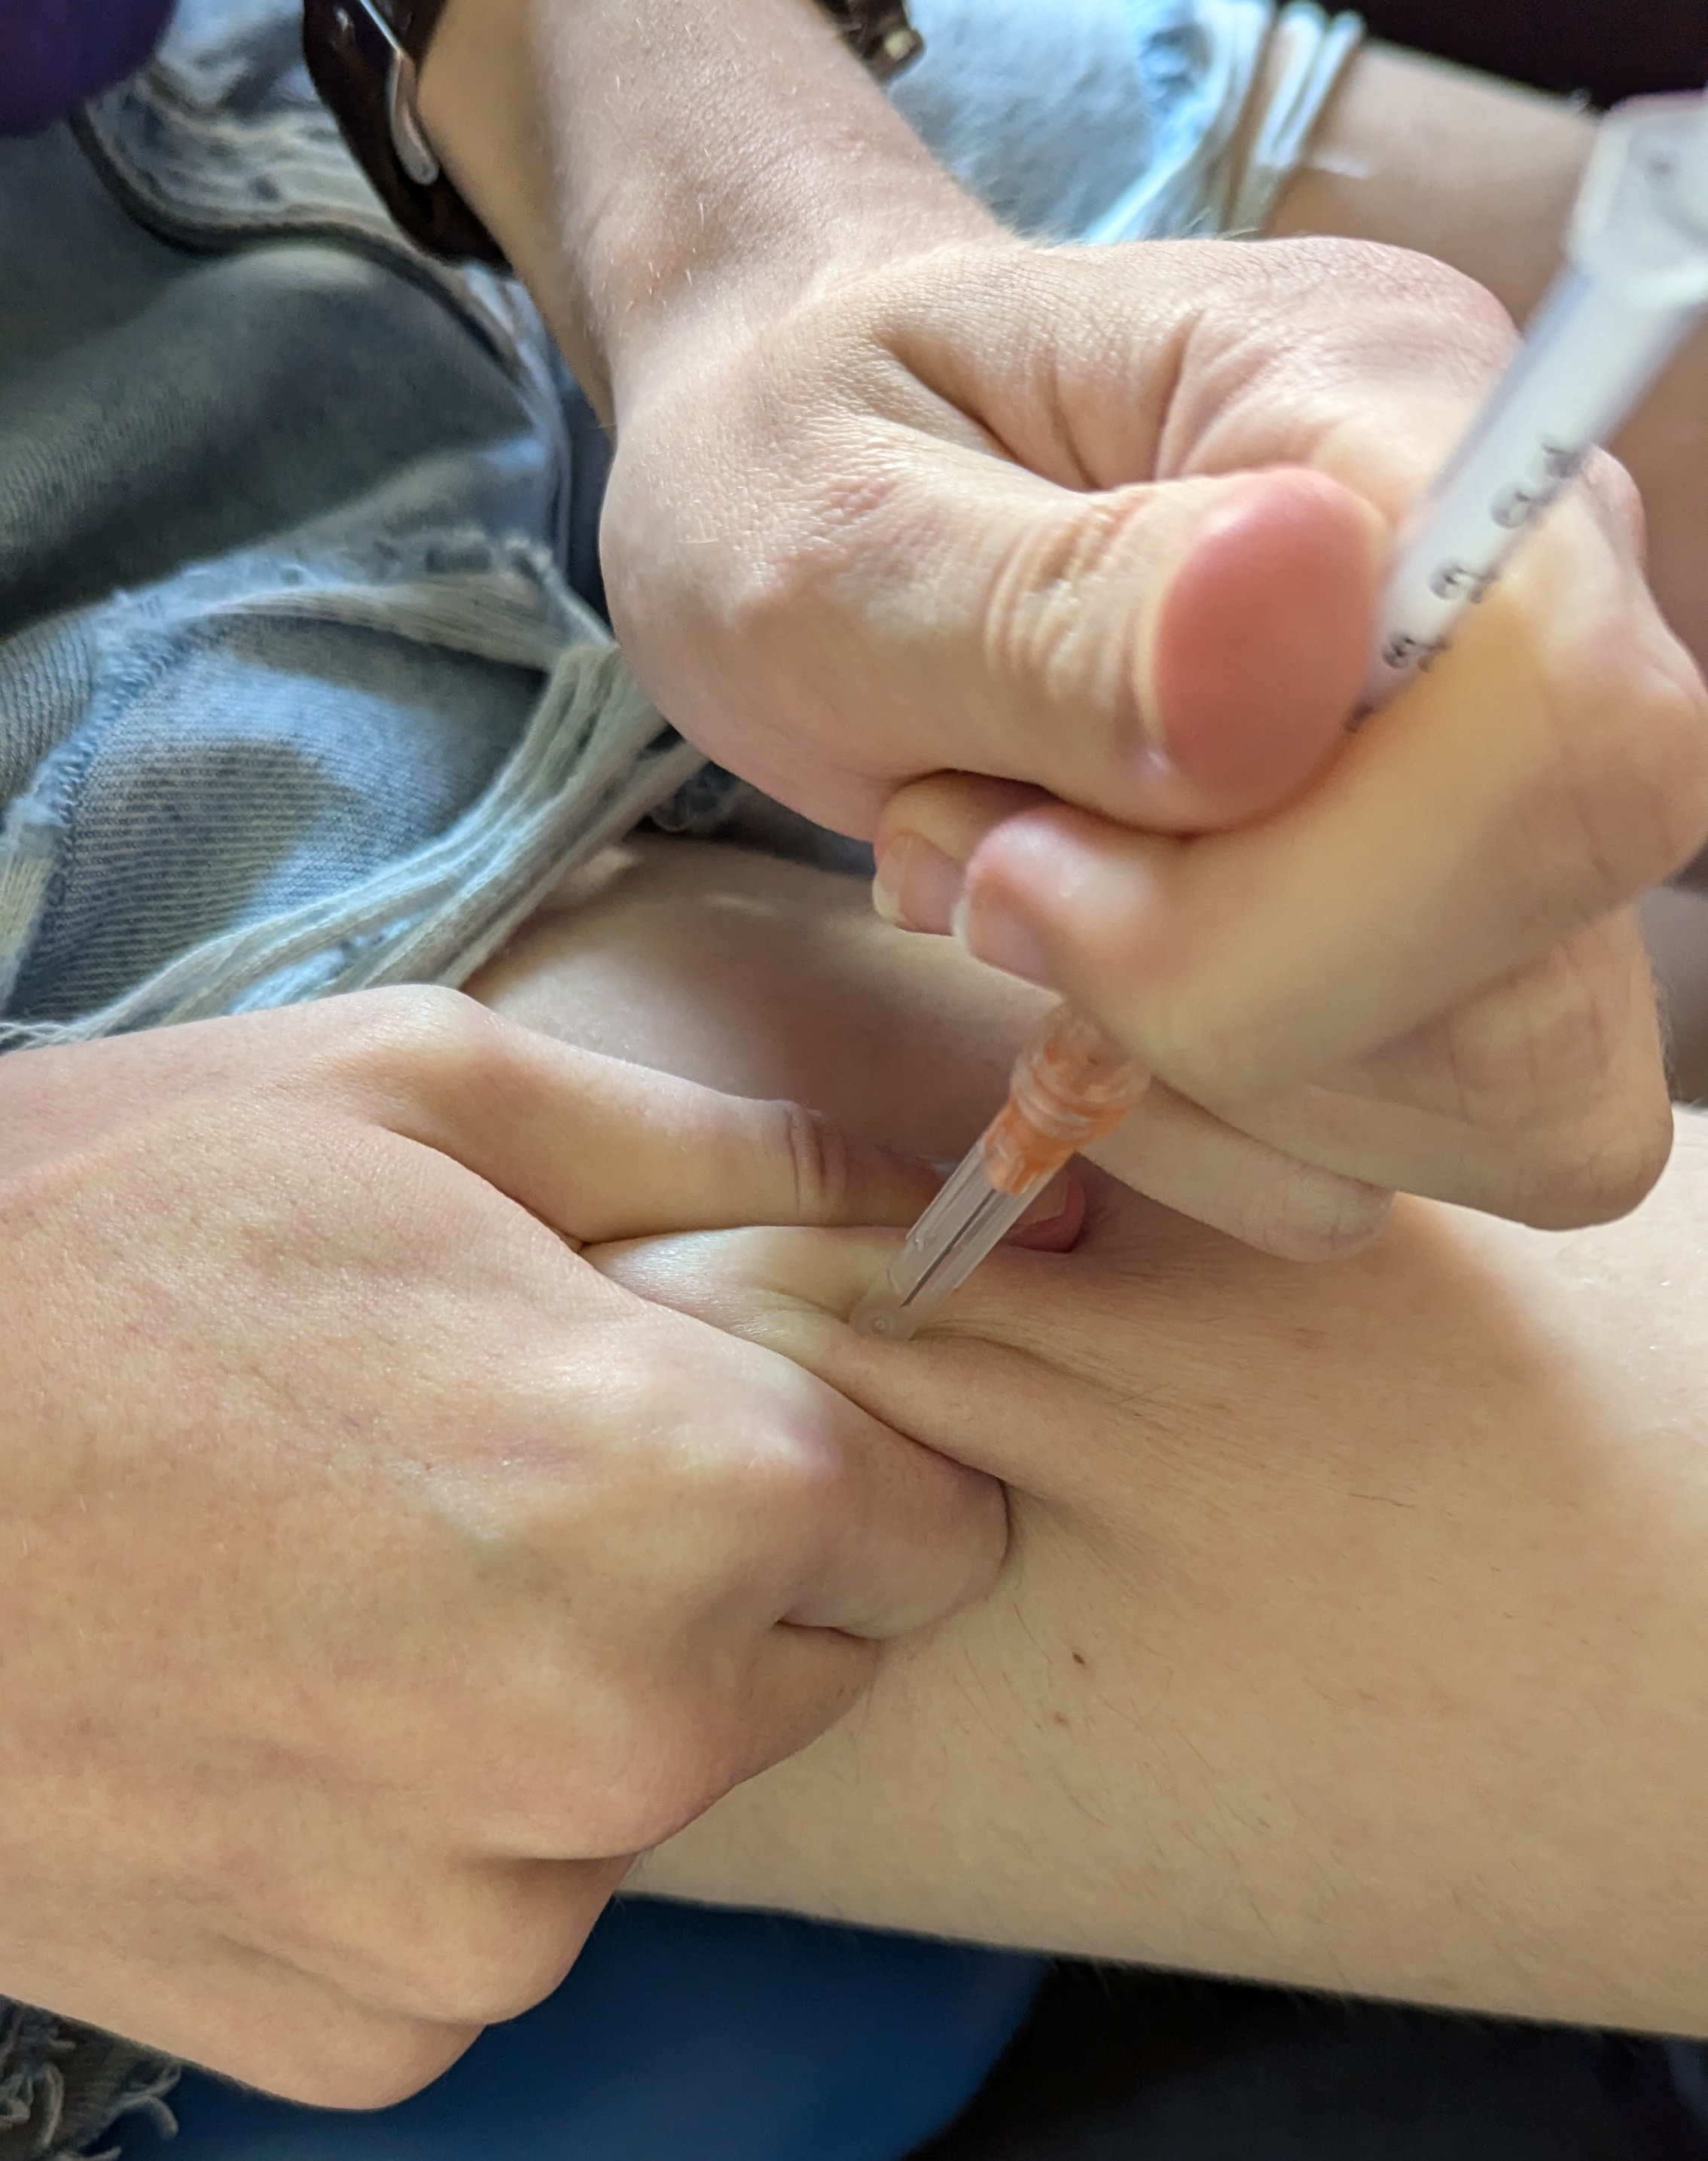
Now you can let go of the fold of skin and put your syringe down. Take the second alcohol swab out of its packet, and you want to do a single spiral motion outwards from the middle of the site. Watch the videos linked at the top of the page for a proper demo of this.
Finally, get a plaster ready to go. Take it out of its packaging, maybe peel back some of the backing paper and have it ready on the desk to put on after you’ve done your injection.
Now your injection site is sterilised, take a deep breath, get yourself calm, put on piano music if you need to, because it’s time for the big moment.
Injecting
A quick note before I start this step: I was a little silly and misread when I was buying needle supplies last, so my injection needles are about twice as long as I actually want for injecting. As a result of this, when you look at the pictures of me injecting here, you’ll see about half the length of the needle still outside the skin. You should not copy that assuming your needles are the size recommended in the “Stuff You’ll Need” section. Your needles should go all the way down to the skin as you inject, like you see in the Plume demonstration video linked at the top of the page.
And a final reminder: this guide is not for intramuscular (IM) injections. If you are not injecting subcutaneously, please watch the Plume video and then skip to “Post-Injection Routine”.
Alright! You’ve got your fresh needle and syringe with the perfect amount of medication in it all prepped, you’ve found, marked, and sterilised your injection site, make sure you’ve calmed your nerves as much as possible (again, feel free to hand off this part of the guide to a trusted friend to deliver your injection if you are too nervous or otherwise shaky to bear to do this for yourself, especially if it’s your first time). It’s time to inject.
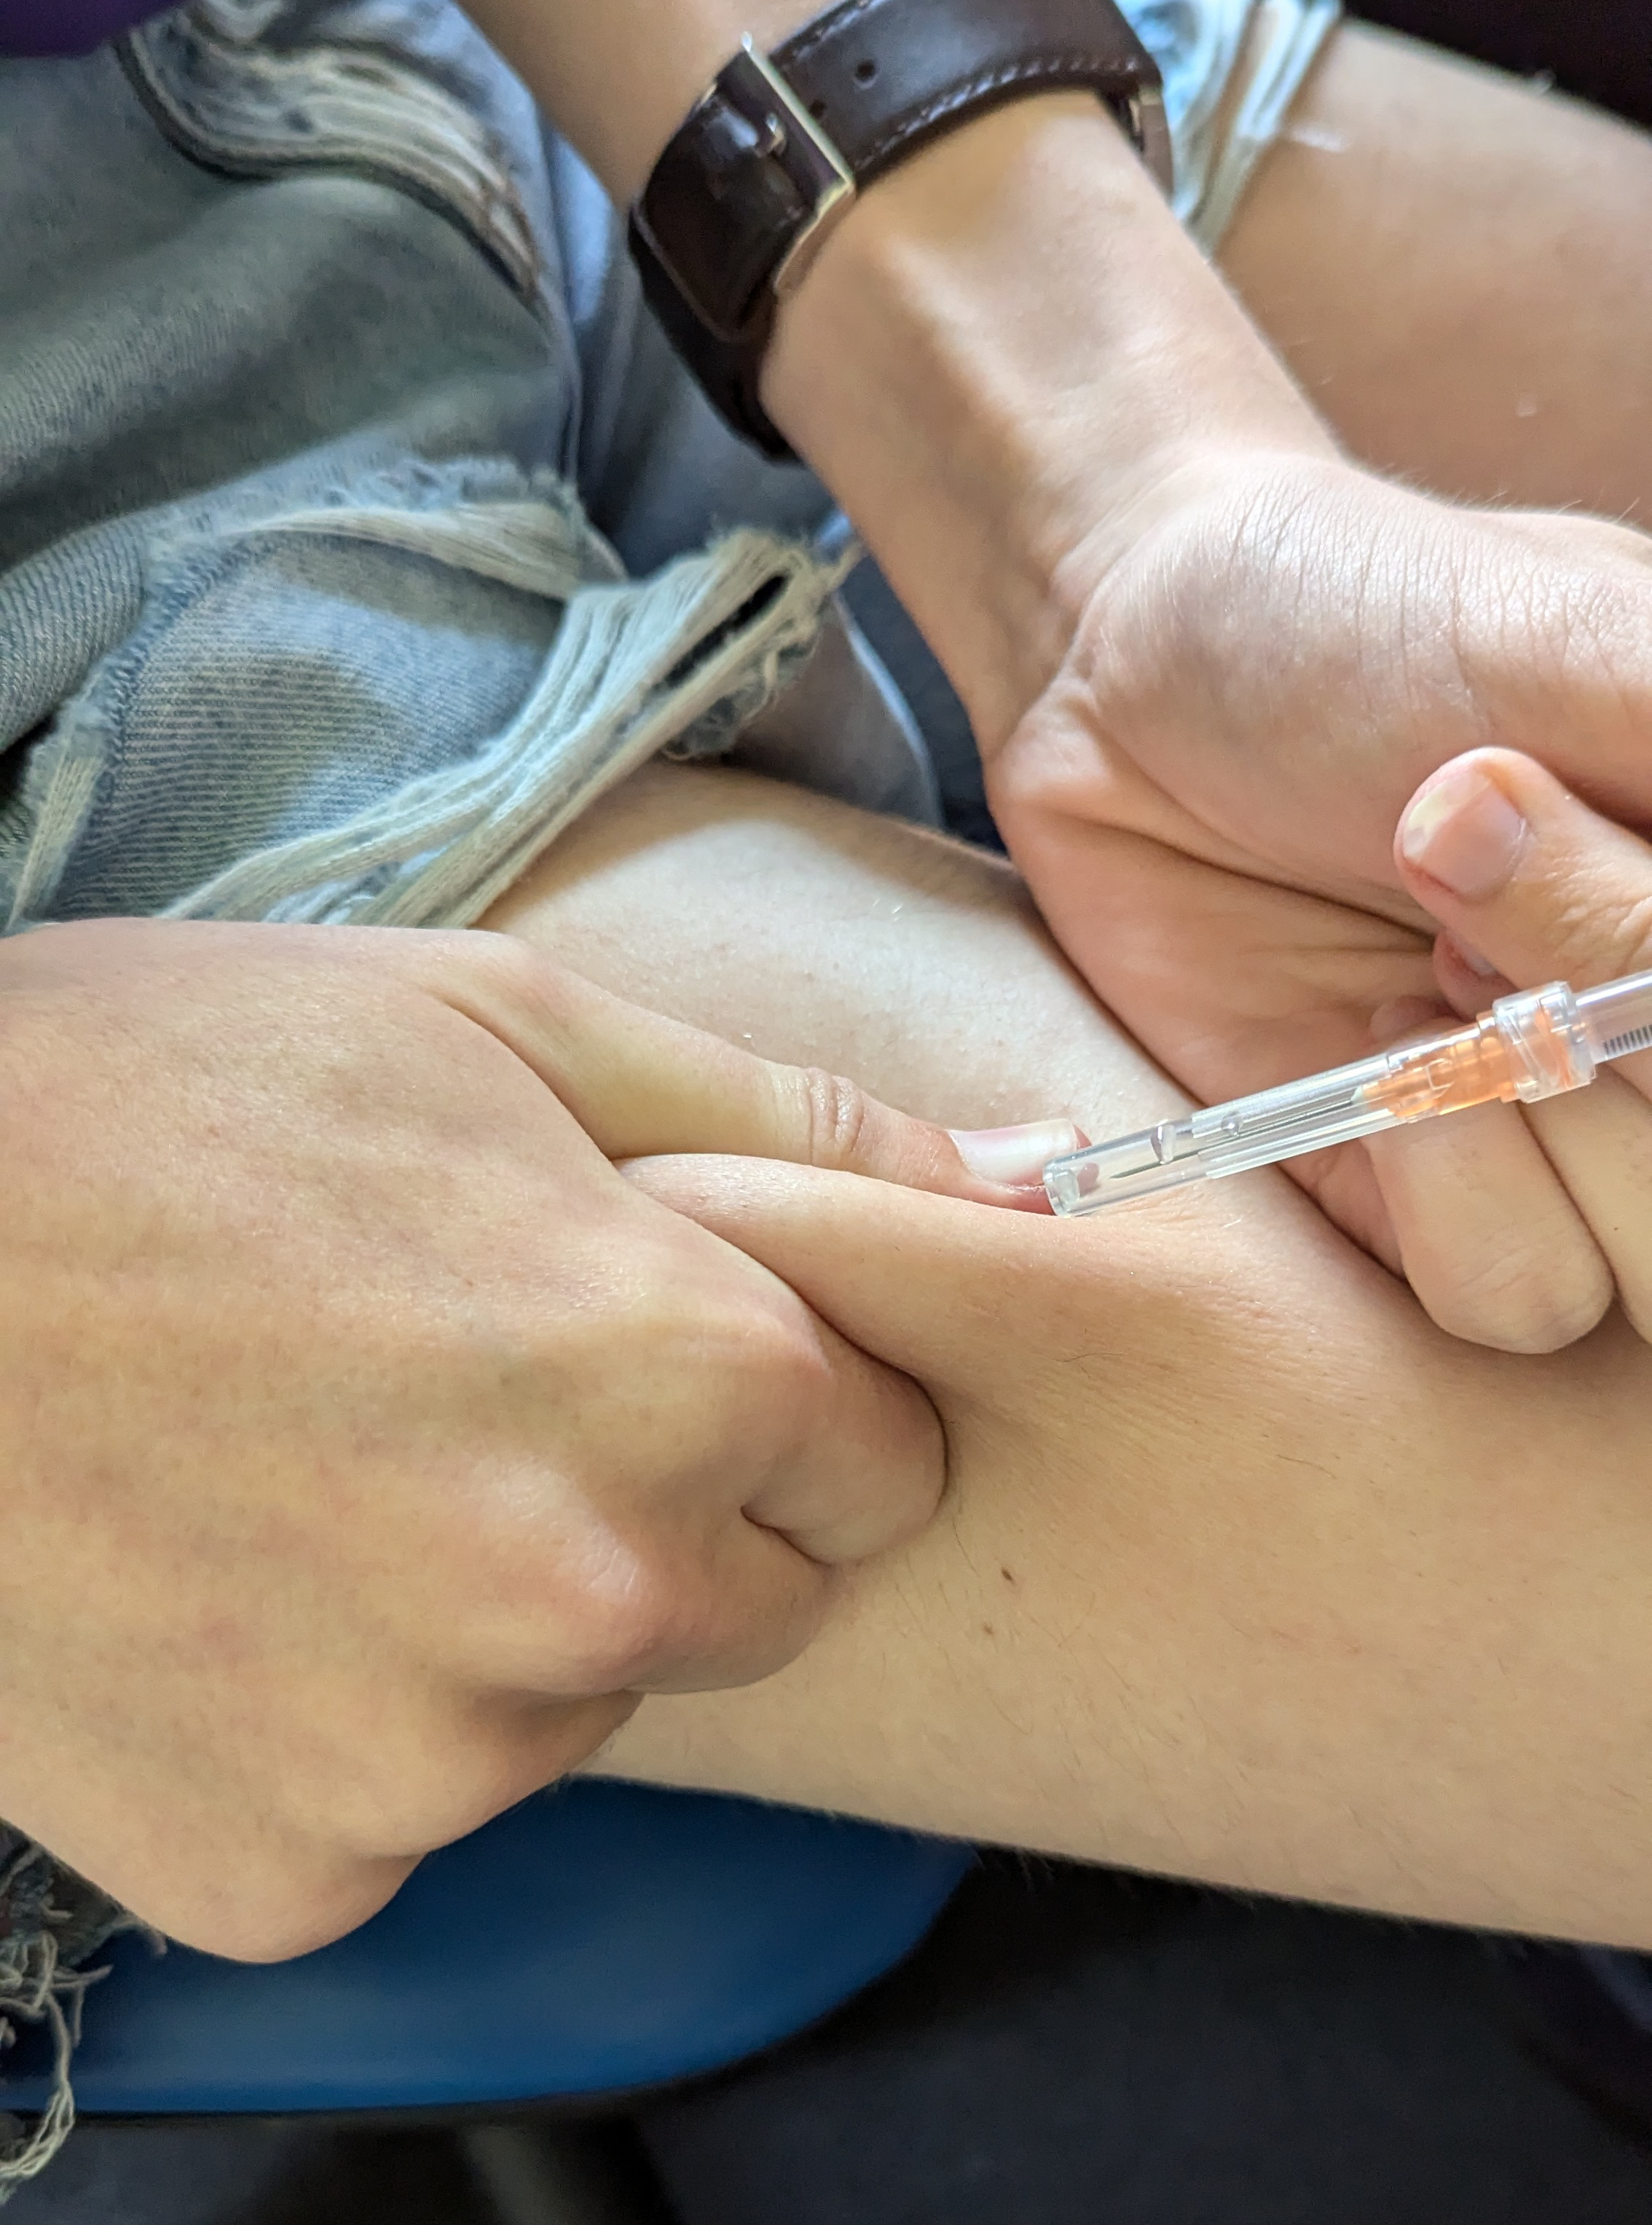
Take the cap off your needle, and make sure that you put the syringe down so that the needle is in open air and not contacting anything that could contaminate it, then grab the fold of skin around your injection site (use two hands to make sure you’ve got it all if necessary), and make sure you’re holding it nice and securely.
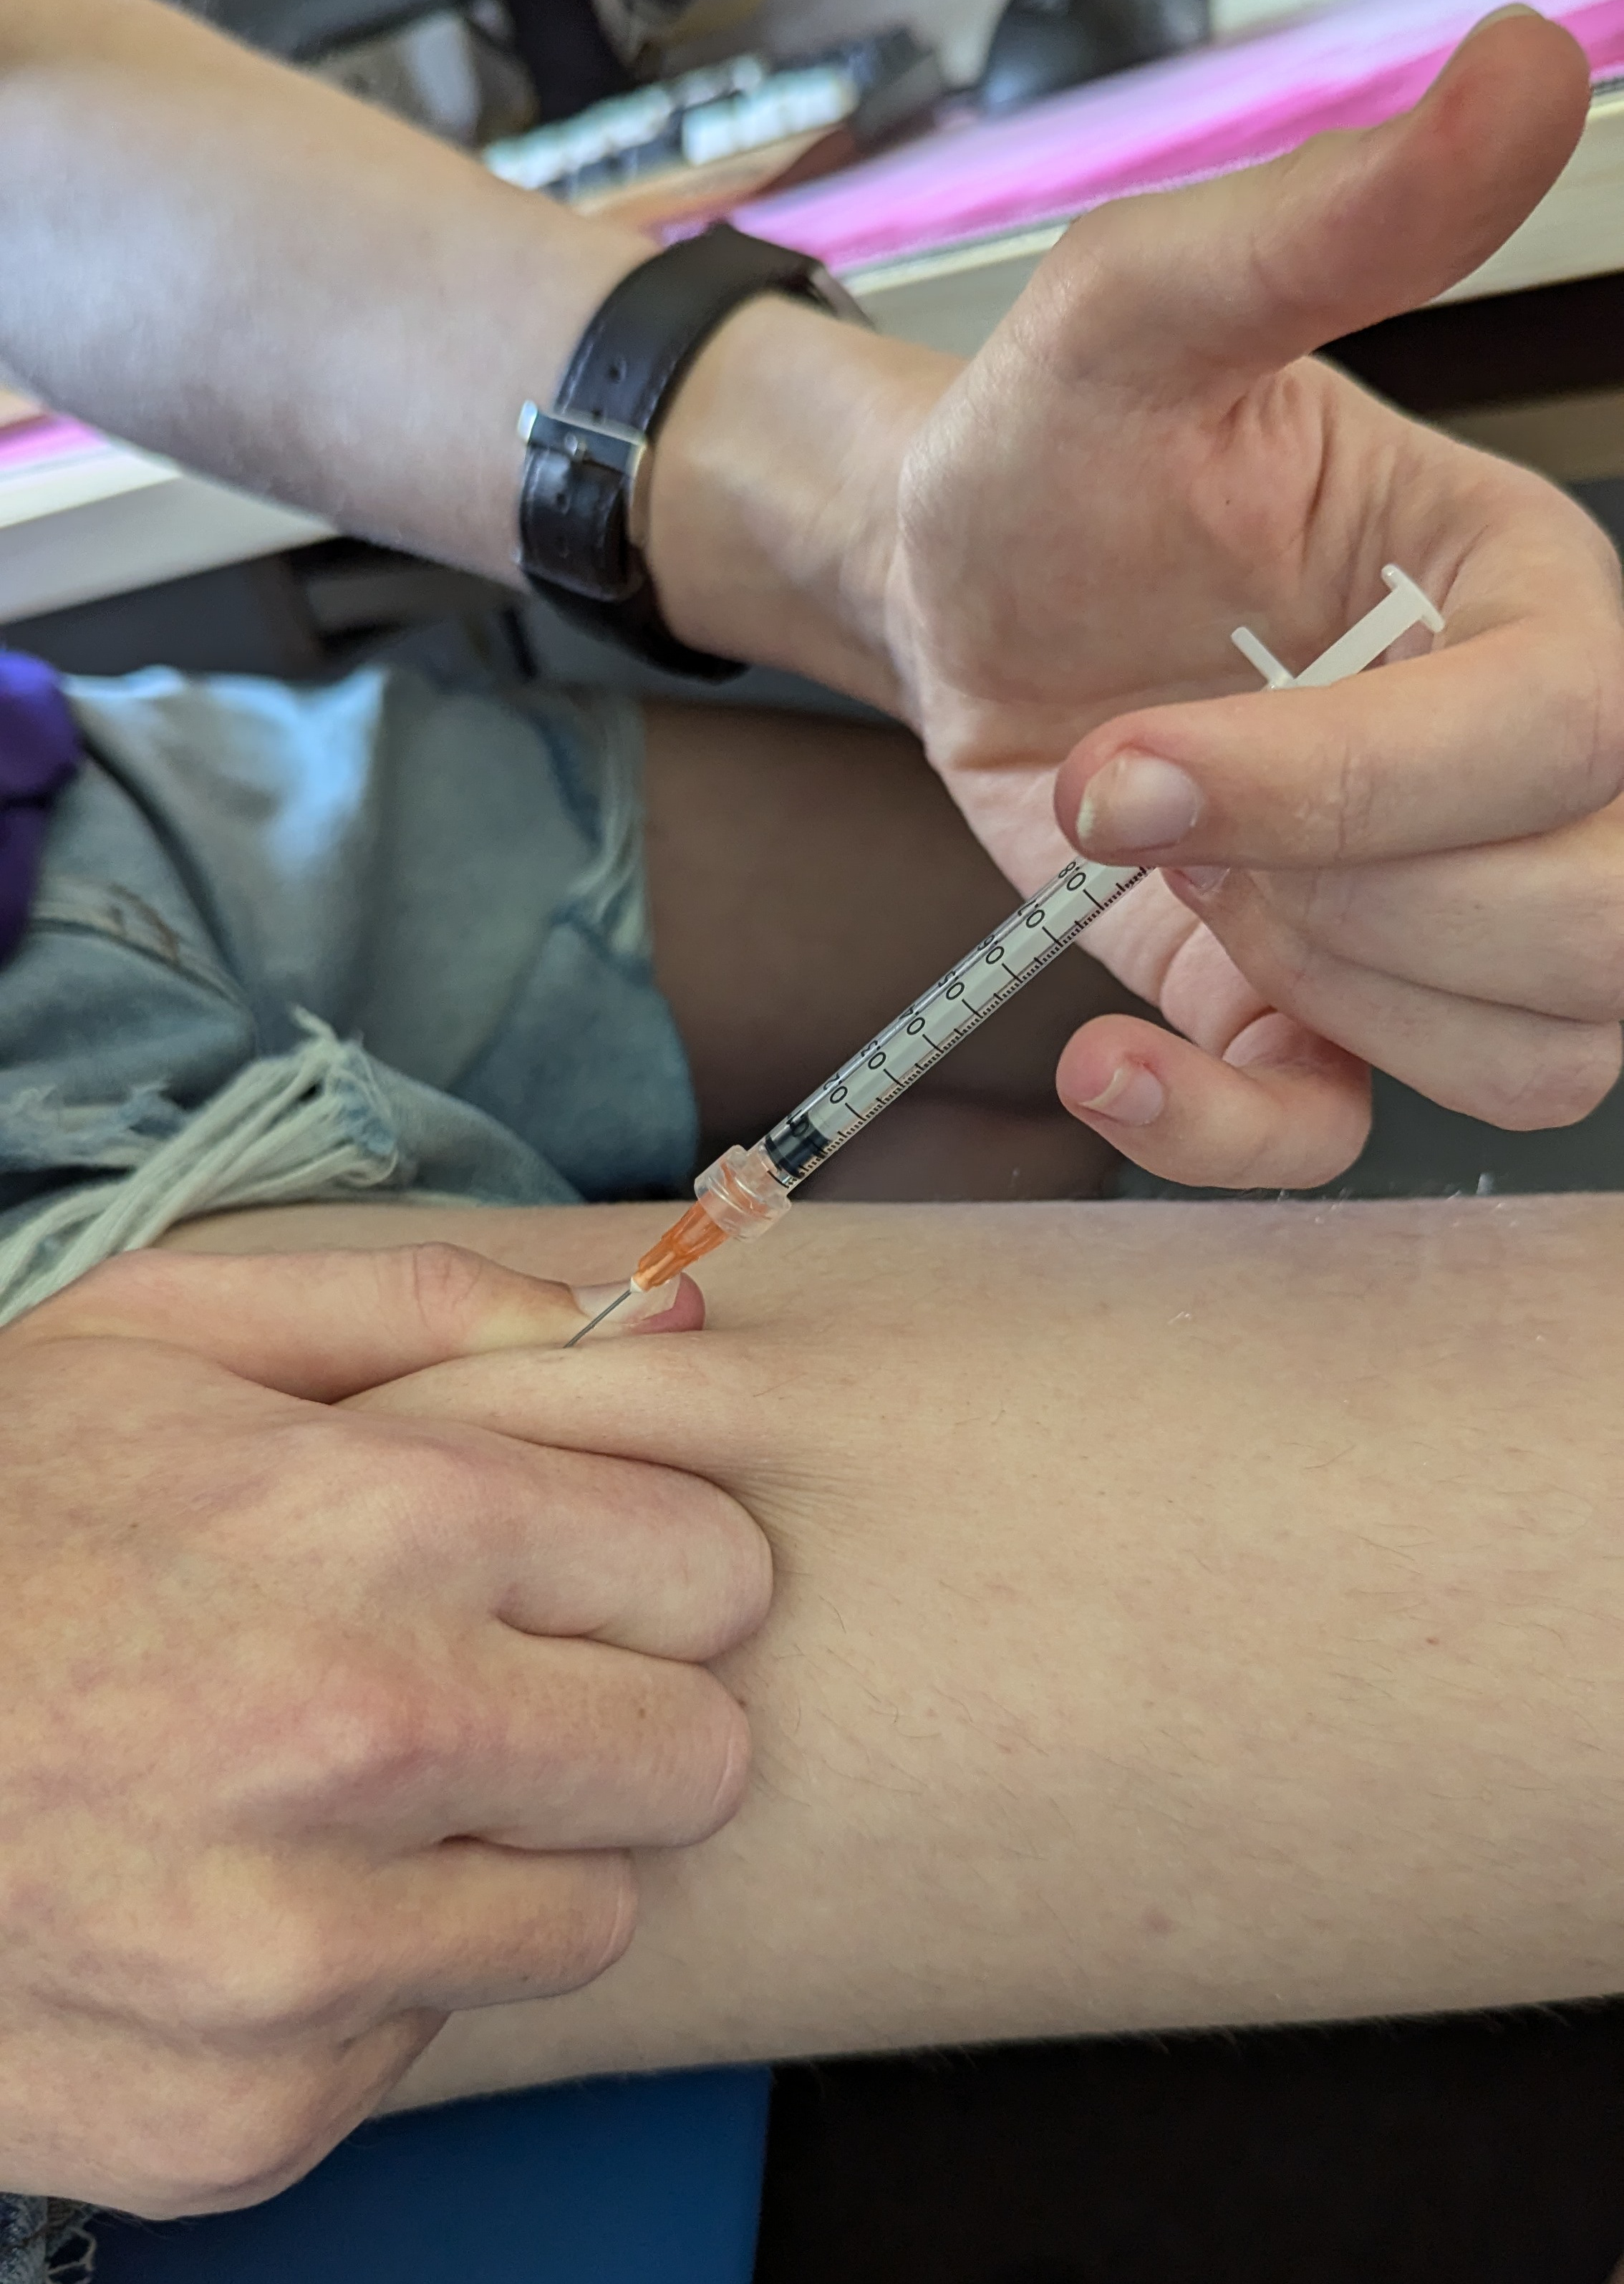
Before you pick up the syringe, just FYI, you’re going to be injecting the needle at a 45-degree angle to the skin. If you’re not sure what I mean exactly, look at this picture.
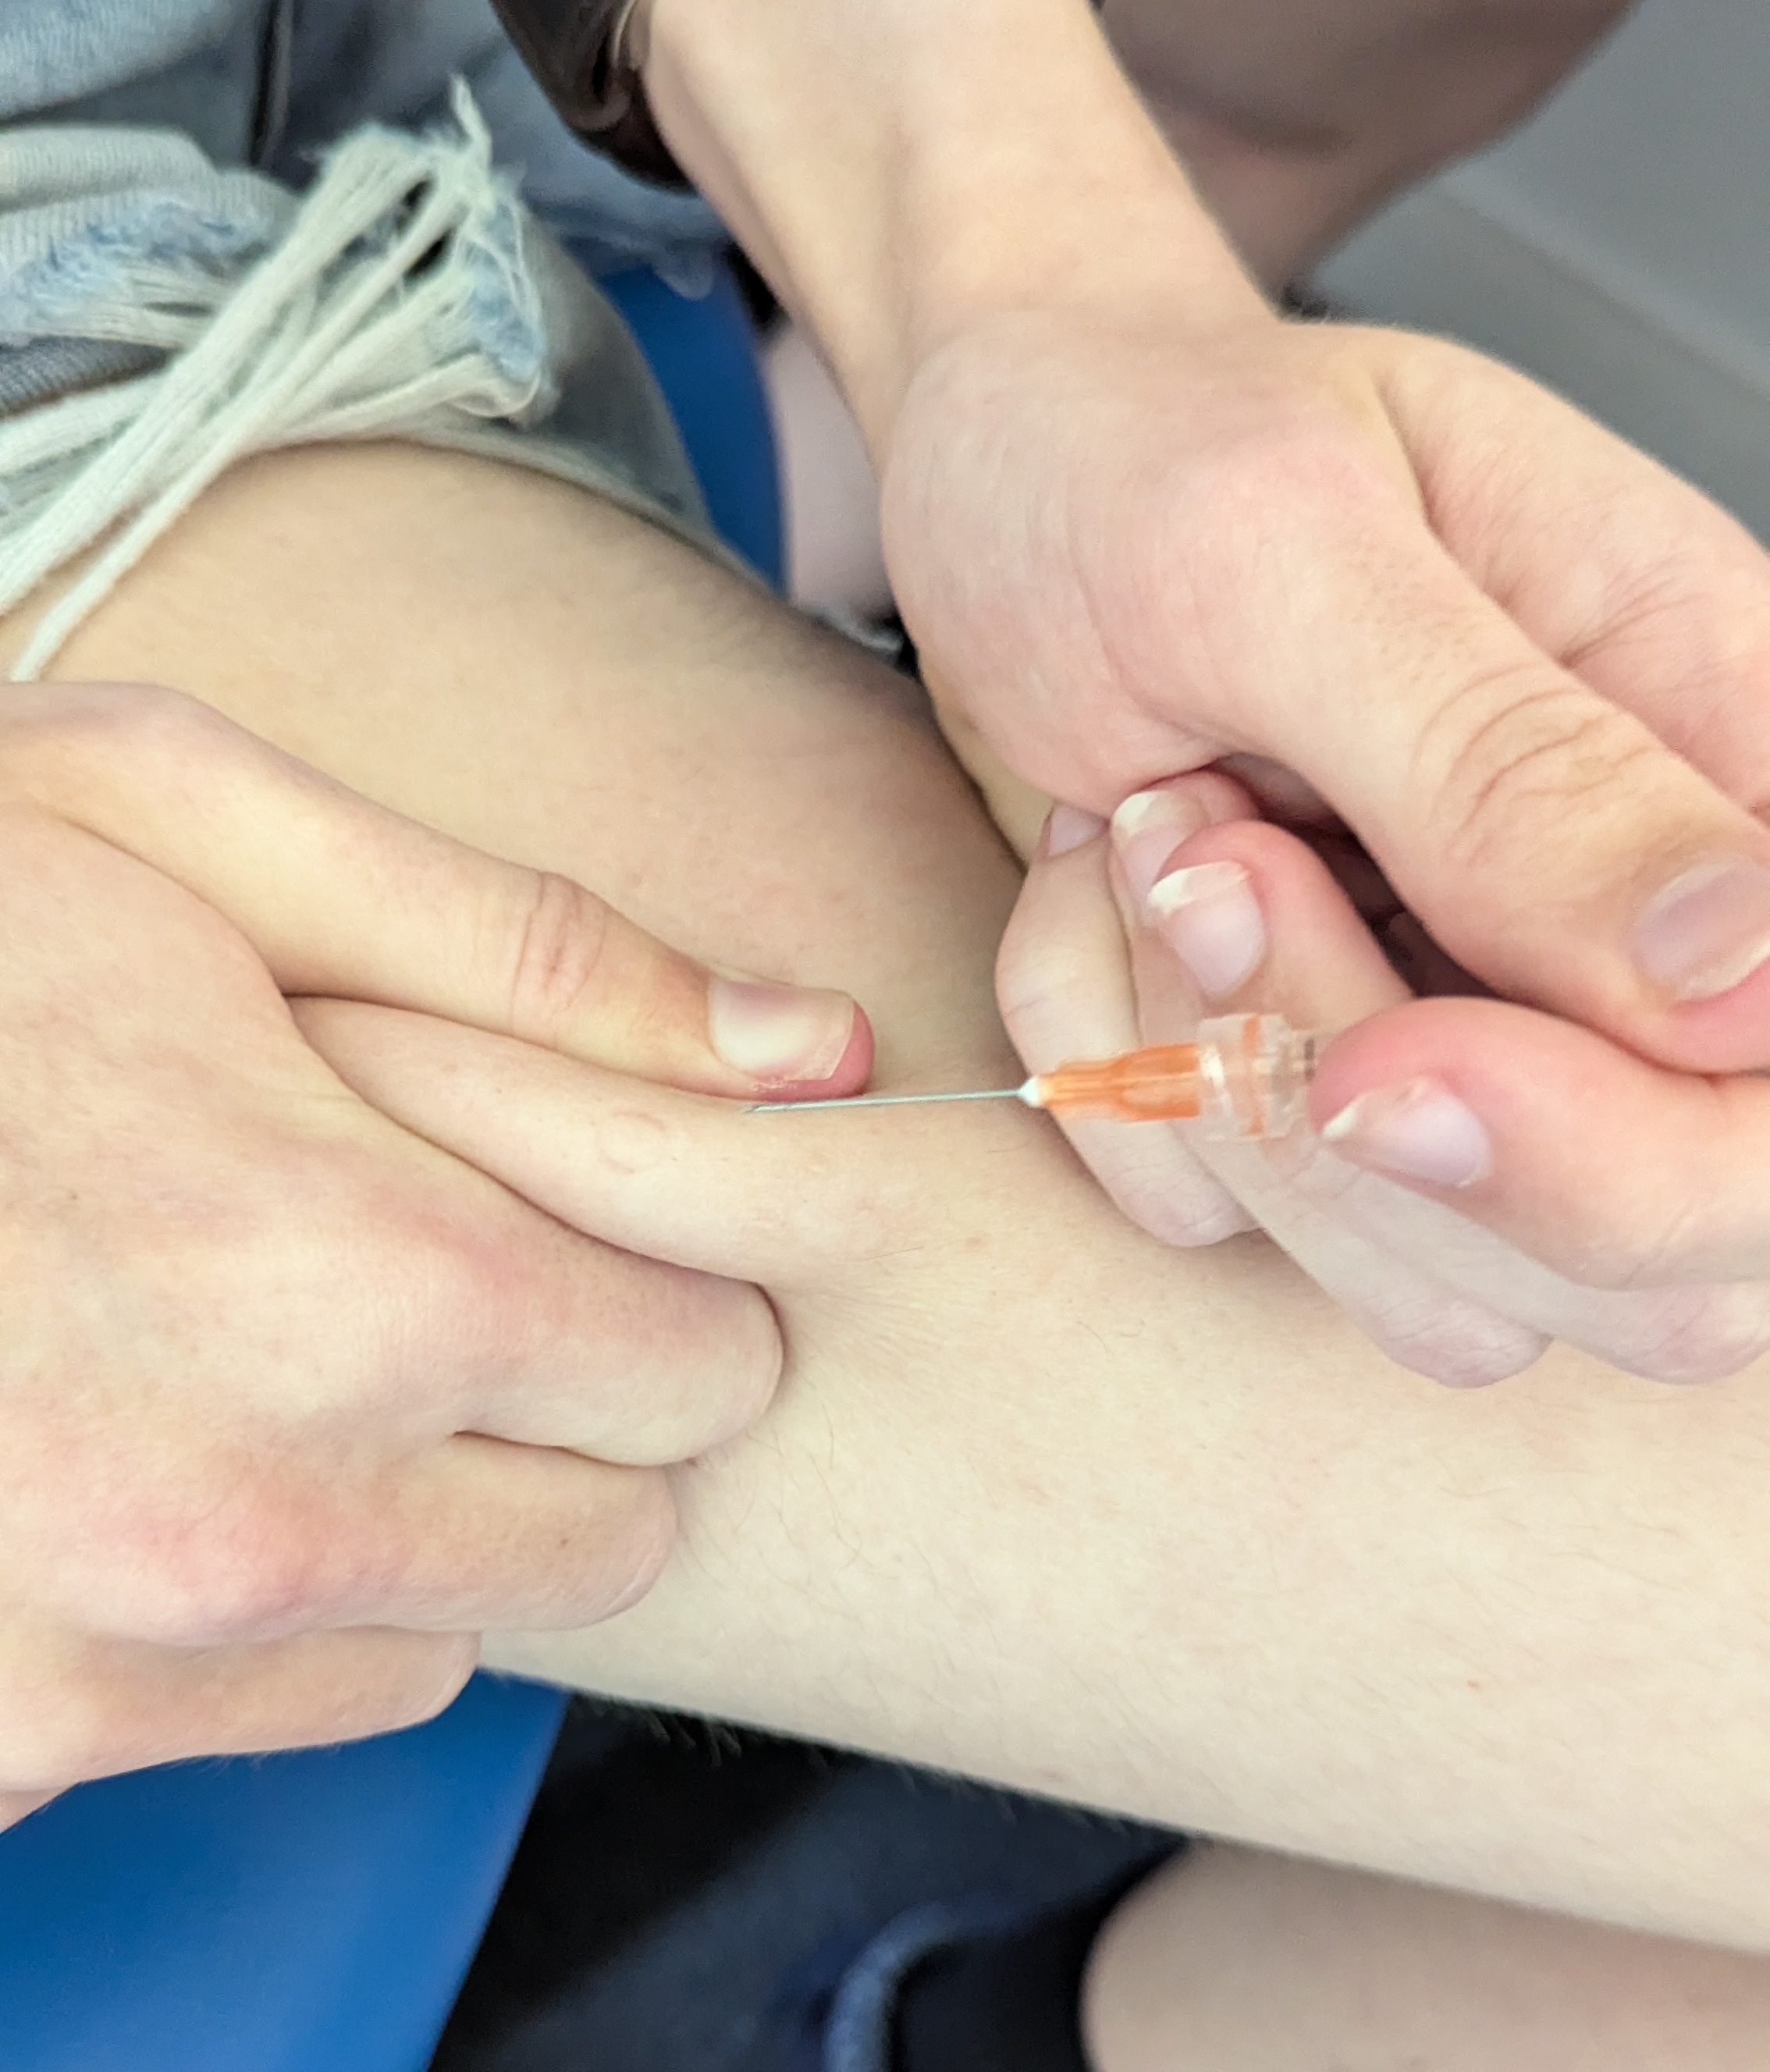
Now, pick up the syringe between your index and middle finger, around halfway down or even nearer the needle end, whatever feels comfortable and secure, with the plunger on the inside of your hand, and rotate it such that the pointy side of the needle tip is closest to your skin (look closely, the needle tip is cut diagonally). Hold the syringe almost like a pen for stability.
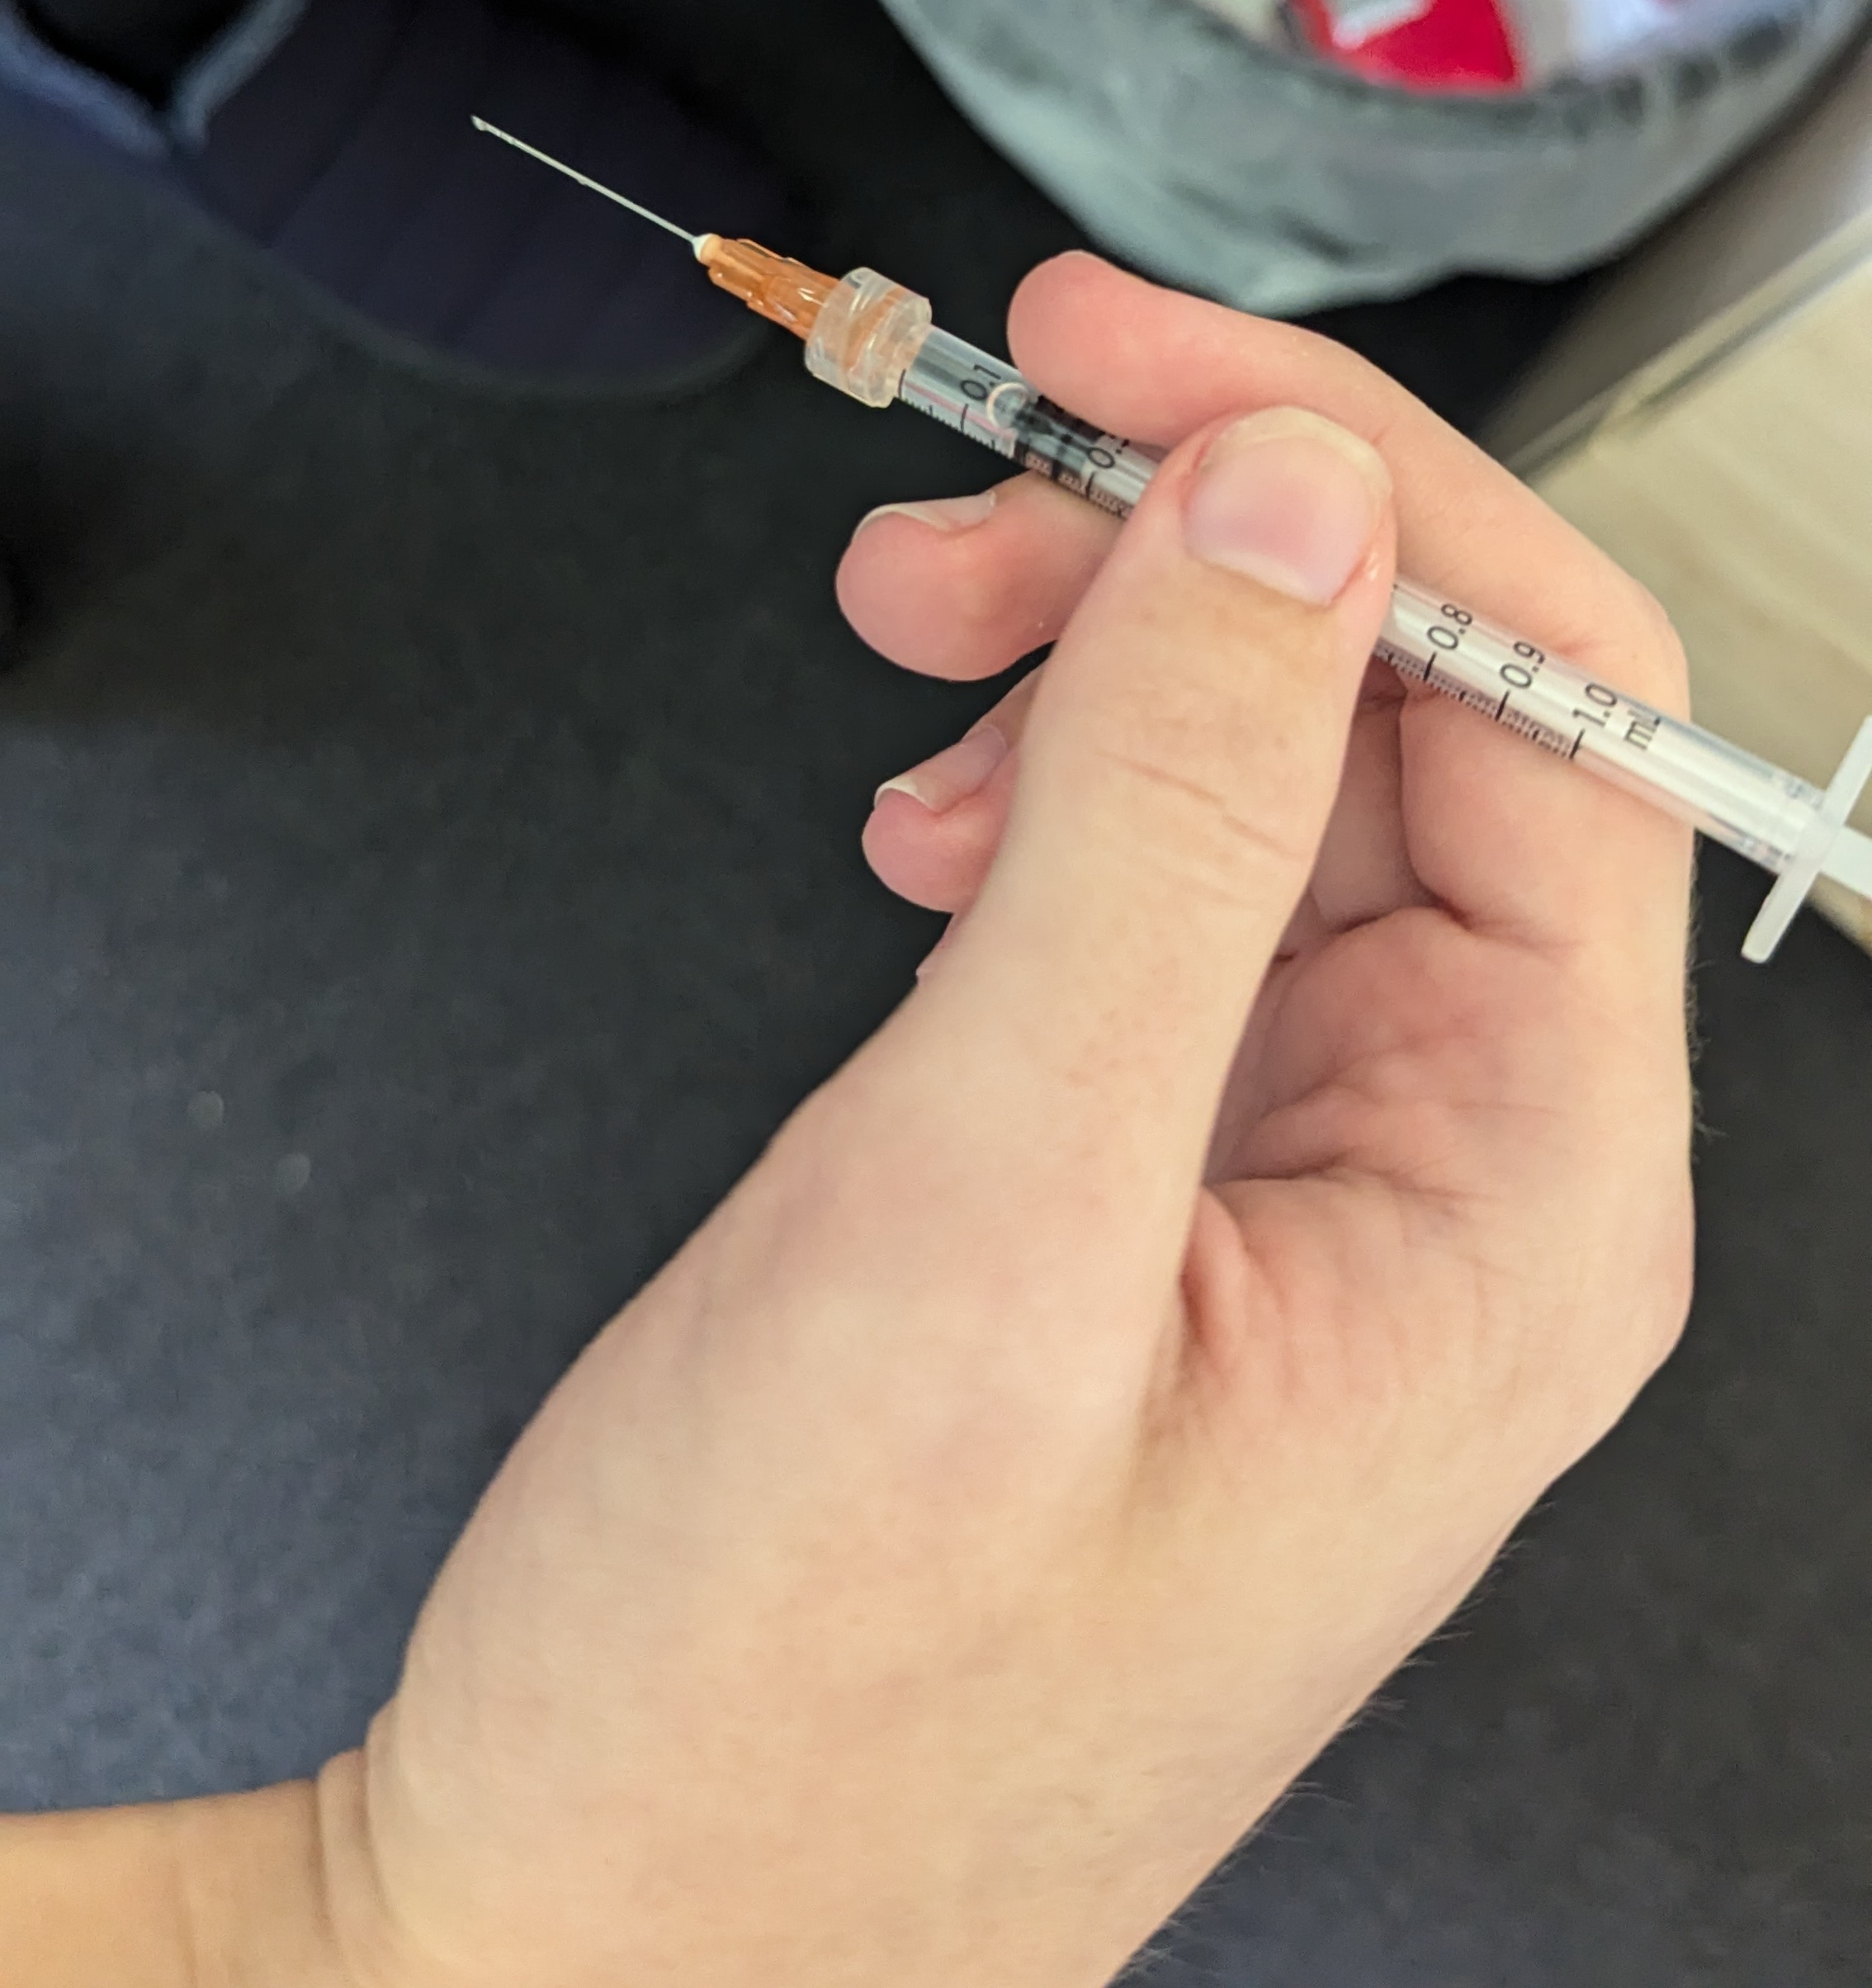
Brace your hand against your body for stability, and hold the needle above the centre of the mark you made earlier, at a 45-degree angle to the skin. See the pictures below for reference.
Now, in as smooth of a single motion as you can manage, push the needle into your injection site, in a straight line into your body.
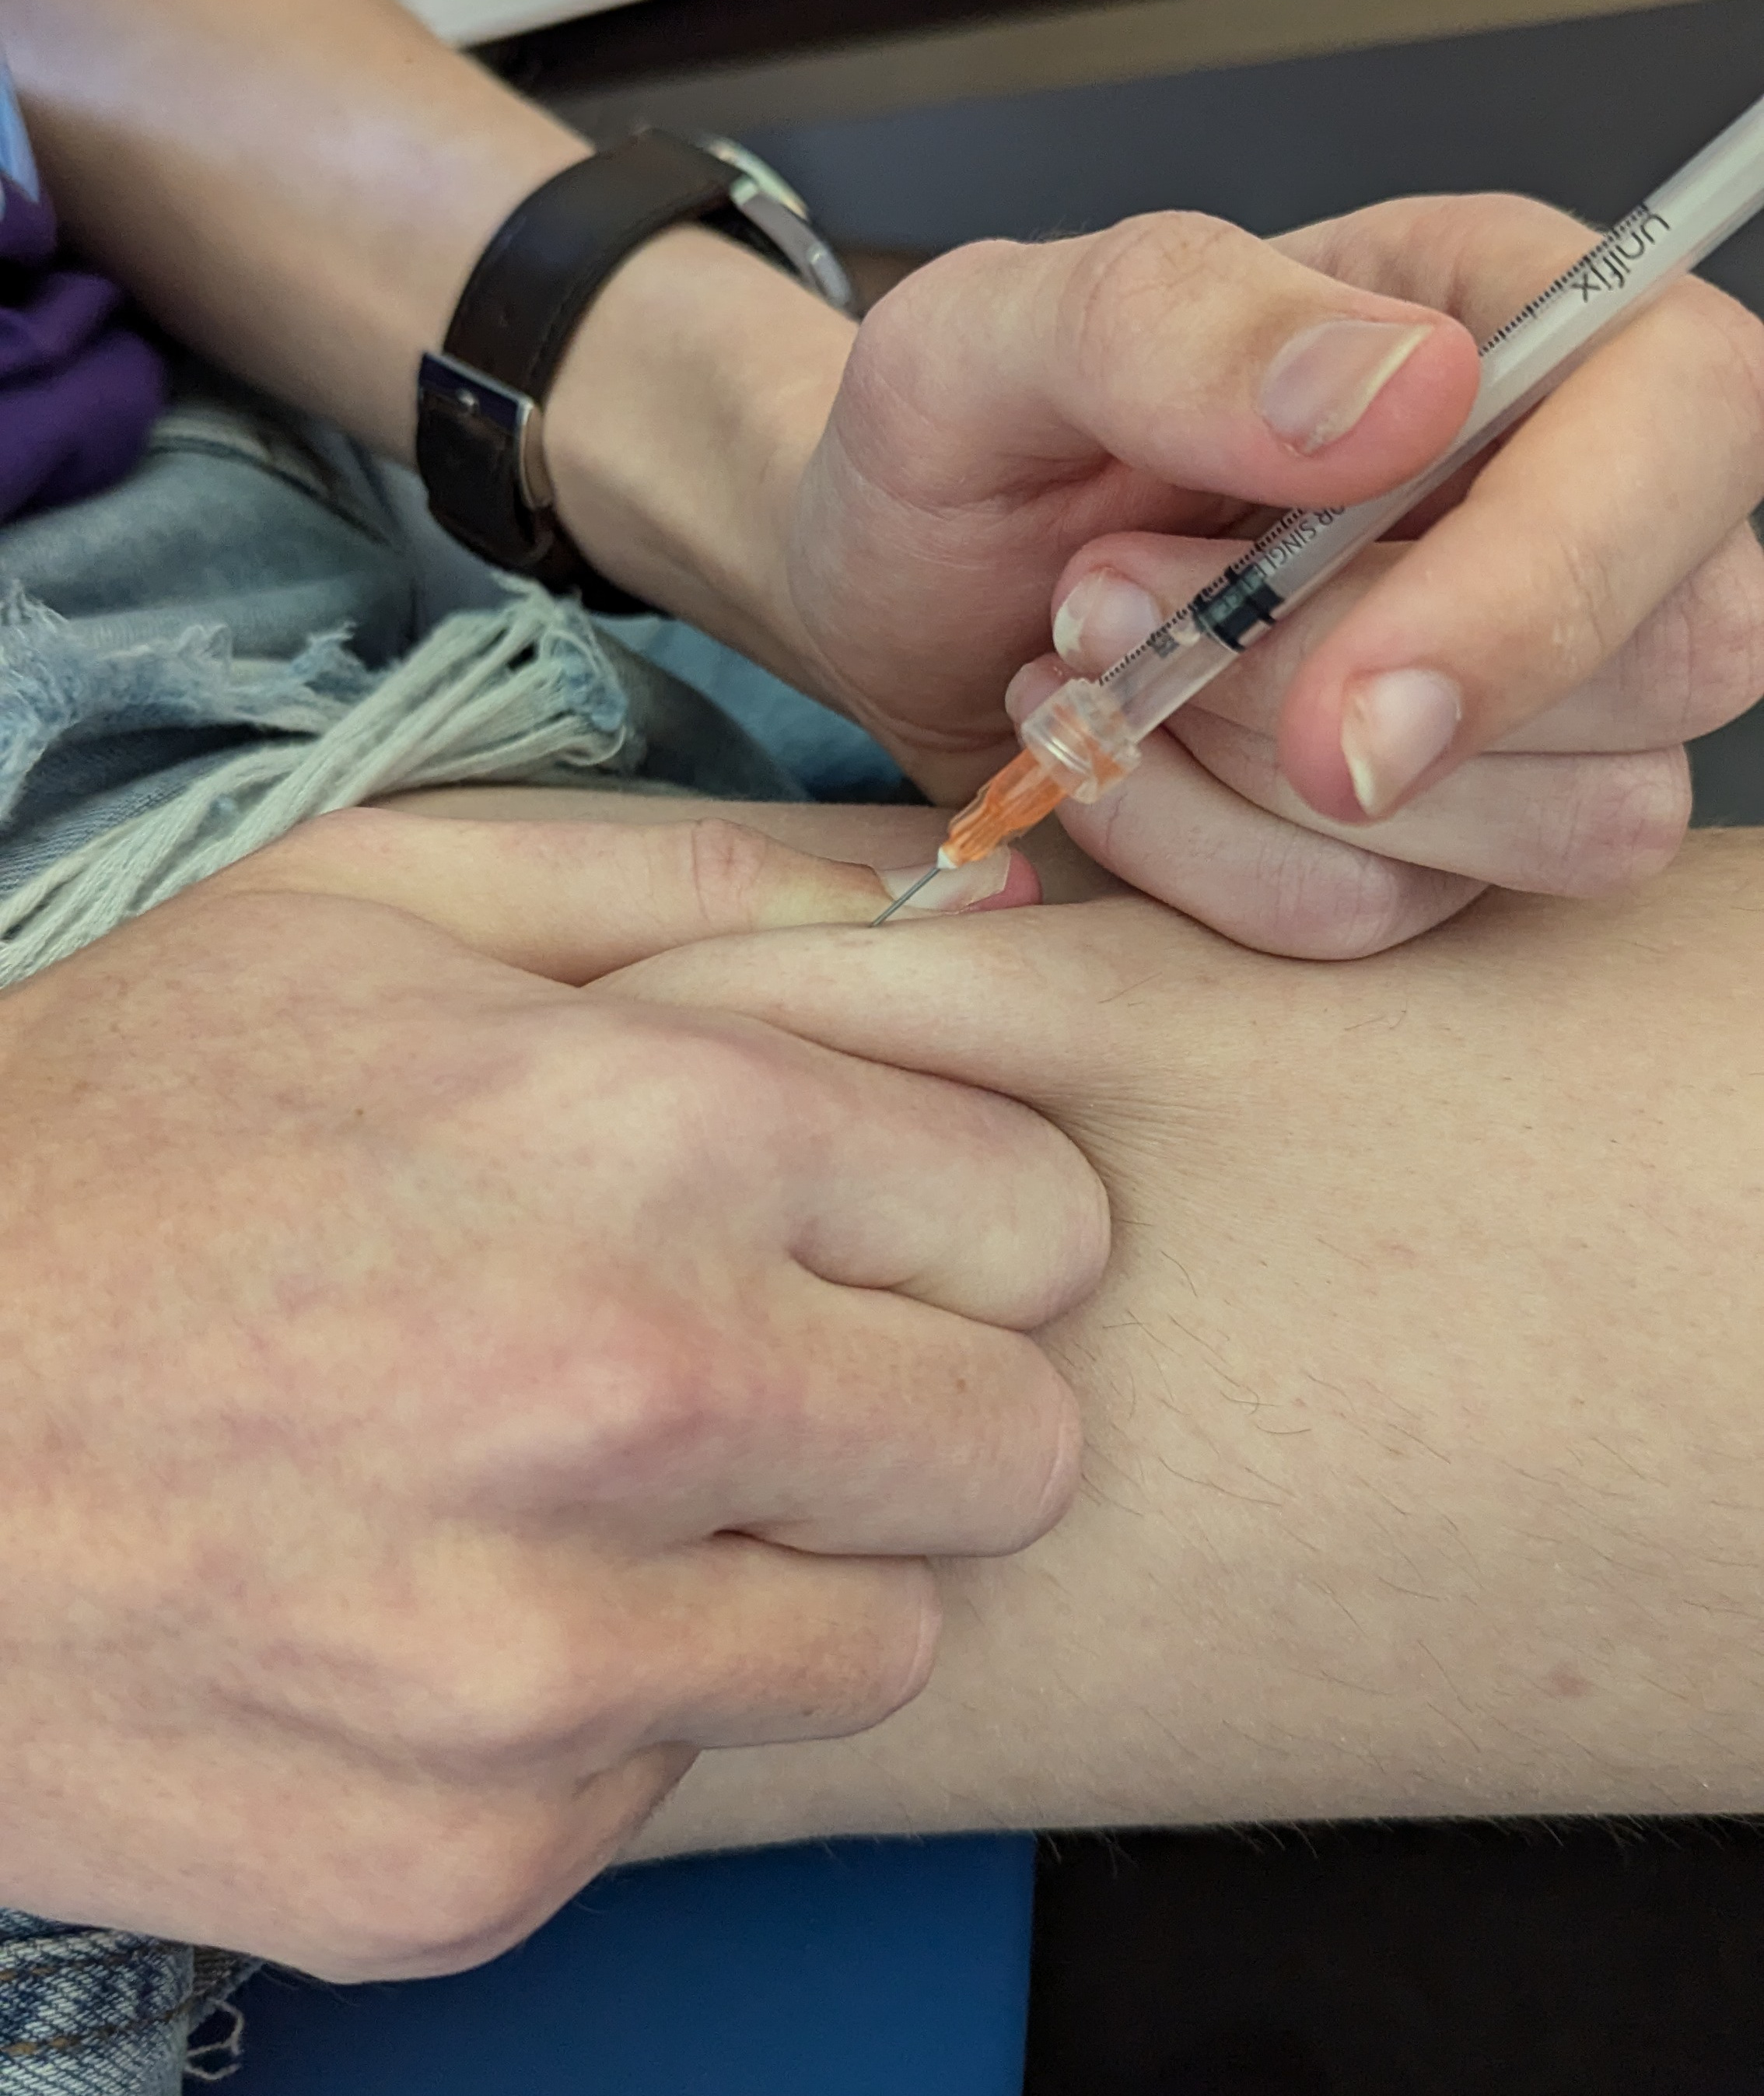
Trying to move the needle as little as possible, reposition your hand so that you have your index and middle fingers either side of the syringe and your thumb free, and slide your hand up the syringe so that your fingers are under the plastic braces, and you can get your thumb over the plunger.
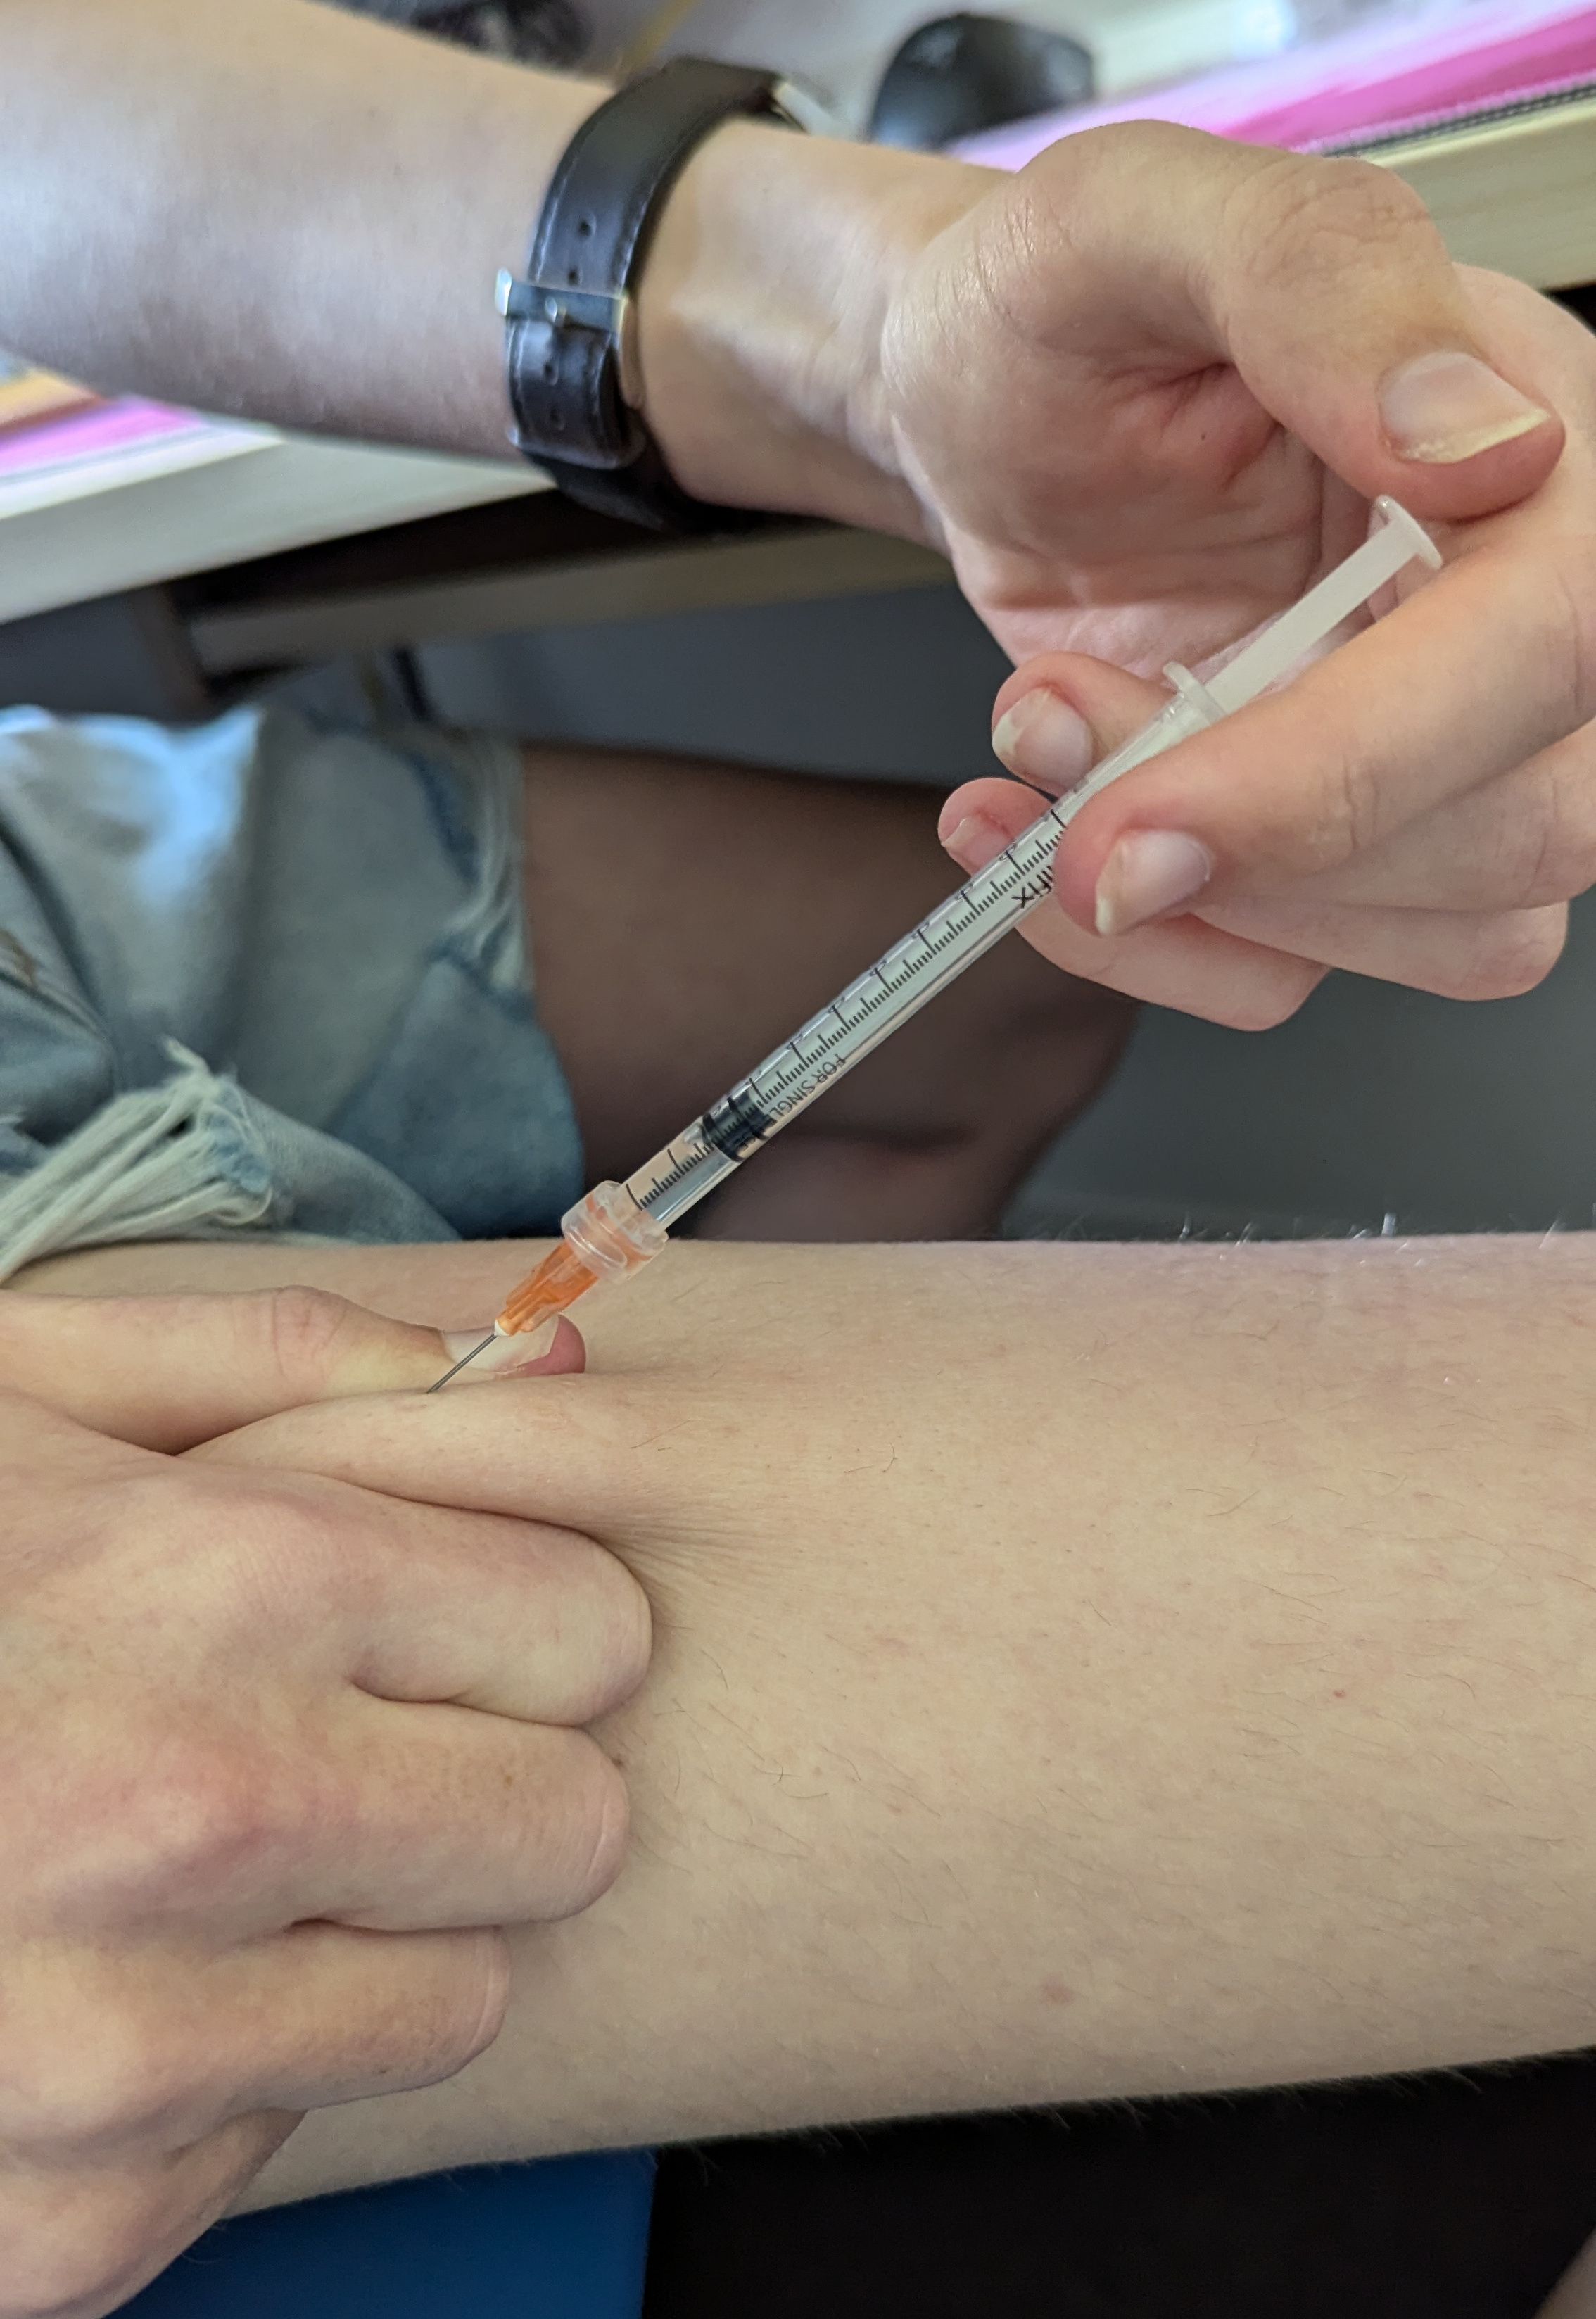
Gently press down on the plunger to push the medication into your body until it bottoms out. Depending on needle gauge and the oil type in your medication, this may take a while, into the tens of seconds even! - be patient.
Now, as smoothly as you can, slide the needle back out in a straight line, just like it went in, and then you can put it on the desk (don’t spike anything), let go of the skin fold, and put the plaster on (this is the most high-speed part of the process, only because of getting the plaster on nice and fast in case you bleed a little bit). It’s not a big issue if you put the needle down on the desk uncapped as you do this as long as it’s not at risk of hurting anyone. It doesn’t need to stay sterile any more!

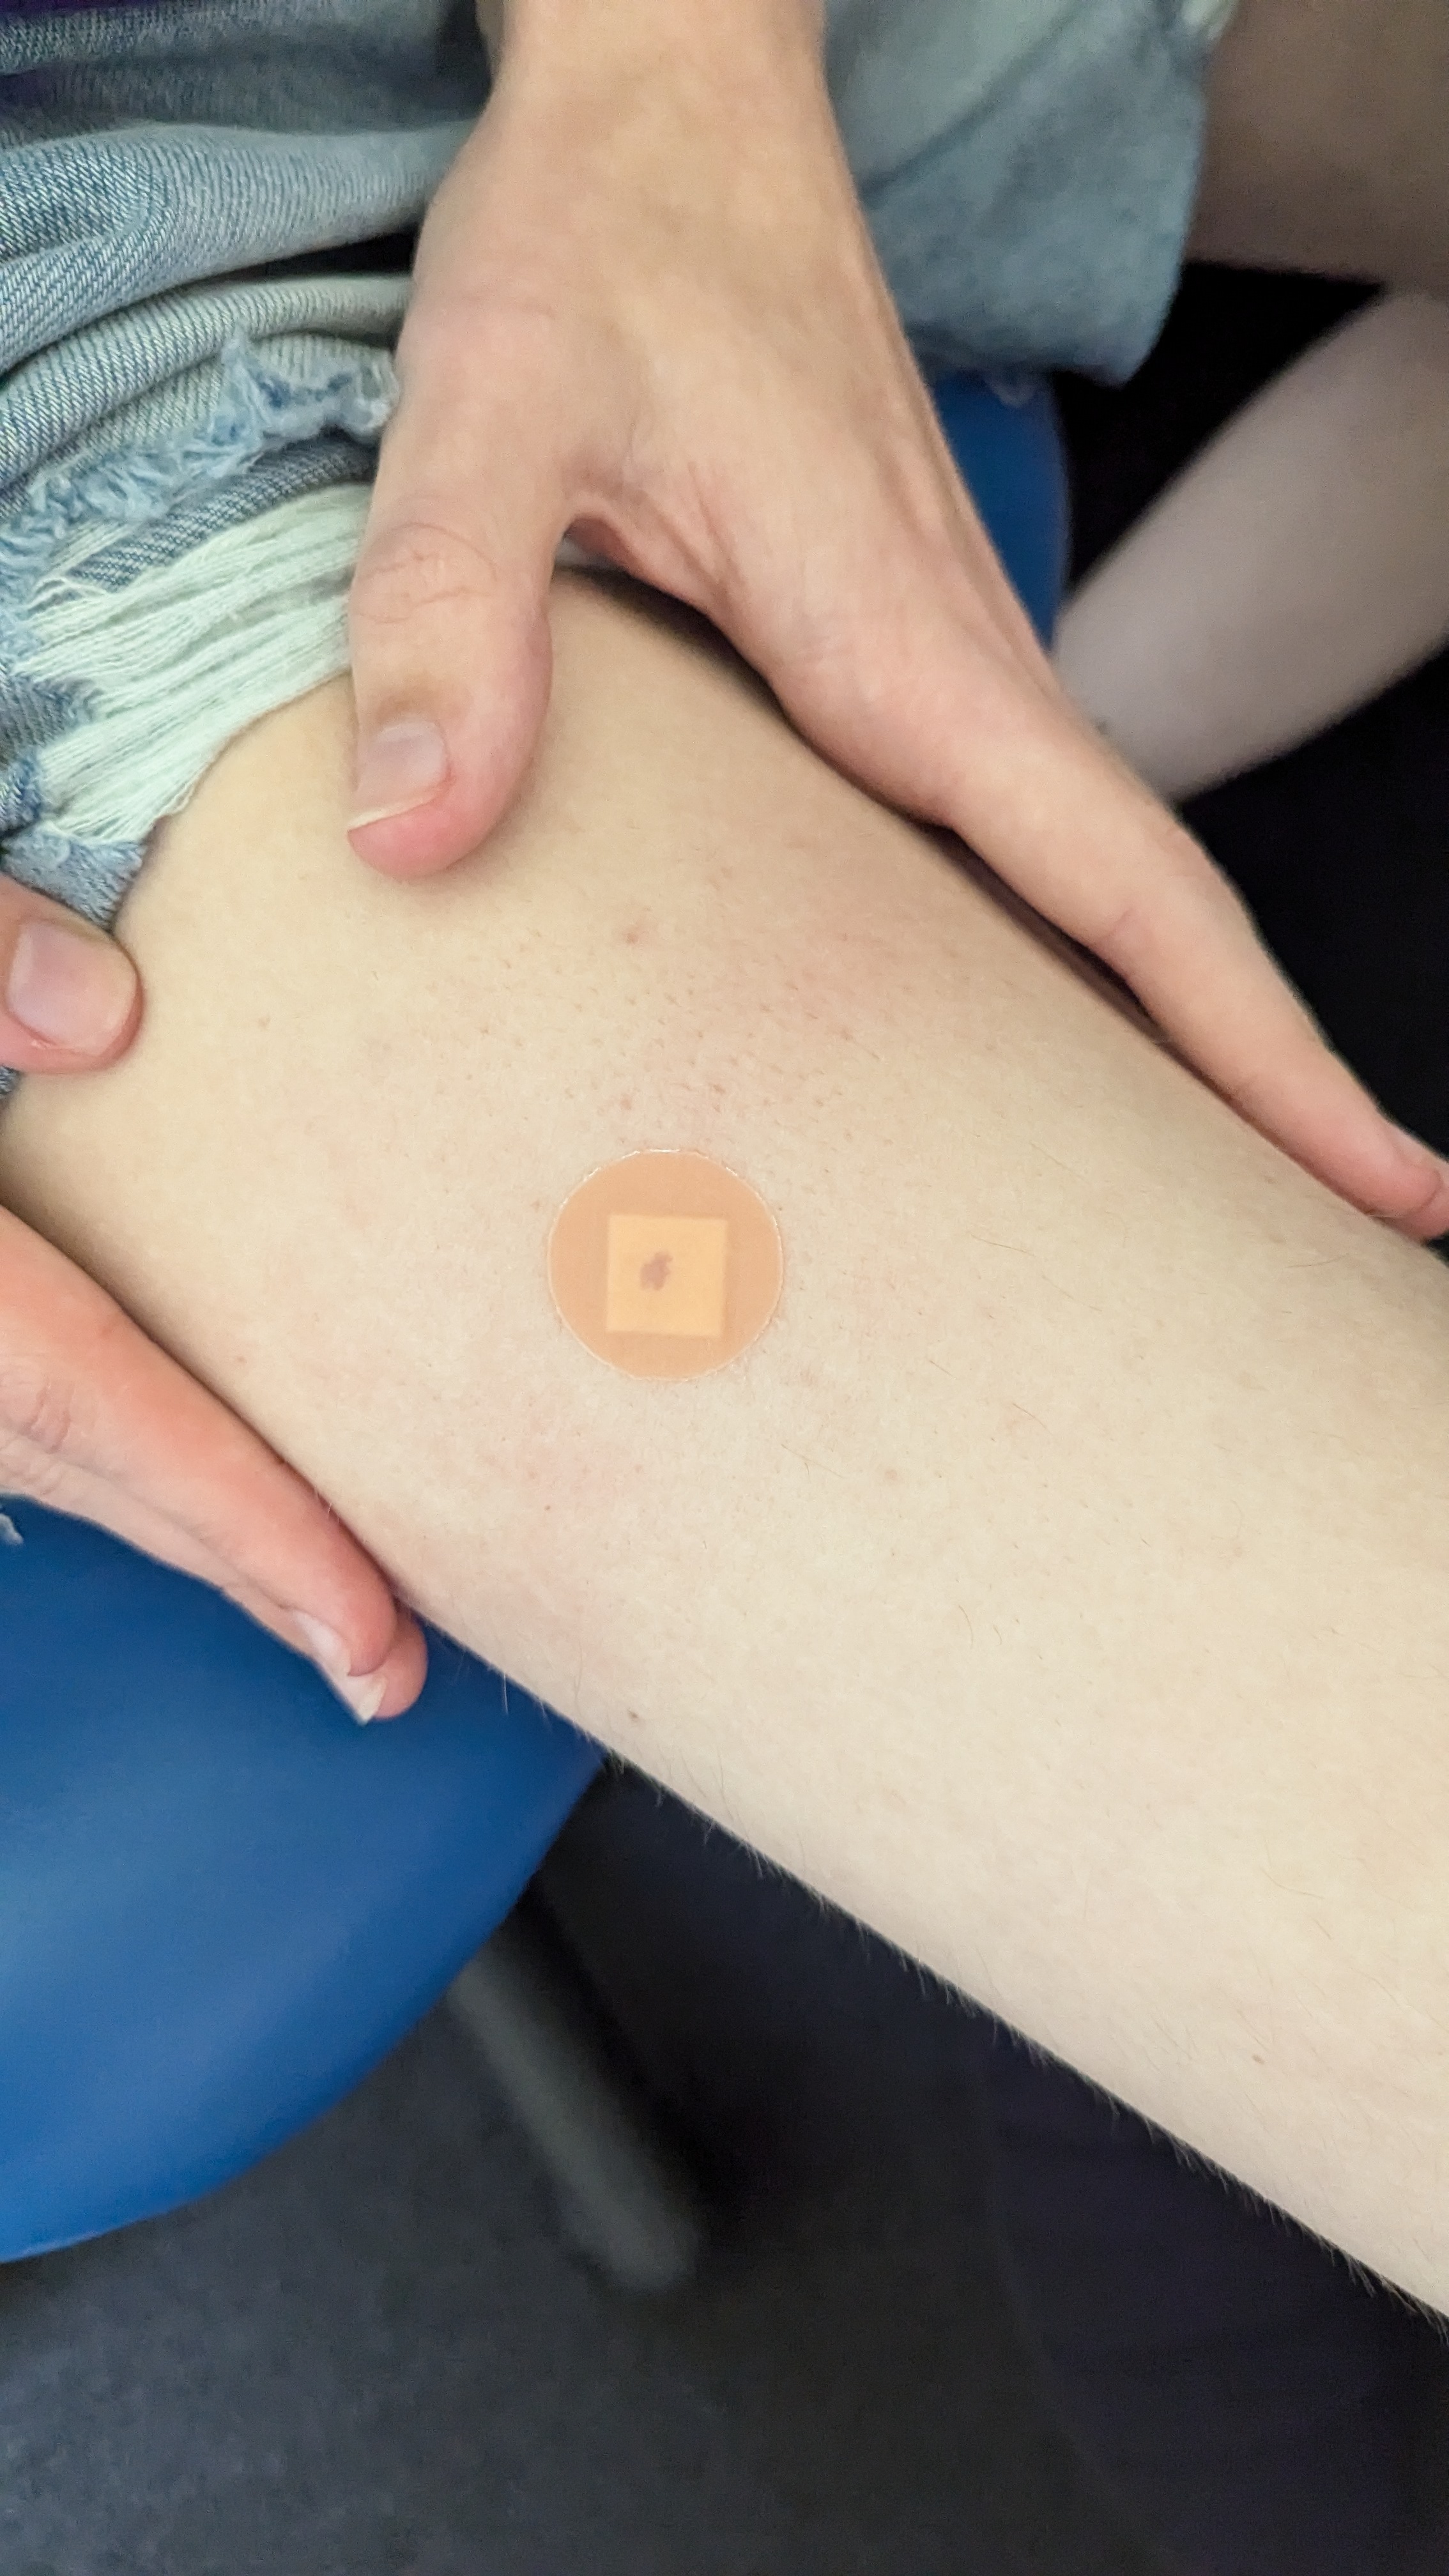
If you get a bit of your medication that fires out the end of the needle as you release it from the skin, or some medication pushes back up out of the injection site, that’s not the end of the world. It’s not ideal, and it’s what a small amount of air can help with if you’re careful, but it’s not a biiiig deal either. Think of it as a similar kind of loss-in-the-process as dead space is. It is ideal for an injection to not bleed but one or two drops are totally fine, especially on the tummy! If you bleed more than that, it’s not great, but not the end of the world, so get that plaster on to stop it from bleeding too much!
Now, you just need to tidy up. Safely pick the syringe up, and cap it just like you did the drawing needle: keep your hands away, push it into the cap, then rotate it up to hook the cap onto the needle, then push it on until it clicks. Then disconnect the needle and put it in the sharps bin.
Now, you can just throw away the packaging of the injection supplies, and you’re done!
Well done! If that’s new to you, as I assume it is given you’re reading this, take a moment to be excited if you’re excited, or take a moment to calm down if you’re nervous and shaken. The nerves go away with time, and especially with repeated successful injections.
If you’re starting HRT, congratulations on starting your HRT journey :)
And if you’re switching to injections, congratulations on your first injection :)
Post-Injection Routine
You can do what works for you, naturally, but I like to use the MediTrak app to track when I do my injections and remind me to do them, so my next step after putting my needles in the sharps bin is usually to mark the injection as complete in there.
Next, I like to keep an injection diary of sorts. I mark:
the date,
what I injected where (that’s probably the most important part)
how much of all supplies and medication I used up
how much pain/soreness I experienced at the injection site during injection, immediately afterwards, and for how long after, and if it was only on movement or pressure or what
how much blood came out after the injection
whether medication pushed back out of the site and spurted out the needle (I find these tend to go together, as both are a product of quantity of air in the syringe)
any other notes about how the injection went that or what was special about this kind that I want to record.
Here’s one of my shot diary entries for reference (I had just bought more plasters of a different brand to before for context):
2025-04-08
7mg 40mg/mL mct een subq thigh right
pain none. some E came back out, no blood.
used 1 25G, 1 22G, 2 alc swab, 1 small plaster, 1 syringe, 0.14ml een. ~1/2"
went smoothly. more resistance than usual plunging? I wish less came back up tho that's kinda annoying. 0.14 or so seems almost perfect for dead space! the Elastoplasts can be a pain to get on ugh they're ultra sticky but oh well
Sometimes I find that I do have to come back to this diary just to remember which site I’m meant to be using this time! So it can be worth keeping. Plus I find it nice to look back, ‘cause sometimes there’s enough prompting there that I actually then remember the specific injection! Which is neat.
General Injection Advice
Don’t sweat a small air bubble. You may have heard advice around injections talking about how dangerous injecting air is. It will increase bruising, but the warnings and horror stories you might read are specific to intravenous injections. For subcutaneous and intramuscular injections, it’s not really a big deal, though naturally don’t go injecting a full 0.1ml of air into yourself just for shits and giggles, be sensible!
It is best if you can collect all the tiny bubbles that may be in the medication into a larger one, or the larger quantity of air at the top of the syringe while you’re changing needles, as it’s not ideal to inject a bunch of tiny air bubbles alongside the medication. Quite often, air bubbles will just stick to the side of the syringe and wouldn’t go into you anyway though.
There is a technique known as airlocking in which you purposefully allow a small amount of air to follow the medication down as you inject. Again this can increase bruising if you do too much, but it does flush out the dead space, and it helps keep the medication in, instead of pushing back up and out when you remove the needle.
I do not purposefully airlock (though again, I’m not concerned about injecting a small air bubble after my medication is in either!) but you can try it out once you’ve got used to doing injections, and see if it works for you.
Don’t worry about if you have body hair on the injection site, it does not affect the injection really, its just going to mean that taking the plaster off before it naturally loses its stick will hurt a bit more. The pictures of the injection process shown here are taken with the site shaved to aid visual clarity.
You can use a single needle for both drawing and injection if you are tight on funds, have difficulty getting the right needles, or you have fixed-needle syringes. This also means you lose less medication to dead space. Please be aware that this will mean a slightly sharper pain on piercing the skin and an increased level of bruising due to the needle blunting a little during drawing. If you choose to do this, I would adapt my method as follows:
Instead of pulling excess air into the syringe, instead flick out all the air to the top and then push it into the vial such that you get exactly your dosage in that one step. That is - so the needle is in the vial still, and the syringe and needle contain only medication, to the right dose.
Then, you can pull the needle out of the vial, cap it, prep your injection site, and just inject with that
If you do this, you can also use fixed-needle syringes which allow you to get near-zero dead space (less than a tenth of the dead space of a standard needle or about a quarter of that of a low-dead-space needle).
Fixed needle syringes are sometimes available with colour coding which may be helpful if you share your medication with a housemate and keep them together, but have different gauge/length preferences for your injections.
Do your damn blood tests.
- You should be getting (for HRT) your E2 and T levels checked: before you start HRT if you haven’t yet started, and three months after any change to your regimen (different ester, different dosage, different medium, etc.)
- Once you’re on HRT, do your blood tests at the end of your cycle, when the levels are lowest (so, either on the day of or the day before your injection).
- If your levels are well within range and you’re just doing the same thing as before, you can probably just leave it, but if you do any changes you should absolutely do a blood test after 3 months settling time.
It’s okay to be nervous, it’s okay to be shaky. This is natural for giving yourself an injection at the start, and it is natural if you are the same after one that doesn’t go quite as you planned. Try your best to be steady, as it will reduce bruising, and prioritise being safe, but you don’t have to be dead still and zen. If you are struggling, and you have a friend, family member, or otherwise who you trust and are comfortable helping, ask them to help you. You could:
Have a friend calm you down and comfort you
Have a friend actually deliver your injection, if you are not steady enough to do it yourself safely
Play calming music if that helps you
Prep the syringe for injection, go off and do something else for a few minutes (make a cup of tea perhaps!) to let your brain come down from the suspense of prepping the injection, then come back, prep your site, and deliver the injection.
If you’re nervous about having a sharp needle in clone vicinity of your body, try sitting still with the needle in the general vicinity of your site, but not actually inserted into the site, until you start to acclimatise to and calm down to the situation of having a sharp needle near your body.
- Be careful not to overdo this one, as the quicker you get in there, do it, and get out, the less time you have to get nervy about it.
Closing Notes
This guide is based on internet research, my personal experience and experimentation being a trans person injecting my hormones, and on the experience of those I’ve had proofread for me.
I hope it can help someone else to have a smoother start to HRT. If you have any suggestions to improve this guide, questions about the process to ask me, or want to get in touch for any other reason, you can find my socials here, but in particular:
- you can email me at yellowsink@riseup.net
- you can message me on Signal @hazel.01
- and Telegram @hazeler_la.
- If you share a server with me on Discord also feel free to message me @yellowsink, but don’t randomly friend request me, please.
Please say that you are contacting in relation to this guide in your initial DM, so that I know to accept your message request :)
— Hazel Atkinson, 2025, hereby released to the public domain under CC0 1.0 Universal  .
.